anickode
Active member
DISCLAIMER:. HOME MADE GAS TANKS CAN BE DANGEROUS, PARTICULARLY IF YOU ARE INEXPERIENCED, IMPATIENT, OR SUCK AT MAKING THINGS. I TAKE NO RESPONSIBILITY IF YOU DO THIS AND BLOW YOURSELF UP.
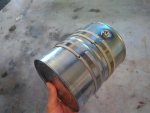
Tin cans, as we all know, are not actually made from tin. They are made from tinplate steel. This means that it is very easy to work soft solder on it with a bit of experience. They can be joined to other cans, copper, brass, etc. Enter my latest little evening project, an old school gas tank for the rat wagon.
What I used:
3lb coffee can x2
Empty pvc primer can
¼" to ⅛" brass pipe bushing
60/40 lead solid core solder (like is used for leaded glass and electrical work, not plumbing)
Plumbing paste flux
Take one coffee can (or any can really, if you don't want a gallon tank) and decide where you want your fill cap and pickup bung. Drill a 1½" hole for the fill cap, and a ½" hole for the pickup.
Remove the top of the primer can (or any similar can with a screw-on lid) with a kitchen can opener (best done when the wife isn't looking) and shape the flange to match the curve of your can. Clean everything with carb cleaner and scotch Brite. Flux all mating surfaces with regular plumbing paste flux. Lightly clamp in place and heat the joint gently with a torch. Apply solder to the joint. It will wick into the joint. Let stand until cool.
Flip it over, flux the bushing and pickup hole. Insert, heat, and solder.
Clean the inside out. Plug the pickup hole and screw the cap on. Stand the can up on end and fill to the brim with water to test for leaks. Drain and dry if test is successful.
Using a "no sharp edge" can opener, remove the bottom from the second can. Clean, flux, and place the bottom of can 2 on the open top of can 1. Solder in place.
Test for leaks again, this time filling from the fill cap.
Rinse the inside out by putting some acetone inside and shaking it around, then pour it out.
Make a new gasket for the lid from cork gasket material, and drill a 1/16" vent hole in the middle of the lid, and poke a few pin holes in the cork gasket.
Congratulations. You made a gas tank the same way they did back in the hit-or-miss engine days. I learned this technique from an old-timer with a santa claus beard and overalls at an old iron show. Except they worked completely from scratch back then, and you dont have to.
And yes, I have made some gas tanks like this before, for old mowers and lawn tractors and stuff, and they all worked just fine. Even made a couple out of those rectangular F-style quart and 1 gallon cans like mineral spirits and Coleman fuel come in. (Those are a bit on the flimsy side though)
I did use a fine scotch Brite roloc disc on a die grinder to buff out and blend the solder a bit.
The can gets mounted with rubber padded straps.
Tin cans, as we all know, are not actually made from tin. They are made from tinplate steel. This means that it is very easy to work soft solder on it with a bit of experience. They can be joined to other cans, copper, brass, etc. Enter my latest little evening project, an old school gas tank for the rat wagon.
What I used:
3lb coffee can x2
Empty pvc primer can
¼" to ⅛" brass pipe bushing
60/40 lead solid core solder (like is used for leaded glass and electrical work, not plumbing)
Plumbing paste flux
Take one coffee can (or any can really, if you don't want a gallon tank) and decide where you want your fill cap and pickup bung. Drill a 1½" hole for the fill cap, and a ½" hole for the pickup.
Remove the top of the primer can (or any similar can with a screw-on lid) with a kitchen can opener (best done when the wife isn't looking) and shape the flange to match the curve of your can. Clean everything with carb cleaner and scotch Brite. Flux all mating surfaces with regular plumbing paste flux. Lightly clamp in place and heat the joint gently with a torch. Apply solder to the joint. It will wick into the joint. Let stand until cool.
Flip it over, flux the bushing and pickup hole. Insert, heat, and solder.
Clean the inside out. Plug the pickup hole and screw the cap on. Stand the can up on end and fill to the brim with water to test for leaks. Drain and dry if test is successful.
Using a "no sharp edge" can opener, remove the bottom from the second can. Clean, flux, and place the bottom of can 2 on the open top of can 1. Solder in place.
Test for leaks again, this time filling from the fill cap.
Rinse the inside out by putting some acetone inside and shaking it around, then pour it out.
Make a new gasket for the lid from cork gasket material, and drill a 1/16" vent hole in the middle of the lid, and poke a few pin holes in the cork gasket.
Congratulations. You made a gas tank the same way they did back in the hit-or-miss engine days. I learned this technique from an old-timer with a santa claus beard and overalls at an old iron show. Except they worked completely from scratch back then, and you dont have to.
And yes, I have made some gas tanks like this before, for old mowers and lawn tractors and stuff, and they all worked just fine. Even made a couple out of those rectangular F-style quart and 1 gallon cans like mineral spirits and Coleman fuel come in. (Those are a bit on the flimsy side though)
I did use a fine scotch Brite roloc disc on a die grinder to buff out and blend the solder a bit.
The can gets mounted with rubber padded straps.
Attachments
-
 IMG_20170930_223218.jpg220.3 KB · Views: 73