Beginner Kart...First Build

Status
Not open for further replies.

JCB003

New member
Messages
66
Reaction score
0
Did you spend much time trying to get all of the mill scale off before priming? And did you use a flap disk, wire brush or what? I'm getting close to the painting stage with our Tarantula. My metal is pretty filthy from whatever mill processes were used.

Your frame looks incredible. We are going to go with metallic Green or Red.

The metallic colors look cool. Red would be sweet, I didn't see the green at our local Home Depot.

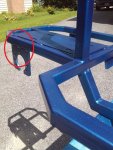
I didn't spend a lot of time cleaning the metal. I just quickly went over it with a flap disc. They are great for grinding, blending and cleaning. Then I wiped it down with some Simple Green to clean off the remainder of dirt. I sprayed one coat Rustoleum Self Etching Primer first, then a coat of Rustoleum Metal Primer in white, then the blue metallic. I'll put a clear coat on before I'm done.

It's overkill for a rattle can job on a go-kart that's going to get banged around, but we have nothing else to do while waiting on parts to get here. Against Mom's wishes I let the boy paint a tiny bit; his hands are not big enough to use a spray paint can so he only did a small section just to say he helped.
 

JCB003

New member
Messages
66
Reaction score
0
Thanks for the info. I'll probably have to flap grind several of my welds to make them look as sweet as yours...

I didn't grind all the welds, just the ones that will be most visible after it is assembled - and I didn't do that great a job on some of those, if you look close there are a few gouges but the paint did a nice job of covering up most of them. If you grind them flush make sure you prepped the joint properly or you'll just grind away the connection. I beveled all my joints before they were welded.

See if you can find one of these; it turns a spray can into a spray gun

http://toolmonger.com/2008/05/28/turn-your-spray-can-into-a-spray-gun/

I did the same with my daughter but, I made it easy for her, I have a small spray gun

I actually have one of those but forgot about it. I'll use it on the finish coat.

Today I cut some aluminum diamond plate for the floor pan. It was a scrap piece and has some discoloration that I hope I can polish out. I didn't like the open area where his feet will be so I think this will help.

The back ordered axle was waiting on my porch when I got home so I did some test fitting - so far I like the look of the bare aluminum axle and sprocket hub with the red anodized wheel hubs against the blue frame.


Some more parts are due in on Wednesday - mainly steering pieces I forgot to order last time.
 

JCB003

New member
Messages
66
Reaction score
0
Quick update: more parts arrived and I tried to fit up the steering, but I think my tie rods are too long. I went off the Spidercarts website parts list and it said 13" tie rods, which is what I have but I think 11" is what I need. I'm going to cut some threaded rod tomorrow and see figure out the correct length. I'm also going to cut some off the steering shaft and weld the Pitman arms on.

I'm not sure about the seat I ordered, it's going to be hard to fit and I think I will have to alter the frame. Hopefully not much, or I might ditch it and just make one.

I ordered wheels and tires today. I also stopped by Harbor Freight and they had a 6.5 Predator engine on the open box table for $60, but no one could tell me why it was returned, so I passed.
 

JCB003

New member
Messages
66
Reaction score
0
Thanks guys. It's not as pretty now - the paint got scratched up a bit fitting the steering and the seat. It was a mistake painting the frame before I got everything worked out, but it's not a huge deal just a little extra work.

I got the steering shaft set up and mounted. I cut the tie rods down so they would fit however my son managed to mess one of them up by cross threading it. I'm not sure how he was able to mess it so bad and I made it worse trying to get it off, so I'm going to need a new tie rod. The seat I bought didn't work out well either, the way it's designed it takes up too much room and I can't slide it back far enough to have it sit correctly. If the kart was bigger it would be fine. I'm just going to make a seat out of plywood and some padding and vinyl from the fabric store. Wheels and tires will be delivered next week.

Any ideas on brakes? - I was thinking of using a mechanical disc setup. I have no idea how to set them up, just going off what I've read and pictures. If there are any sold as a kit that would be nice to have everything included - rotor, hub, caliper, cables etc. The kits I saw were hydraulics which are expensive and probably not needed.
 

OzFab

Well-known member
Messages
15,615
Reaction score
66
Location
Warwick Qld, Australia
Thanks guys. It's not as pretty now - the paint got scratched up a bit fitting the steering and the seat. It was a mistake painting the frame before I got everything worked out, but it's not a huge deal just a little extra work.

Rookie mistake :roflol: Trial fit everything first. Once it's complete then take it to pieces & paint it.

Any ideas on brakes? - I was thinking of using a mechanical disc setup. I have no idea how to set them up, just going off what I've read and pictures. If there are any sold as a kit that would be nice to have everything included - rotor, hub, caliper, cables etc. The kits I saw were hydraulics which are expensive and probably not needed.

Have you considered something like this:
http://tboltusa.com/store/rear-brake-system-piranha-p160-p-604.html
 

JCB003

New member
Messages
66
Reaction score
0
Yeah I know...lol. Lesson learned. I actually thought about the fact that I was going to have to repaint it while I was spraying down the blue, but we were bored and wanted to do something. I also decided to weld on the steering support brackets instead of bolting them since I have to repaint anyway. The plan was to bolt it so I could adjust it in the future, but there is no adjustment room. Also the steering shaft is rubbing the front of the frame a tiny bit so I will need to grind down the frame a fraction so it clears.

I like that brake setup, I didn't consider motorcycle brakes. It looks perfect. I'm probably going to go with a different set up only because I have a credit at BMI Karts for the seat that I have to return and they were kind enough to let me exchange for some other parts, brake parts among them.

Good news! - I found a HF 20% coupon in the back of a Popular Mechanics mag when I was getting a haircut so I ripped it out for when we're ready for the motor.

I also worked on the seat and did some upholstery. It's clear that I'm not going to make a living as an upholsterer. It's not horrible, but could be better. Good thing the ugly part is hidden on the bottom of the seat - however on the seat back I'm going to have to cut a piece of stainless sheet to hide the staples and vinyl. We went to the fabric store and picked up some marine grade vinyl and some high density foam. Foam was 50% off and the vinyl was 40% off so total was under $15. My boy picked out lime green, which would be cool on a dark green metallic frame, but not as much with blue, so we agreed on black. White was close second but I know it would only look good for a short time.


OzFab

Well-known member
Messages
15,615
Reaction score
66
Location
Warwick Qld, Australia
The plan was to bolt it so I could adjust it in the future, but there is no adjustment room. Also the steering shaft is rubbing the front of the frame a tiny bit so I will need to grind down the frame a fraction so it clears.

Do you plan to have forward or rear facing steering arms?

I like that brake setup, I didn't consider motorcycle brakes. It looks perfect. I'm probably going to go with a different set up only because I have a credit at BMI Karts for the seat that I have to return and they were kind enough to let me exchange for some other parts, brake parts among them.

... & you're sure you won't need any other parts? :roflol:

I also worked on the seat and did some upholstery. It's clear that I'm not going to make a living as an upholsterer. It's not horrible, but could be better. Good thing the ugly part is hidden on the bottom of the seat - however on the seat back I'm going to have to cut a piece of stainless sheet to hide the staples and vinyl.

Hey, none of us are professional kart builders here (I think). The fact is, we have a go &, if the end result looks ok & functions as it should, then we've achieved something :thumbsup:

Building your own kart is harder but, IMO, much more satisfying than going out & just buying one; where's the fun it that?

Edit: Hey, I didn't see the pics before; that's a pretty good job on the upholstery, well done
 

JCB003

New member
Messages
66
Reaction score
0
Do you plan to have forward or rear facing steering arms?


... & you're sure you won't need any other parts? :roflol:


Hey, none of us are professional kart builders here (I think). The fact is, we have a go &, if the end result looks ok & functions as it should, then we've achieved something :thumbsup:

Building your own kart is harder but, IMO, much more satisfying than going out & just buying one; where's the fun it that?

Edit: Hey, I didn't see the pics before; that's a pretty good job on the upholstery, well done

The arms are forward facing.

Thanks for the compliments! And I'm sure I'll need more parts! I have all the major components on order or here (minus the motor) The only things I will need will be hardware items for the braking and throttle.

You're right...building is much more fun than buying, hopefully everything works! Buying complete however is less expensive, but at least we get the experience of making something and having fun together.

Today we worked some more on the seat. Drilled the frame and the plywood backing of the seat and installed some threaded inserts. Then bolted it up with a thin sheet of aluminum backing to hide the staples and vinyl mess and give it a more finished look. If you look close you can also see the aluminum diamond plate I cut for the floor pan.


Getting closer...rims and tires arrive tomorrow. We hope to be up and running in a couple of weeks.
 

Iron John

New member
Messages
397
Reaction score
1
Location
NA
Really nice job so far. Your son must be going nuts waiting to take it for a spin! :)
 

landuse

Moderator
Staff member
Messages
18,740
Reaction score
506
Location
Pietermaritzburg, South Africa
I have just noticed this thread now. You have done a brilliant job on making that frame! Well done.

Have you figured out what your gearing is going to be. I see you have a axle sprocket and clutch already. What is the tooth count on both? Divide the axle sprocket tooth count by the clutch tooth count. This will give you your gering. You should be hitting about 6:1 or so.

I also noticed in one of your pics that you have just tack welded the axle hanger to the frame. Are you going to fully weld it on. I would, just to be safe. I have included a pic of yours to show you what I mean

Oh, and welcome to the forum :thumbsup:
 

Attachments

  • kartrearblue.jpg
    kartrearblue.jpg
    148.7 KB · Views: 48

landuse

Moderator
Staff member
Messages
18,740
Reaction score
506
Location
Pietermaritzburg, South Africa
Seriously? Have you been asleep? :roflol:

I have been on holiday for the last while, and checking the forum on my phone is a pain, so I missed a lot. I hate trying to type on the thing too.

...and I am going to the beach for the next few days again. Just a few minutes of work left. I took a half day and the rest of the week off!!!! :wai: :wai:
 

OzFab

Well-known member
Messages
15,615
Reaction score
66
Location
Warwick Qld, Australia
I have been on holiday for the last while, and checking the forum on my phone is a pain, so I missed a lot. I hate trying to type on the thing too.

...and I am going to the beach for the next few days again. Just a few minutes of work left. I took a half day and the rest of the week off!!!! :wai: :wai:

Ah, fair enough. I thought you went missing for a while...
 

JCB003

New member
Messages
66
Reaction score
0
:iagree: Good job. How much does it weigh? :roflol:

I stripped it down today to weld on it tomorrow - I weighed the frame and it's 35 lbs so almost 16kg. I don't know if that qualifies as a pig or not?

Really nice job so far. Your son must be going nuts waiting to take it for a spin! :)

He always tells me when the UPS man has visited and if that's all the parts.

I have just noticed this thread now. You have done a brilliant job on making that frame! Well done.

Have you figured out what your gearing is going to be. I see you have a axle sprocket and clutch already. What is the tooth count on both? Divide the axle sprocket tooth count by the clutch tooth count. This will give you your gering. You should be hitting about 6:1 or so.

I also noticed in one of your pics that you have just tack welded the axle hanger to the frame. Are you going to fully weld it on. I would, just to be safe. I have included a pic of yours to show you what I mean

Oh, and welcome to the forum :thumbsup:

Thanks. The axle sprocket is 54T and the clutch is 10T. The welds on the bearing hangers are more than just tack welds, there is over 4" total weld on each one (the back side is welded too.) I didn't want to put too much heat on them at the time. You're right, it wouldn't hurt to weld them up.

Rims and tires arrived today, they are wider than I imagined. Fronts are 10.5x4.50-6 and the rears are 11x6.00-6. Tires are Maxxis HT3 and rims are by Douglas.

 
Status
Not open for further replies.
Top