Arachnid Build

Status
Not open for further replies.

Silvergrizz

New member
Messages
174
Reaction score
0
Location
Albert County, NB, Canada
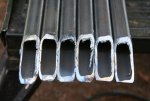
Well, I thought I was going to get some welding done today, but it didn't happen. I figured I had about 45 minutes work cleaning up the cuts I had done on the A-Arms. This is a 68 degree angle, so needless to say, I had to do it free hand with a mini grinder. I discovered there are two types of cut off disks. Flat and cupped. I had been using the cupped ones, which would wear out fast and not go all the way through the square steel. I had picked up another pack on sale some time ago, and not till I opened them, did I realize they were flat. Worked a lot better, and go all the way through the steel from one side. Still not a pretty cut as the pictures show.

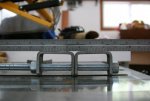
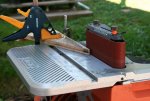
Decided to make a simple 22 degree jig to guide the pieces on the belt sander for squaring up. Simple enough, but you want the steel pointing in the opposite direction to the travel of the belt, or its going to jam. It ended up taking about 30 minutes per piece, allowing time for cool down, heat will destroy the sandpaper real quick. I was wearing leather gloves and when I felt the heat through the glove, I would swap out to another piece of steel.

Also going to have to make a jig to weld up the A-Arms, probably the most critical part of the build to keep them all a the same or as close as possible. :toetap05:

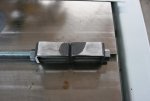
First picture is the rough cut 68 degree angle
Second is the belt sander using 50 grit paper and jig
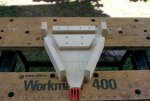
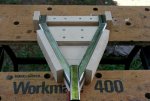
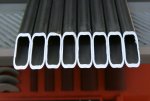
Third is the result
 

Attachments

  • IMG_3168R.jpg
    IMG_3168R.jpg
    66 KB · Views: 76
  • IMG_3171R.jpg
    IMG_3171R.jpg
    79.6 KB · Views: 99
  • IMG_3177R.jpg
    IMG_3177R.jpg
    54.3 KB · Views: 88

Silvergrizz

New member
Messages
174
Reaction score
0
Location
Albert County, NB, Canada
okay, let me know how it comes along! i think when i order spindle brackets for my swing arm i will leeve a note in the box at checout saying im using them for swing arm mounts and dont want the holes off set, also you should email bmi and see if they can help you out

Certainly will. I have talked to BMI several times on the phone about other issues and they have been great, did not mention the spindle bracket issue to them. I figured it would be too expensive to mail them back and the rest of their stock is probably no better as Bill as the same issues with his brackets. :mad2:

You only need 4 of those brackets right? You might have better luck getting them to check for just 4 that lined up than 20. If my solution works, it will be an easy fix, as long as they are not too far out of line to begin with.
 

r97

Measure twice cut once
Messages
3,793
Reaction score
8
Location
Massachusetts, USA
yea I've emailed bmi about stuff to and they have bean great! I'm gonna leave a note about the brackets and hope fully the will get me what i want. nice job on the 68 angles, i had to cut two pieces with 68x18 degree miter cuts free hand with angle grinder Jerry rigged for cut off wheels with a washer and a few pieces of duct tape, lol, after making an extremely messy cut i smoothed things out with my bench grinder(one of my favorite tools! http://www.harborfreight.com/garage-shop/stationary-grinder-buffer/8-inch-bench-grinder-39798.html)
 

Wobbly

New member
Messages
82
Reaction score
0
Location
UK
I am just about to start cuttimg the A arms out and have been wondering how best to attack the 68 angles. I was going to do it by hand with a hacksaw, but I do have an angle grinder with cutting discs which may be better. I also have a bench mounted angle grinder very similar to r97's, but it never occured to me that I can use it to clean up the cuts. I take it you use the side of the wheel to do this?
 

Silvergrizz

New member
Messages
174
Reaction score
0
Location
Albert County, NB, Canada
I am just about to start cuttimg the A arms out and have been wondering how best to attack the 68 angles. I was going to do it by hand with a hacksaw, but I do have an angle grinder with cutting discs which may be better. I also have a bench mounted angle grinder very similar to r97's, but it never occured to me that I can use it to clean up the cuts. I take it you use the side of the wheel to do this?

Wobbly, I tried using a hacksaw, but I want to finish this project before the snow flies this year. I just scribed a line on the metal using the 22 degree template, then clamped the steel at a comfortable height to stand along side with the angle grinder. Absolutely need a steady pair of hands. I start the cut in the center and just let the weight of the grinder carry the cut down until it has penetrated, then I slowly move back and forth until reaching the ends. Don't try and force, just let the weight do the cutting. I am using a 4 1/2 inch grinder. Must be the quality of the disc, but sometimes I only got halfway through a cut, before the disc was worn out, other times I managed to get two completely cut. Your mileage may vary. Have a dozen or so disks on hand. I get them here in 15 packs for about $12 on sale.

As for using the side of the wheel on the bench grinder, DON'T, :eek: they are not designed to cut on the side. You could explode a wheel attempting to to this.

Much better off with a stationary disk sander. Doesn't have to be a belt sander type like I have. (it was just I already owned it) I like it because it oscillate up and down, so it runs cooler. You should be able to find a 12 inch stationary disc sander for under $100 I would think. Well worth the money to be able to get nice tight joints for welding. :thumbsup:

Here is a link to a US design, but I would think you could find something over there at a discount hardware store.

http://www.harborfreight.com/12-inch-direct-drive-bench-top-disc-sander-43468.html

:cheers2:For the record: Credit goes to Bill for the sanding idea, I never would have thought of it either, till I asked him how he got such clean looking finish cuts. :thumbsup:
 
Last edited:

r97

Measure twice cut once
Messages
3,793
Reaction score
8
Location
Massachusetts, USA
wobbly- do you have a bench grinder with big grinding stones, or a chop saw with a cutting disk, a chop saw wont work for what me and sliver are suggesting, but the sander bill and silver use will work just about perfectly, unfortunately the sanders cost about 100 us dollars, a bench grinder like i have will also work nicely you will just have to put a little more thought into it, bench grinders can also be used for beveling edges or they can have a handy wire brush mounted on them, an extremely cheap bench grinder can run you about 20 us dollars whereas a standard one should be around 50 us dollars. disk sander is very good at making clean edges with minimal effort but is a bit expensive. bench grinder is good for cleaning, beveling, and grinding down rough cuts, but requires more thought/concentration, a little more danger, and some strength, but its not overly expensive. both options are great and will definatly be one of your favorite tools!
 

Wobbly

New member
Messages
82
Reaction score
0
Location
UK
Thanks for the advice guys. I'll use my angle grinder for the awkward cuts, I have been using a Rage Evolution 3 chop saw for everything else up till now, but it has a max cutting angle of 45. I like the look of those stationary disk sanders, I'll keep an eye out for one. I am rapidly running out of room in my little garage :)
 

Silvergrizz

New member
Messages
174
Reaction score
0
Location
Albert County, NB, Canada
OK, I think I have this whole spindle bracket problem solved. I bolted two that were the closest in measurements together as explained in a previous post. Don't get the big guns out yet Bill, I'm going to the store tomorrow to get a proper 5/8 bolt long enough to accomplish this. The threaded rod was all I had this morning to test this out. :D I'll trash that once I get proper bolts.

Looking at the picture 2, face on I call the front and back sides of the bracket. I sanded these till I got smooth edges on both sides so I could be sure the backside of the bracket was resting up against the sander at 90 degrees. I then sanded down the high points on the backside so the brackets will lay flat and not pinch the line of site between the tow brackets when clamped.

First picture shows how much metal was removed, second picture shows straight edge resting on backside with no visible light. If you back a couple of posts, it is the same two brackets on the rod, showing the open space on the backside.

I know the rod allows a little more slack than a proper bolt will, so I will finish the rest off when I get a couple of bolts long enough to do the job correctly

I am now convinced the designer knew of the issue with the brackets from BMI, cause the plans call to purchase 20, but I only see where 12 are required,4 on the swing arm and 8 on the front suspension, so I have an extra 10 (2 came with the spindle set). That was waste of $35 plus shipping and taxes on the extra brackets. :mad2:
 

Attachments

  • IMG_3182R.jpg
    IMG_3182R.jpg
    56 KB · Views: 78
  • IMG_3180R.jpg
    IMG_3180R.jpg
    65 KB · Views: 80

Silvergrizz

New member
Messages
174
Reaction score
0
Location
Albert County, NB, Canada
Thanks for the advice guys. I'll use my angle grinder for the awkward cuts, I have been using a Rage Evolution 3 chop saw for everything else up till now, but it has a max cutting angle of 45. I like the look of those stationary disk sanders, I'll keep an eye out for one. I am rapidly running out of room in my little garage :)

I have the same problem with space Wobbly. I just use a workmate, link below, and I screw small bench sanders, chop saw, tiny spray paint booth, etc on a piece of plywood that I can clamp to the workmate. When not in use, it is stored on shelf in the shop just for that purpose. Save a lot of space. You probably have a similar item available over there. :thumbsup:

http://www.blackanddecker.com/ProductGuide/CategoryOverview.aspx?cPath=1496.1506
 

Wobbly

New member
Messages
82
Reaction score
0
Location
UK
Ah the Black & Decker Workmate, the best tool ever! I'm using my Grandad's original one, it must be 30 years old by now :)
 

Silvergrizz

New member
Messages
174
Reaction score
0
Location
Albert County, NB, Canada
OK, By now you guys have figured out I Like to use jigs to keep stuff lined up. Here is my latest one for the A-Arms and probably the one I spent the most time on. I built the jig this morning. Spent a couple of hours to get it right. :toetap05:

A word about jigs. I usually make them from hardboard, a product that I hate to see used in any woodworking project. I prefer REAL wood any day. However, hardboard has one redeeming quality. "It doesn't move" By that I mean it does not expand and contract like real wood does. So, build it today and it will be unchanged years from now. Great for jigs. If your going to make a jig using real wood, build it, use it and throw it away at the end of the day, because tomorrow, it will probably have changed shape.

If you are going to use hardboard, predrill ALL holes and countersink all holes on both sides of the pieces that are to be attached to the main board. You need to drill pilot holes in the mainboard as well, or it will crack. Glue all joints. Hardboard is primarily glue anyway.

If you don't have the tools to build a decent jig accurately, talk to your friendly neighborhood woodworker, and trade services. :thumbsup: You can weld, and who doesn't need something welded at some point in time. I still do this today with my neighbor, who has a big old Lincoln Buzz Box that will stick weld up to 1/2. Beyond the capacity of my mig. We have traded work for many years.

Here are a couple of pictures of the jig. #1 the Jig, #2 loaded with the first set of pieces to tack welded for the a-arms, so you know what I'm doing for the rest of the day.
 

Attachments

  • IMG_3186R.jpg
    IMG_3186R.jpg
    86 KB · Views: 138
  • IMG_3188R.jpg
    IMG_3188R.jpg
    84.2 KB · Views: 158

theo

New member
Messages
872
Reaction score
1
Grizz, I do my a arm jigs a little different. I find the 3 important positions, 2 pivot points and the rod end. Then the rest of the tubing can be a little off here and there.
 

T-man

New member
Messages
1,232
Reaction score
4
Location
Missoula,MT
Grizz, useing jigs are always a good idea ... it showes that the builder cares about what their doing. Plus if you keep all those jigs then you can expand into ..... manufacturing .... ya, just think of it, making 10 of these to be sold around the neighborhood, :)

just joking
 

T-man

New member
Messages
1,232
Reaction score
4
Location
Missoula,MT
Ya, that would be cool. start a business called "Grizzly off road motor sports" and your slogen could be " You can't outrun a grizzly" :)
 

Bill CNC

New member
Messages
270
Reaction score
0
Location
So. Calif. Desert
Bob,

A word to the wise, ...

Be very, very careful welding those 68* pieces, ... They move, ... a lot. Go very, very sloooooo.

Go on, ... ask me how I know! ;)

OH, ... I almost forgot to tell you, .. when welding the suspension block, ... on the open end, (rear of the block) tack weld a piece to keep them from closing in on you. They start bending right in the steering rack cross member piece.

Lets just say, ... I should have done it. I had to cut off the brackets on the lover piece and re-weld them back on. Just trying to save you from a major headache.

Bill
who thinks he's Tylenol for the day
 

T-man

New member
Messages
1,232
Reaction score
4
Location
Missoula,MT
oh ya Bill ..I ment that if he was was making them then they wound be known as grizzly karts , referring that you cant out run his karts. :thumbsup:
 

Silvergrizz

New member
Messages
174
Reaction score
0
Location
Albert County, NB, Canada
Ya, that would be cool. start a business called "Grizzly off road motor sports" and your slogen could be " You can't outrun a grizzly" :)

T-man, if I ever decide to get into production, I couldn't have come up with a better slogan. you're the man. Fantastic. :wai: Should I discuss royalties now, before I hit the big time? :surrender:
 
Status
Not open for further replies.
Top