Arachnid Build, ... or is it! (Highly Modified)

Status
Not open for further replies.

The_Machine

New member
Messages
136
Reaction score
0
Location
GA/AL
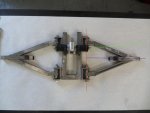
just make the upper wishbone mounts out futher some and shorten the upper wishbones. camber change during travel will be only 1-2 degrees at full travel.

Look at any 4 wheeler and you'll see the same thing anyway. the 10-15 degree angle of the upper and lower wishbone mounts helps with roll center and camber change during body roll.

if you want some more confidence, refer to this http://www.racingaspirations.com/?p=286


Ask Theo. I'm curious why he places his pivots at 180 degrees


theo

New member
Messages
872
Reaction score
1
The_Machine - I just make sure that I have the correct KPI, rake, caster and a camber gain through the travel. And without bump steer.
 

Bill CNC

New member
Messages
270
Reaction score
0
Location
So. Calif. Desert
Alright, ... Here's the skinny

The rack was recommended in the plans and calls for a 8" rack from Desert Karts. With the ball ends on the rack, screwed all the way in it measures 8.250" center to center of the balls.

For those that haven't seen the plans;
... The upper and lower A-arm pivots are vertically inline with one another and the lower A-arms are .5" forward horizontally.

I can unscrew the ball ends 15 turns before it comes out. For adjustment purposes, I unscrewed the ball end 5 turns out and still have some thread strength. This gives me a distance of 8.5", center to center for the rack.

The bushing pivot points as I have built here are 7. 687" center to center.

Between the rack centers and the bushing pivot centers, that leaves a difference of .813" (.406" per side).

Just how close do I need it to be? It seems much easier to rebuild the block pieces, than to start trimming the A-arms.
 

theo

New member
Messages
872
Reaction score
1
I would rebuild the block assm. You can adjust the bump steer out by shifting the rack around if you want to try that. Do you have a drawing of the front a arms at full droop and how much travel do they claim?
 

Bill CNC

New member
Messages
270
Reaction score
0
Location
So. Calif. Desert
I would rebuild the block assm. You can adjust the bump steer out by shifting the rack around if you want to try that. Do you have a drawing of the front a arms at full droop and how much travel do they claim?

I sure do. I can only post so much as I don't want to have any copywriter infringement mumbo-jumbo going on.

I have poster a couple basic drawing showing the layout and the front end. Also a couple photos, one of the drop and the other of the hub end.

I used a very complicated set up with the aid of my computer to come to the conclusion that the kart has an 18* drop when sitting without the rider. my complex method to measure this, ... is to hold a protractor to the screen! :thumbsup:


Bill CNC

New member
Messages
270
Reaction score
0
Location
So. Calif. Desert
That looks great. Even your metal looks good lol it's so shiny.

I didnt really put this together until I was re-reading the entire thread.

Are you talking about no splatter or the brown discoloration of the
of the steel from using flex wire, or that their is no rust?
 

theo

New member
Messages
872
Reaction score
1
It looks to me like they use equal length parallel a arms, so no camber change at full compression. I believe you can get the bump steer out by spacing the rack back toward the driver and making the tie rods longer. But to save a lot of screwing around I would make a new front section wider. Make sure that the center of the rod ends inboard and outboard are the same ratio between the pivots. Looking at the pics they aren't. Also the tie rods shown in the pics are terrible especially out at the spindle.
 

Bill CNC

New member
Messages
270
Reaction score
0
Location
So. Calif. Desert
Hmmm, ... Apparently the steering mount is different than the ones listed in the plans, ... ALSO I am now finding out that the clevises which he calls out to be purchased from a hardware store are not the ones he used on the rack side. The ones he calls out in the plans are .250". I should have know something was up here. It also called for a .250" diameter steering rods, on a kart with 18" balloon tires. Could be why I couldn't find a .250" clevis for a .5" part to fit inside it, .. yeah think!

Now I would like to know how the hell he stuffed the end ball on the rack which measures .500 thick, into a clevis with a spread of .250". Do they make a special tool for that? :2guns: (rhetorical question)

Another issue, ... the single hole shock mounts (not the triple) that are called out to be purchased from BMI, ... they have a .5" hole on the tab, for a .375" bolt hole on the shock. Looks like I need to machine some bushings.

In my profession of being a prototype/ model maker for many, many years I have come to expect these screw ups. It just really :censored: me off that designers change parts and tweak things to get things to fit and work right and then don't reflect the changes in the plans.

As disappointed as I am, ... I do have to give the designer the benefit of the doubt, he could be on a vacation or something. But just a little bit. :toetap05:

Unrelated to the cart, ... That just happened on a project I was working on, ... 130,000 units had 3 bolt holes moved .093" in sheet metal. Can we say MAJOR F-UP! All over a designer forgetting to change the plans. Considering the NEW hole fell half way on the other hole, ... the unemployment number jumped by 1.

Agrrrrr.
 

Bill CNC

New member
Messages
270
Reaction score
0
Location
So. Calif. Desert
It looks to me like they use equal length parallel a arms, so no camber change at full compression. I believe you can get the bump steer out by spacing the rack back toward the driver and making the tie rods longer. But to save a lot of screwing around I would make a new front section wider.

I was thinking just that. It would be very simple to make the front block again than trying to tweak things. The way the rack is positioned, it is inline with the holes on the arms of the spindle.

Make sure that the center of the rod ends inboard and outboard are the same ratio between the pivots. Looking at the pics they aren't. Also the tie rods shown in the pics are terrible especially out at the spindle.

Now without sounding like a total newbie here, ... I'm not sure I understand you mean about the ratio.

Also, ... what do you see as being terrible about the tie rods out at the spindle?

Thanks Theo, ;)
Bill
 

theo

New member
Messages
872
Reaction score
1
If you go up this page to where The Machine posted a pic of my front end you will see the rack rod end is 1/2 way between the center of the a arm rod ends, so the center of the tie rod rod end at the spindle is also 1/2 way between the cent of the a arm rod ends.

You have to have rod ends to eliminate ware, they have a loose bolt through the clevis, big time slop and of course it will get worse.
 

Bill CNC

New member
Messages
270
Reaction score
0
Location
So. Calif. Desert
Thanks, ... But Mcmaster Carr has solved the problem for me. Just more things that I didn't need to buy in the first place. BTW, ... he parts were delivered at my work today, ... to bad I'm at home 100 miles away! :mad2:

I went to Azusa Engineering yesterday on my way to work and picked up .375" tie rod kit, peddles, and spindles. The spindles I bought from BMI are taking to long to get here and I needed to get the geometry to the front end done, but now It's turned into a dollar waiting on a dime with the current front end issues.

Thanks
Bill
 

Bill CNC

New member
Messages
270
Reaction score
0
Location
So. Calif. Desert
You might be right, ... But it's to late now, it's already arrived. But in any-case, it has to be better than the .250" hardware choices the plans call for, ... don't you think?

Anyhow, ... The tie rod kit I bought from Azusa engineering came with (4) of the 3.75" rod ends. http://www.azusaeng.com/tierods/tierods.html

Just scroll down to the solid rod kits. I ordered the deluxe kit #1844-13.
 

Silvergrizz

New member
Messages
174
Reaction score
0
Location
Albert County, NB, Canada
Another issue, ... the single hole shock mounts (not the triple) that are called out to be purchased from BMI, ... they have a .5" hole on the tab, for a .375" bolt hole on the shock. Looks like I need to machine some bushings.

Agrrrrr.

Bill, check out these guys and check out FF520-15 3rd from the bottom, for 32 cents each, hardly worthwhile to make em. I got my bushings for the training arms here. Not sure what there minimum order is though. I was just going to weld some 3/8 washers to the mounts. :biggrin5:

http://www.aircraftspruce.com/catalog/hapages/flangedbushings.php
 
Last edited:

theo

New member
Messages
872
Reaction score
1
Bill does your rod ends bottom? Can you cut a little off the rod end? Can you turn a little off the rack in the lath?
 

Silvergrizz

New member
Messages
174
Reaction score
0
Location
Albert County, NB, Canada
It looks to me like they use equal length parallel a arms, so no camber change at full compression. I believe you can get the bump steer out by spacing the rack back toward the driver and making the tie rods longer. But to save a lot of screwing around I would make a new front section wider. Make sure that the center of the rod ends inboard and outboard are the same ratio between the pivots. Looking at the pics they aren't. Also the tie rods shown in the pics are terrible especially out at the spindle.

Theo. I got a headache from all the reading I've done today about bumpsteer, but you seem to have the knowledge on this one. So let me ask you this. Based on the following photo of Bill's:
Since the upper and lower a-rms are parallel, if the distance from the lower inner centerline to the center of the lower ball joint (blue line) was equal to the distance from the center of the inner Rack and pinion heim joint to the center of the tie rod attachment point at the spindle (green line) were equal, would the tie rod not effectively travel in the same arc? Also, the shock only 9 3/4 inches in length and probably won't allow any more than a couple of inches of suspension travel, how much bump steer could be induced by this setup having say 1/4 difference in the distances? Like I said, I have a headache from so much reading and I may be totally out to lunch on this theory, but in the end will it really make any difference?
 

Attachments

  • SAM_1467.jpg
    SAM_1467.jpg
    58.7 KB · Views: 124

theo

New member
Messages
872
Reaction score
1
Regarding the first part of the question about the length of the a arm and the tie rod. If they are both the same length it is ok, but for the pic shown if you did this then you will have to alter the arm on the spindle and this will affect the ackerman.

If you are going to use a short shock so less travel, you could most likely dial bumpsteer out by moving the rack. Down the road though you might want to go to longer shocks. Bumpsteer is bad because it feeds back up the steering to your hands and the front end dart from side to side if bad.

The best thing to do is to make a new front end, save a lot of time and headaches.

Do the plans show ackerman??
 
Status
Not open for further replies.
Top