Wheel Works Bicycle Build

Status
Not open for further replies.

OzFab

Well-known member
Messages
15,615
Reaction score
69
Location
Warwick Qld, Australia
As some of you already know, I volunteer for a local community group called Wheel Works, teaching young teenagers the ins & outs of building, repairing & maintaining bicycles.

As we rely on public donations, we sometimes aquire bikes that are "less than desirable" to teenage boys; most of them we can offload to other community groups & others end up in the "too hard basket" & get stripped for parts & scrapped.

Every now & then, we get a bike that fits none of the above: not desirable for the kids, not suitable to offload, too complete to scrap so, it sits doing nothing...

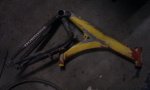
We recently aquired one such bike; 24" wheels, 18 speed with full suspension frame & forks. everything was there... A few boys looked at it, one even stripped it down but, because the PO had attacked it with orange & silver spray cans (WITHOUT STRIPPING IT FIRST!), it sort of lost its appeal.

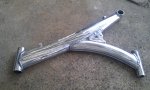
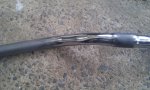
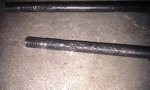
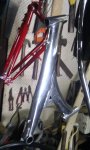
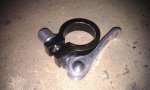
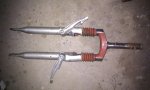
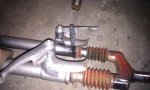
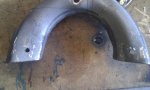
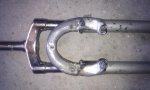
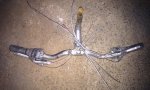
There was one issue, the piece connecting the shocks on the front forks was broken (see pics for details)

After it sat for a while, I decided to fix it myself, for no other reason than to show the kids what's possible if you invest enough time into something. The plan is to replace nothing & repair everything.

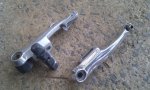
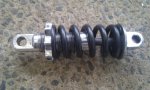
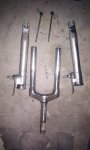
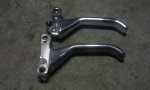
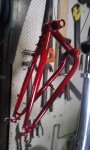
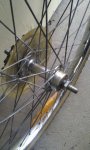
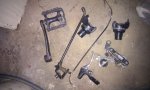
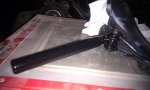
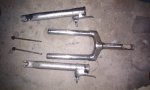
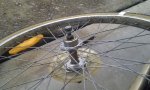
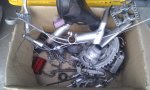
There is only one or two "before" pics of the frame which I currently don't have; I'll get them ASAP but, here's a few shot of the rest of the parts:
 

Attachments

  • IMAG0235.jpg
    IMAG0235.jpg
    97.9 KB · Views: 15
  • IMAG0234.jpg
    IMAG0234.jpg
    83.4 KB · Views: 16
  • IMAG0208.jpg
    IMAG0208.jpg
    102.6 KB · Views: 14
  • IMAG0211.jpg
    IMAG0211.jpg
    78.8 KB · Views: 20

OzFab

Well-known member
Messages
15,615
Reaction score
69
Location
Warwick Qld, Australia
I started by further stripping everything, split the frame & attempted to sand blast it; between the decals & the baked enamel paint, that was proving difficult so, for the front of the frame, which, by now, I'd realised was aluminium, I resorted to heavy sanding to remove the paint. the rear section was sanded with a lighter grade to remove only the decals & the orange/silver paint, leaving the original black as a base on which to respray.

A lot of parts will need to be cleaned with thinners, others will be sandblasted & either painted or polished. I've already started polishing, starting with brake calipers & levers but, the major part is the aluminium front section, I'm even polishing the steel handlebars...
 

Attachments

  • IMAG0229.jpg
    IMAG0229.jpg
    93.8 KB · Views: 17
  • IMAG0232.jpg
    IMAG0232.jpg
    102.2 KB · Views: 15
  • IMAG0231.jpg
    IMAG0231.jpg
    75.6 KB · Views: 12
  • IMAG0196.jpg
    IMAG0196.jpg
    47.1 KB · Views: 12
  • IMAG0233.jpg
    IMAG0233.jpg
    108.1 KB · Views: 14

OzFab

Well-known member
Messages
15,615
Reaction score
69
Location
Warwick Qld, Australia
I managed to split the forks the other day, man, were they in bad shape...

Below is a pic of the bolts (post cleaning) that were holding them together
 

Attachments

  • IMAG0241.jpg
    IMAG0241.jpg
    75.1 KB · Views: 16
  • IMAG0242.jpg
    IMAG0242.jpg
    108.3 KB · Views: 19

OzFab

Well-known member
Messages
15,615
Reaction score
69
Location
Warwick Qld, Australia
Man, this is gonna be a long, slow process which is not good 'coz I want it finished by the time we finish for the year...

I haven't had a great deal of thime so, I've been doing what I can when I can...

I did manage to get the seat clamp parts cleaned & painted & laid more primer on the rear frame section, as well as a bit more cleaning & polishing...
 

Attachments

  • IMAG0262.jpg
    IMAG0262.jpg
    100.8 KB · Views: 16
  • IMAG0254.jpg
    IMAG0254.jpg
    52.2 KB · Views: 11

OzFab

Well-known member
Messages
15,615
Reaction score
69
Location
Warwick Qld, Australia
Well, I feel good; the other day, I had an issue with the front frame half I was polishing so, I took it to a pro, a friend who does it for a living; he runs a chrome plating shop his father started years ago. His overall, unsolicited opinion of my work was "that's pretty good"... :D
 
Last edited:

landuse

Moderator
Staff member
Messages
18,766
Reaction score
550
Location
Pietermaritzburg, South Africa
Well, I feel good; the other day, I had an issue with the front frame half I was polishing so, I took it to a pro, a friend who does it for a living; he runs a chrome plating shop his father started years ago. His overall, unsolicited opinion of my work was "that's pretty good"... :D

Maybe you can compete?? :D
 

Poboy kartman

Senior Moments Member
Messages
12,461
Reaction score
69
Location
White Settlement Texas
There is something addictive about polishing parts. Years ago (probably 10) I started an old Mauser project. It was a little bit rusted. I sanded it down and did most of the polishing with a Dremel. Anyway, it came out looking like a nickel plated gun. It's just been sitting in a corner all this time and I never put anything on it but it hasn't even thought about rusting.

I ported and polished some heads. I finished out the combustion chambers and exhaust so smooth you could see yourself in them. Before I had to get rid of my 1980 F-150, I was taking all the "chrome" off that had some kind of finish on it that was shot. I started with 80 grit to take them down to bare aluminum and worked up to 2000 before going to a 3 stage polish. The result was brand new looking trim. I've lost count of the rouge sticks I've been through. Yeah, I guess you could say I'm a polish junkie.
 

OzFab

Well-known member
Messages
15,615
Reaction score
69
Location
Warwick Qld, Australia
Maybe you can compete?? :D

Oh yeah, compete with a local icon, that would work, I'm sure I'd make a fortune...

There is something addictive about polishing parts.

I've always had a thing about shiny surfaces; I'm not too fond of satin/matt/brushed finishes. Many years ago, I polished a steering wheel that much you couldn't be in the car without sunnies on...
 

OzFab

Well-known member
Messages
15,615
Reaction score
69
Location
Warwick Qld, Australia
I thought I'd better update this, not that I've really done that much... but, then again...

I've mostly been cleaning parts. As I mentioned, everything was covered in silver or orange (or both) rattle can paint which, in a way, was a good thing because a quick rub with a thinners rag removed most of it, some parts were a little more difficult...

I painted the frame yesterday & I've made one attempt at repairing the forks with mixed results (more on that later). Still left to do:
-Clean/polish front wheel
-Repair forks
-Modify gooseneck (I'll explain later, when I have pics)
-Complete reassembly

...& I have a whole two weeks!
 

Attachments

  • IMAG0327.jpg
    IMAG0327.jpg
    82.5 KB · Views: 13
  • IMAG0328.jpg
    IMAG0328.jpg
    86.3 KB · Views: 18
  • IMAG0331.jpg
    IMAG0331.jpg
    89 KB · Views: 13
  • IMAG0332.jpg
    IMAG0332.jpg
    89.5 KB · Views: 12
  • IMAG0333.jpg
    IMAG0333.jpg
    55.3 KB · Views: 10
  • IMAG0334.jpg
    IMAG0334.jpg
    83.8 KB · Views: 7

Oxymoron

Newbesque builder.
Messages
444
Reaction score
10
Location
Maryland
That chrome doesn't look shiny enough to me. I think yo have some work to do :rolleyes:

Get that buffer out, and make it look like your award winning kart. What? Less fortunate kids aren't worth the effort? Shame, shame... I know your name.......... Tony :D

Seriously though, good job man, and there couldn't be a better reason. Do you know who the lucky kid is yet, or are they going to have to fight over this one?

*tip o' the hat* :thumbsup:
 

OzFab

Well-known member
Messages
15,615
Reaction score
69
Location
Warwick Qld, Australia
Get that buffer out, and make it look like your award winning kart. What? Less fortunate kids aren't worth the effort? Shame, shame... I know your name.......... Tony :D

The idea is to show what's possible with what you have & a little effort; even by my standards, it's not great...

Seriously though, good job man, and there couldn't be a better reason. Do you know who the lucky kid is yet, or are they going to have to fight over this one?

No one gets it, it will be a display...
 

Oxymoron

Newbesque builder.
Messages
444
Reaction score
10
Location
Maryland
You know I'm just messing with you, buddy :D

Seriously, very cool that you're a part of that. I dig it!

Sent from my XT1060 using Tapatalk
 

J_Walker

New member
Messages
898
Reaction score
1
Location
Florida
Hey, Fabroman I know this might be a little late, but there's a trick to hanging parts for painting with wire/string.. so the string doesn't cover a spot on the bike.. Roll a piece of printer paper, or card stock, kind of tightly, stick it in the hole and let go of the roll, so it expands, then do what you did, the string will be out of your way of painting...

I've sprayed some mountain/ road bikes in my years... :)

and stuffed cotton balls where there's threads.. make sure to compress them. Keeps the paint out. sometimes they can get "fuzzy" and stick to paint, so depending on your shoot quality you're looking for, something like a plastic plug would be better.

I've gone as far as taking a torch, and a scarp piece of steel on the backside of where the bottom bracket is, and plugging the back and filling it with foam. careful, some foam melts with spray paint.. hehe
 

OzFab

Well-known member
Messages
15,615
Reaction score
69
Location
Warwick Qld, Australia
Just a little late but thanks for the tips anyway :thumbsup:

To be honest, I could've/should've taken more time prepping it properly but, with all the time I've spent cleaning & polishing, time is running out, I now have just under 2 weeks to finish it...

I'm nowhere near happy with the paint, it went on too thick & too heavy &, as a result, is full of runs & gas bubbles but, I don't have time to repaint it...
 

OzFab

Well-known member
Messages
15,615
Reaction score
69
Location
Warwick Qld, Australia
Until now, I've had a bit of trouble repairing the front forks. As previously mentioned, some noob removed the bridge from the top which balances the two shocks so, I had to recreate it.

Using another set of forks as a guide, I cut a piece of 1.6mm sheet steel the approximate size & shape, allowing for the folds on the sides &* proceeded to "persuade it" into shape. I thought it worked well but, when I tried to fit it I found that the sides had pulled in due to the tuck on the inside... Back to the drawing board...

There's a hole at the centre of the bridge & a thread in the guide set so, after I knocked out the inside tuck, I bolted the two together & clamped the two ends tightly in place. Now I knew they would stay in place &, instead of the metal simply folding, it would actually stretch into shape.

Success :wai: After a bit of pounding, I released the clamps & it stayed in place. I then reassembled the shocks & attached the front wheel (to get the spacing, angles & length correct; if the bridge is out, the shocks will be out & the wheel won't sit true). I then tacked the bridge in place... three times! Every time I tacked one side it would cool & pull the bridge out of line & the shocks would end up crooked but, I finally got there.

Now to finish welding, smooth out the joins & remove any excess material...
 

Attachments

  • IMAG0210.jpg
    IMAG0210.jpg
    76.1 KB · Views: 5
  • IMAG0211.jpg
    IMAG0211.jpg
    78.8 KB · Views: 4
  • IMAG0241.jpg
    IMAG0241.jpg
    75.4 KB · Views: 3
  • IMAG0278.jpg
    IMAG0278.jpg
    56.7 KB · Views: 4
  • IMAG0280.jpg
    IMAG0280.jpg
    71.2 KB · Views: 3
  • IMAG0341.jpg
    IMAG0341.jpg
    66.6 KB · Views: 7
Status
Not open for further replies.
Top