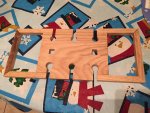
trying my hand at some carpentry

Status
Not open for further replies.

supermanotorious

Winchmaster 5000
Messages
2,088
Reaction score
103
Location
New River, AZ
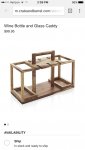
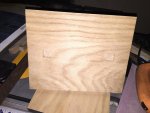
I've built several subwoofer boxes out of MDF in my time but haven't worked too much with solid wood. I drew one my sisters in this years "Secret Santa" put on by Elfster.com (check it out if you've never heard of it) and noticed the wooden wine/picnic thing from Crate and Barrel for $100. Our gift suggestion amount is $100 so I thought I could make it for her and get her another item on her list as well. I decided to go with oak since its my favorite hardwood.

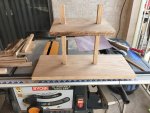
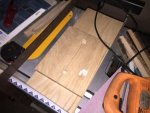
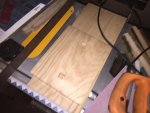
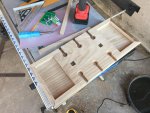
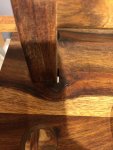
So far I'm in to it for $40 and that might just be enough. I rough cut all the pieces and started sanding some until I was tired. I do have an orbital sander I picked up this year but haven't gotten the discs for it. I will work on it a little each weekend and see where I end up. I got the square holes made and they aren't a perfect fit, or perfectly aligned but whatever. They'll be close enough and when she and her friends are drinking wine they wont notice lol. I will stain it when it's ready so it looks good and rejects moisture.
 

Attachments

  • 034.jpg
    034.jpg
    116.1 KB · Views: 6
  • 035.jpg
    035.jpg
    132.5 KB · Views: 8
  • 033.jpg
    033.jpg
    379.6 KB · Views: 15

8t6bronco

New member
Messages
53
Reaction score
1
Location
Owensboro, Ky
I'd look at getting a new blade for your table saw so you won't have that campfire smell when you make a cut, or all the splinters when making a crosscut. The better the cuts made with the table saw will equal less sanding later.
 

supermanotorious

Winchmaster 5000
Messages
2,088
Reaction score
103
Location
New River, AZ
Thank you, however I super hate this saw. The clamping guide bar clamp does not go parallel to the blade so I have a scrap piece of wood I use with separate clamps to use as a guide, its a super pain and I really don't know if I should put any more $$ in to this saw.

I know there are saws that you can adjust the blade angle or pitch but not this one.

And actually, I got little to no splintering, the splintering you see is from the cut made by Home Depot for the piece. I guess I could've said I don't want that piece but I am not that picky for a project I'm unsure how will turn out.
 

Poboy kartman

Senior Moments Member
Messages
12,461
Reaction score
69
Location
White Settlement Texas
It's a cheap saw for sure....however, it's really your ignorance keeping it from it's full potential. It obviously has a provision to yaw to at least 45° . It's pretty much a given that the "clamp bar" (better known as a "fence" to those of us who make our living with wood) has provisions to adjust it to be parallel to the blade...(look close) .

Also...the whole trunion assembly is usually adjustable (from underneath) by loosening 4 bolts and truing it to the table.

Ryobi tools are one of those good "bang for the buck" ones....but any table saw of that size isn't even a match for what I can do with a skillsaw.

That being said...one thing to keep in mind, my general rule of thumb is this: the cheaper the table saw, the more money you need to pay for a blade. You can always use that blade if you upgrade, and a quality blade can be resharpened for many years, even with frequent professional use.
 

itsid

Moderator
Staff member
Messages
11,563
Reaction score
248
Location
Ruhrpott [Germany]
Make sure the blade isn't sticking out too far from the workpiece you cut, that way you'll have a much cleaner cut without too much thinking.

Also it can help to add a strip of painters tape on the cutting line.

But it's looking good!

Oh one more thing (since I can't tell from your pic)
The uprights must be throughhole (chiseled mid section)
since you can't support the weight of four wine bottles with just glue, especially not when there's a chance of it getting wet or worse lateral force when carried (and believe me if there's a handle it WILL get carried ;))

That is by far the hardest part of that build I'd say, a perfectly straight square hole...
I'm sure Doug will chime in with some good advice on how to achieve that,
mine never turned out to be perfect :(

The lower plate isn't as big of an issue since you can add screws from beneath.

'sid

[EDIT]
Oh see.. he's even faster than me :D

Hi Doug!
 

Poboy kartman

Senior Moments Member
Messages
12,461
Reaction score
69
Location
White Settlement Texas
Not really, that's too much unnecessary work. Find a stair section or a stair part supplier and get some double ended lags...(used to attach balastuers to treads)....you might even find them in the hardware section....

I have a driver to install them....but you can just screw one end in with vise grips and twist the posts to tighten together....one caveat: you want a pretty precise pilot hole diameter...(usually 1/4" for a 5/16" lag) but test on scrap, and paraffin helps.
 

8t6bronco

New member
Messages
53
Reaction score
1
Location
Owensboro, Ky
Make sure the blade isn't sticking out too far from the workpiece you cut, that way you'll have a much cleaner cut without too much thinking.

Also it can help to add a strip of painters tape on the cutting line.

But it's looking good!

Oh one more thing (since I can't tell from your pic)
The uprights must be throughhole (chiseled mid section)
since you can't support the weight of four wine bottles with just glue, especially not when there's a chance of it getting wet or worse lateral force when carried (and believe me if there's a handle it WILL get carried ;))

That is by far the hardest part of that build I'd say, a perfectly straight square hole...
I'm sure Doug will chime in with some good advice on how to achieve that,
mine never turned out to be perfect :(

The lower plate isn't as big of an issue since you can add screws from beneath.

'sid

[EDIT]
Oh see.. he's even faster than me :D

Hi Doug!


And if one of your fingers ends up in the wrong place you just get a saw kerf instead of an amputation

The comment about good saw blades is correct, spend as much as you can on a blade and keep it sharp. It will last a long time if you don't hit metal (old nails) with it
 
Last edited:

itsid

Moderator
Staff member
Messages
11,563
Reaction score
248
Location
Ruhrpott [Germany]
Not really, that's too much unnecessary work. Find a stair section or a stair part supplier and get some double ended lags...(used to attach balastuers to treads)....you might even find them in the hardware section....

I have a driver to install them....but you can just screw one end in with vise grips and twist the posts to tighten together....one caveat: you want a pretty precise pilot hole diameter...(usually 1/4" for a 5/16" lag) but test on scrap, and paraffin helps.

I found drilling the pilot for these things isn't exactly the hardest part..
for me it was either it ended up leaving a gap or the upper and lower not being parallel when tightened down.

So I ended up making extra long wooden dowels instead and glued them in...
which I think is as solid as those double enders.
*shrugs*

But frankly Ryan, listening to Doug on carpentry is likely the better advice than listening to me.
haven't knocked on wood in a looooong time ;)

'sid

[EDIT]
And if one of your fingers ends up in the wrong place you just get a saw kerf instead of an amputation...
Yeah, but it's not fun either way....

have you seen that emergency shutdown saw?
when it touches your finger it retracts the blade slamming it into some aluminium honeycomb...
still scary as ****... but it actually works
 

Poboy kartman

Senior Moments Member
Messages
12,461
Reaction score
69
Location
White Settlement Texas
Yeah....when you have to install 100 balastuers, and off-center holes cause them not to be in line, you need a quick and easy way to center those holes.

First, you need a small cut off section of the square post. A line corner to corner line diagonally both ways gives you an exact center..a pilot hole through that....and viola, you have a template....

---------- Post added at 11:03 AM ---------- Previous post was at 10:57 AM ----------

Oh....yeah....'Sawstop'....I forget exactly why that never took off...I kinda wish a couple of table saws had had them installed though, sticking fingers into spinning carbide tipped blades and guitar playing aren't exactly the best case scenario.
 

chancer

ɔ ɥ ɐ u ɔ ǝ ɹ
Messages
9,358
Reaction score
93
Location
COMFORT, TEXAS
Hey just do the best you can, and then get here some really good/strong Wine. She will never notice the rack.
 

supermanotorious

Winchmaster 5000
Messages
2,088
Reaction score
103
Location
New River, AZ
I have done some carpentry in school and one of the lessons that stuck with me is to let the cutting blade barely extend above/below the width of the material being cut. I do make all my winch crates and use the skill saw for those. They come out really accurate MOST of the time using a "screw on" or "clamp on" guide but I thought the table saw would be more appropriate for this build.

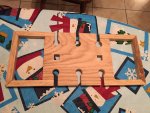
Hope these pics help show what I meant by the square holes! I am aware wood glue will not support the weight of this. On that note I am concerned about the mitered top corners. I wonder if they use glue and dowel pins. I wasn't planning on mitering mine but using a butt joint with a screw, but with the screw, how would I attach to the 3rd axis?- glue? I don't trust that to be strong enough.

For the bottom screws, I plan to finish the top "half", lay that on the bottom, trace the 2 square holes. Use diagonals to find the centers, then drill through with the pilot hole. I'll then flip the bottom over and countersink the screw holes,
 

Attachments

  • 001.jpg
    001.jpg
    223.3 KB · Views: 4
  • 002.jpg
    002.jpg
    224.8 KB · Views: 3
  • 003.jpg
    003.jpg
    307.1 KB · Views: 4

supermanotorious

Winchmaster 5000
Messages
2,088
Reaction score
103
Location
New River, AZ
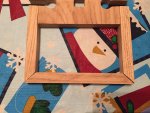
here's where it's at as of 12/5, for now the mitered corners are only bonded with glue, the weight will be supported by the 2 vertical handles screwed to the base but I will want to strengthen those corners as they attach to the uprights
 

Attachments

  • 002.jpg
    002.jpg
    407.9 KB · Views: 11

OzFab

Well-known member
Messages
15,615
Reaction score
70
Location
Warwick Qld, Australia
Nice work :thumbsup:

Mitred corners can be a pita, 1/16" off & it just doesn't work &, unlike metal, you can't simply weld a bit back on... :lolgoku:
 

Poboy kartman

Senior Moments Member
Messages
12,461
Reaction score
69
Location
White Settlement Texas
Nice work :thumbsup:

Mitred corners can be a pita, 1/16" off & it just doesn't work &, unlike metal, you can't simply weld a bit back on... :lolgoku:

Now that you mention it...the one side piece does appear to be about 1/8" long....

:backtotopic: The glued mitered corners will be more than sufficient....
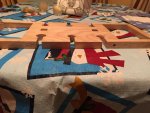
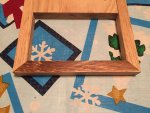
Now....for the uprights....back to double endeded lags at top, screws on the bottom....(invisible, strong, and my first choice)...You could drill a 3/8" shallow hole , use drywall screws ,and plug it....(not too obvious....especially if you make your own plugs)...or do the same with button plugs....(highly obvious....but tasteful and professional looking.)
 

supermanotorious

Winchmaster 5000
Messages
2,088
Reaction score
103
Location
New River, AZ
oh, and that picture doesn't represent the final glue position, these do!

I haven't fully secured the "arms" to the main piece so the rotate along the screws axis, that makes it look a little distorted, I will lock it in all straight and whatnot
 

Attachments

  • 009.jpg
    009.jpg
    351.2 KB · Views: 3
  • 008.jpg
    008.jpg
    366.7 KB · Views: 3
  • 007.jpg
    007.jpg
    401.6 KB · Views: 2
  • 006.jpg
    006.jpg
    375 KB · Views: 2
  • 005.jpg
    005.jpg
    361.4 KB · Views: 4

supermanotorious

Winchmaster 5000
Messages
2,088
Reaction score
103
Location
New River, AZ
went to the ol' crate and barrel to pick up those other "extra" gifts for my sister, studied the real wine caddy for a moment, I'm pleased to see that their square holes aren't perfect either, anyway mine is 3/4" where theirs is 1/2", my glass spacing is a little off but more love is going into mine ;-)
 

Attachments

  • 009.jpg
    009.jpg
    297.6 KB · Views: 1

Poboy kartman

Senior Moments Member
Messages
12,461
Reaction score
69
Location
White Settlement Texas
Well.....Don't discount my advice on the double ended lags....(better known as dowel screws)...and yes, you can get them at Home Depot.

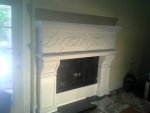
I AM a carpenter, this mantel was one of more interesting recent jobs...(just so you know I know of what I speak....(using them instead of square holes would have been easier and faster, and a better end result....) but, too late for that, but you should seriously get some and check them out!
 

Attachments

  • 14500361814880.jpg
    14500361814880.jpg
    75.1 KB · Views: 4
Status
Not open for further replies.
Top