torque converter, um, conversion

Status
Not open for further replies.

c-gar

same as it ever was
Messages
56
Reaction score
0
Location
another part of the world
Every now and then I pick up a new way to burn free time. Over the last several years it's been nerf modding, yoyo, unicycle, , pinewood derby when my son was in cub scouts, etc. Lately the task has been tinkering with a go kart. I bought the thing not thinking that much about usability and quickly found the stock gearing was WAY too high for my liking. A project was born -- http://www.diygokarts.com/vb/showthread.php?t=40242

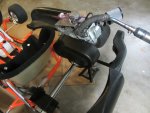
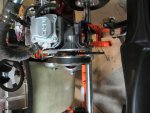
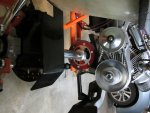
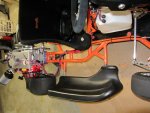
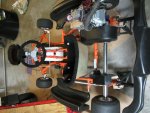
Now I've committed. Pictures of the concept and test layout are in the linked thread. But for those who don't want to sort through all of that, here is the test fitting.
IMG_2057.jpg
I have the torque converter (TC) and the swing mount is on the way. I know I'll need some more fuel line but not sure about how long the throttle cable will need to be -- going to wait until it's all set.

Will update with new pictures and updates as progress is made.
 

c-gar

same as it ever was
Messages
56
Reaction score
0
Location
another part of the world
Expected arrival of the swing mount is in a few days so I've got some time to goof off before it gets here. I installed a sliding engine plate that makes adjusting the chain tension SO much easier than fighting the angled motor mount on the frame.
IMG_2072.jpg
I had to remove a few links to get the chain tensioned going from 18 to 12 tooth clutch to make it more ridable while waiting to put on the TC. It ran up to 43 mph on a long straight at about 6000 rpm and could do about 30-35 mph around a short parking lot figure 8 loop. I'm excited to see how the TC will accelerate with the standard 12 tooth gear installed.
 

c-gar

same as it ever was
Messages
56
Reaction score
0
Location
another part of the world
The swing mount came in yesterday.
Measure twice, (sketch, measure some more, draw, layout), cut once, (maybe cut a little more, file, bend)….
If flattened, here is what it would look like when finished.
mount plan.JPG
Hole template to mark the new holes and cut locations.
hole template.JPG
If I bolt the stands of the mount on the outside of the bearing hangers, the existing hole diameter of the mount just comfortably fits around the bearing bits.
A problem now is the width of the engine mount is almost exactly the width of the bearing hangers. I'll have to figure out some way to bend it to naturally fit on the outside of the hangers.
 

c-gar

same as it ever was
Messages
56
Reaction score
0
Location
another part of the world
One broken and one worn out drill bit later the new holes line up perfectly. Now I'm fretting about how to bend the thing to open it up about 0.325 inches so it will mount cleanly on the outside of the bearing hangers.
 

c-gar

same as it ever was
Messages
56
Reaction score
0
Location
another part of the world
watching paint dry

I paid a local fab shop a little to get my mount bent up to fit on the bearing hangers after I cut and drilled new holes.
before:
left-top.JPG

plan:
before-after sketch.JPG

after:
bent and painted.JPG

I'm an impatient painter so it's outside while I anxiously wait for it to dry enough to bolt on and try it out.
 

Tpdingo

Member
Messages
903
Reaction score
1
Location
Bellmore, NY
I've honestly got no clue what you are making or where it goes on the kart but it looks really cool and you are doing a great job. :thumbsup:
 

c-gar

same as it ever was
Messages
56
Reaction score
0
Location
another part of the world
I've honestly got no clue what you are making or where it goes on the kart but it looks really cool and you are doing a great job. :thumbsup:

It started with the simple desire to replace my clutch with a torque converter (TC). Unfortunately it wasn't just a bolt-on project. On my race kart frame I don't have enough room between seat and engine to fit the drive pulley and just moving it over to the right gets into axle bearings. After some moving it around I figured out that if it were mounted on top of the axle bearings (about 12 inches back from where it started) the TC drive pulley and cover would fit. The jackshaft pulley would also be out of the way of the axle bearings. So I bought a Azusa swing mount thinking it was the closest thing to what I wanted. I had to cut the bottom off and drill some new holes to fit my bolt pattern. It also had to be opened up about 3/8" to fit on the outside of the frame.

Paint is still drying so it's not bolted down yet, but this is close to where it is going to sit.
mount almost in place.jpg
Once bolted on, it will match the angle of the original engine mount and I'll get some 1.25" square tubing to run from the original engine mount to under the new one. (https://www.homedepot.com/p/Everbil...PIPHorizontal2_rr-_-206939537-_-204331421-_-N) OR (https://www.homedepot.com/s/square%20tubing?NCNI-5) That should stop it from being tippy forward and back...
 

c-gar

same as it ever was
Messages
56
Reaction score
0
Location
another part of the world
It's ON!

it couldn't have worked out much better than this. I felt the mount alone was stable enough so I didn't include the 3/4" square tubing tongue to the old engine mount. See pictures....
:bannana:
IMG_2084.jpgIMG_2085.jpg
What am I going to do with all of that free space?
* first aid kit?
* sidecar?
* cooler?
* :idea2: reposition the fuel tank?
* at least it will be easier oil changes. The drain pan will fit perfectly now.

The engine and TC cover loosely placed in position fitted perfectly, even with the cover!
IMG_2087.jpgIMG_2089.jpgIMG_2091.jpg

Minor items left... running new fuel lines and throttle cable to reach the new engine location.
 
Last edited:

c-gar

same as it ever was
Messages
56
Reaction score
0
Location
another part of the world
It's beginning to look a lot like Christmas

I had a post all ready to go and then lost it when I was trying to add pictures by closing too many windows. Here's attempt #2....

Everything is installed and tested with tires off the ground. I'm waiting for the snow to melt to see if it really works.
DEC snow.jpg

New throttle cable (started with a Manco 8252 and cut the housing) and new, longer fuel lines. The carburetor and vacuum pulse connections were smaller than the 1/4" I had laying around so I had to make reusing some short sections of the old, dull, grey tubing to bridge some gaps.
Steering wheel kill switch has bullet disconnects on the wires. The throttle and fuel lines are long enough to set the engine aside if (when) I have (want) to work on it later.
 

Attachments

  • fin side cover.JPG
    fin side cover.JPG
    213.7 KB · Views: 9
  • fin rear.JPG
    fin rear.JPG
    238 KB · Views: 11
  • fin side naked.JPG
    fin side naked.JPG
    232.7 KB · Views: 8
  • fin front.JPG
    fin front.JPG
    263.5 KB · Views: 8
  • fin rear whole.JPG
    fin rear whole.JPG
    255.1 KB · Views: 10

c-gar

same as it ever was
Messages
56
Reaction score
0
Location
another part of the world
Mission accomplished!
I got a chance to try it out after the snow melted and everything dried out. Acceleration from a stop is snappy and it can creep up hills without fear of burning a clutch.
The boy tried it and he wasn't expecting the difference and it whipped his head back the first time he took off -- like lifting an empty milk jug when you think it's full... It provoked a minute of maniacal laughter from me as he made the neighborhood rounds.
Now to read up on belt break-in to be sure I'm not doing anything too stupid. I read 43mph by GPS and under 5000rpm on the tachometer so something's not as expected. I didn't expect that much overdrive.
 

c-gar

same as it ever was
Messages
56
Reaction score
0
Location
another part of the world
not much time since last post.
I did order a 15 tooth sprocket to reduce the RPMs but haven't had a chance to ride it yet.
https://www.ombwarehouse.com/torque-converter-sprocket-35-15t-5-8-bore.html

I did see that my original bronze bushing was gone when I put the new sprocket on so I replaced that as well as the belt. It was nice that the TC kit I bought came with spares of those parts.

Now if it will ever stop raining I'll have a chance to try it out. I estimate 35 mph at 3600 with 0.9:1 TC overdrive, 15t sprocket,
55t axle and 11" tires.
 
Status
Not open for further replies.
Top