Stretched Carter Bros. Econo Kart

Status
Not open for further replies.

TXST8tj

New member
Messages
66
Reaction score
0
Location
Katy, TX
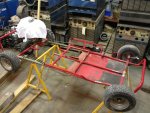
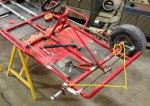
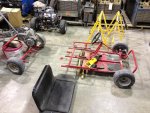
In a recent acquisition from a co-worker of mine, I picked up two and a half karts. One is a Chinese Roketa kart (build thread for that one), and one is a Carter Brothers Co. Inc. "Econo Kart".

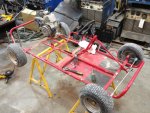
We'll just call this one a 'chase kart' for chasing my son in his kart (the Roketa one). It's definitely nothing fancy and it might bust my kidneys, but it will get the job done.

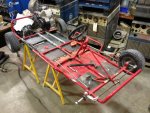
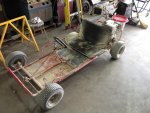
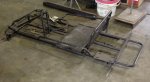
It has the usual (from recently gained knowledge) Tech 5hp engine and was made as a two-seater. With my body size, I do not lend room for a second rider easily, so this one is being converted to a single rider, center steer kart. It will also be receiving a 10"-12" stretch in the rear to allow the seat to be moved back.
I will document the other modifications as they occur.
It also looks like this one will be receiving a new paint job too.
 

Attachments

  • photo 1.jpg
    photo 1.jpg
    122.5 KB · Views: 34
  • photo 2.jpg
    photo 2.jpg
    138.2 KB · Views: 29
  • photo 3.jpg
    photo 3.jpg
    124.1 KB · Views: 29

TXST8tj

New member
Messages
66
Reaction score
0
Location
Katy, TX
While the Roketa is off getting painted, we decided to start working on this one during lunch today.
We spent more time working out the basic plans than working, but it's all important somewhere.

You can see in the picture that we removed the seat, gas tank, throttle line, and have cut off some of the protective bars on the front.

We also cut off the rear seatbelt attachment point and cut off the steering setup (neither pictured yet).

The throttle pedal will be moved to the outside tube, in the same fashion as the brake pedal.
The steering assembly will be moved to the center of the kart, in the otherwise same location/distance. I will need to source the correct length of tierod arms to accomodate that move.

The seat will be moved back to the point where the rear 'axle' is. That section will be cut off and moved back about 10"-12". Supports will be welded between the two sections, and 1/8" plate will be added to fill in the 'floor' and add extra rigidity.
 

Attachments

  • photo 5.jpg
    photo 5.jpg
    132.3 KB · Views: 25

TXST8tj

New member
Messages
66
Reaction score
0
Location
Katy, TX
Other than those mentioned mods, it will likely be fully painted and will receive a new band brake.
I am also looking for a set of new rear tires. I would like something beefier and taller (need to be same width I think), but don't want to spend a ton of $. Worst case is I will replace them with the same tires as are on there now.
 

TXST8tj

New member
Messages
66
Reaction score
0
Location
Katy, TX
I would like a live axle setup, but if I went that route, I would want to add suspension, and I really just don't feel like dumping the money into it.

My hobby and money hog is Jeeps. I just want these cleaned up and ready to run and have fun with them...not extended projects.

The third frame however might have more work done to it, but I will be giving it to the guys here that have been helping me with these.
 

TXST8tj

New member
Messages
66
Reaction score
0
Location
Katy, TX
Did a little cutting.

It is getting sleeved and then bracing added. The plate will go on last.

Tomorrow during lunch, I am going to try to find the correct thread pitch and diameter allthread to make new tierod rods.

I found the correct brake bands. Do I need to replace the drum too, or is the band fine?
 

Attachments

  • photo.jpg
    photo.jpg
    136.2 KB · Views: 32

landuse

Moderator
Staff member
Messages
18,740
Reaction score
505
Location
Pietermaritzburg, South Africa
Just remember that lengthening your kart by 12" is going to make it steer like a pig. It is too late now, but you should have staggered your frame cuts so that the weak point would not be in one place throughout the kart frame.

With the steering, you are going to have to look at your ackerman angles again. With a longer kart, if you did have ackerman before, it is going to be out of wack now.

You must also keep in mind that with taller tyres, your gearing is going to change. You might need to regear if you really deviate from the tyre size you have now. You will have to gear lower.

What is the tooth count on your clutch and rear sprocket at the moment?
 

TXST8tj

New member
Messages
66
Reaction score
0
Location
Katy, TX
how many welders you got in that picture
Those are just a couple down for service. I am the operations director for a code vessel shop (oil/gas). We have more welding machines here than I can count.
Just the band should be fine .
Thanks! I'll get it ordered.
Just remember that lengthening your kart by 12" is going to make it steer like a pig. It is too late now, but you should have staggered your frame cuts so that the weak point would not be in one place throughout the kart frame.

With the steering, you are going to have to look at your ackerman angles again. With a longer kart, if you did have ackerman before, it is going to be out of wack now.

You must also keep in mind that with taller tyres, your gearing is going to change. You might need to regear if you really deviate from the tyre size you have now. You will have to gear lower.

What is the tooth count on your clutch and rear sprocket at the moment?
The steering is a bit of an issue for me in that I am curious how it will handle when done.
From my knowledge of 'ackerman', I don't believe this kart had that (spindles faced forward...parallel to the chassis).

I'm not terribly worried about the splice point. Besides the first-class welds that will lock the sleeves in place, additional tubing will be welded in place for added strength to the area (black lines in attached picture). We will also be welding a sheet of 1/8" plate to the underside to close in that area and add rigidity. Other than being heavier, I don't foresee too much issue.
With that said, the kart will stay up here at work for a couple weeks with plenty of drive time on it before being brought home. We will pay close attention to the splice points for breakage during that time.

For the tires, I think I am just going to get a set of replacements that are the same size ($20 each). I really can't get carried away with too much concern about ground clearance with this kart if I am not willing to do a full custom redesign. I don't know that it would be worth the added efforts to regear.
There was talk about lifting the kart by dropping all the wheel mounting points, but again, decided to keep it simple. Not to mention, with the speed of the kart and no suspension, lower to the ground is definitely a better idea.


If I want to get carried away, I might get a set of these for the rear ($33 each)....but then again, I'm just not sure I care to spend the extra money on them.


Attachments

  • photo 5a.jpg
    photo 5a.jpg
    132.8 KB · Views: 22

jamyers

Well-known member
Messages
1,444
Reaction score
47
Location
Buffalo Gap, TX
Looks like you're on track for a fun ride! I'd note that with a "flat" kart like ours, "racking" out of square isnt much of an issue- instead the frame wants to bend / sag in the middle, especially if adult-ridden - those extra side rails are for more than just keeping you inside the kart. I'd suggest that instead of plate steel to control racking, a set of additional side tubes to keep the frame from sagging / bending would be better and lighter.


Sent from my iPhone using Tapatalk while I wander aimlessly around the pool.
 

jamyers

Well-known member
Messages
1,444
Reaction score
47
Location
Buffalo Gap, TX
I'd also just run the old tires until they pretty much fall apart.... :)


Sent from my iPhone using Tapatalk while I wander aimlessly around the pool.
 

TXST8tj

New member
Messages
66
Reaction score
0
Location
Katy, TX
Looks like you're on track for a fun ride! I'd note that with a "flat" kart like ours, "racking" out of square isnt much of an issue- instead the frame wants to bend / sag in the middle, especially if adult-ridden - those extra side rails are for more than just keeping you inside the kart. I'd suggest that instead of plate steel to control racking, a set of additional side tubes to keep the frame from sagging / bending would be better and lighter.
We actually just talked about adding some additional side tubes.
The attached picture shows the first splice tubes in place as well as my MSPaint side tube sketch.
We set the seat in place to allow me to sit in it for rough fit. The steering wheel could come back a little, but it will still work well. We'll have to test it out a bit to decide whether the steering shaft needs to be extended or not.

I'd also just run the old tires until they pretty much fall apart.... :)
The drive tire is bald, so I will at least be replacing that one.
 

Attachments

  • photo 6a.jpg
    photo 6a.jpg
    121.2 KB · Views: 25

TXST8tj

New member
Messages
66
Reaction score
0
Location
Katy, TX
Here is an update of my limo. Haha.

There is still a bit more to do, but yesterday we got some stuff done....
-all the sleeves finished
-the bottom plate cut and welded
-the new seat rails/brackets in place
-the brake rod lengthened
-the throttle pedal moved and ready to be be lengthened
-the throttle cable remounted
-steering wheel moved and welded in place
-new steering rods installed and tires aligned


All that is left is extending the throttle rod and hooking it up, bolting the seat in, hooking the gas tank back up, and taking it for some test drives.
We do need to add the additional side bars that will extend to the rear, so I need to find out when that is going to happen.
When we're satisfied with everything, the painters want it to repaint.
 

Attachments

  • IMG_1540.jpg
    IMG_1540.jpg
    130.5 KB · Views: 25

TXST8tj

New member
Messages
66
Reaction score
0
Location
Katy, TX
As part of the deal with the guy I bought the karts from, I also got a third kart frame. He said he thought it is a Manco, but I think it is a Thunderkart.

Anyway, I gave the frame to the guys helping me with my two karts. They are excited to build it up. It's basically just the frame (freshly blasted and painted), the seat frame, and the wheels.
If I swap the Tech 5hp engine out for the 6.5hp Predator from HF, I will let them have the Tech for theirs.
 

jamyers

Well-known member
Messages
1,444
Reaction score
47
Location
Buffalo Gap, TX
...The attached picture shows the first splice tubes in place as well as my MSPaint side tube sketch.
...
The drive tire is bald, so I will at least be replacing that one.

Looks good to me, that oughta be plenty strong.

Replace the baldie? Nyahhh, just swap it with one of the other 3, and spend the $20 on a header. :idea2::cheers2:
 

TXST8tj

New member
Messages
66
Reaction score
0
Location
Katy, TX
Buttoned it all up for a test run...or several. It is perfect regarding length. It is terrible off pavement, which is where the testing occured. The kart itself handled very well with the stretch.
The steering is not great at high speed, but fine when slower. I think the fact that the weight is pulled farther back has effect on that.

There is a little more finish work to do on it and then off to paint.

Also attached is the third kart frame.
 

Attachments

  • photo 1.jpg
    photo 1.jpg
    113.5 KB · Views: 23
  • photo 2.jpg
    photo 2.jpg
    66.9 KB · Views: 20

jamyers

Well-known member
Messages
1,444
Reaction score
47
Location
Buffalo Gap, TX
...The steering is not great at high speed, but fine when slower. I think the fact that the weight is pulled farther back has effect on that.
...
I had the same thing with my thunderkart...it was good at slow speeds, but twitchy and hard to keep straight when going fast. Had to keep a death-grip on the wheel, lol.

I'll bet you've got either zero, or negative caster. Take a look at your kingbolts (the ones going through the spindles, indicated by the yellow lines in the pic). It may be the camera angle, but it kinda looks like the left one is leaning forward (negative caster), which is bad.

You really really want them to lean backwards relative to the ground (positive caster) so that the top of the bolt is behind the bottom of the bolt. Anywhere from 10 to 15 degrees works. This makes it more self-centering and stable at speed.

All I did to fix mine was heat the arm where I circled in the pic, then twist it back with some large channel-locks.

Made a WORLD of difference!
 

Attachments

  • IMG_1540.jpg
    IMG_1540.jpg
    78.3 KB · Views: 14
Status
Not open for further replies.
Top