Some old builds

Status
Not open for further replies.

Russell ATV

New member
Messages
154
Reaction score
2
Location
Southern Washington State
High Power Kart Part 2

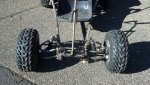
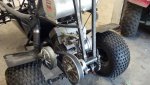
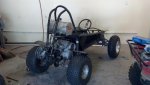
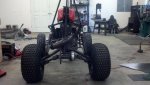
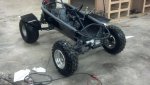
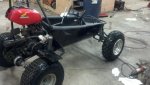
Once you have experienced 4 wheel independent suspension on an off road kart, there is no other alternative. There is a reason the high dollar ATVs and Side by Sides use an independent suspension. It comes down to cornering. The swing arm set up forces your front tires to compress when you hit an uneven surface in the rear. When in a corner, this forces the front on the outside of the corner to dive, and the inside rear tire to lift. This pitches the vehicle forward and away from the corner like you are going to roll. On top of that, the rear outside tire starts to exhibit positive camber (bottom part of the wheel is further inward than the top) which can suddenly dig into the ground. With a fully independent suspension, cornering is more predictable, and based on your rear suspension design, you can control camber through the compression of the suspension.

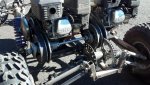
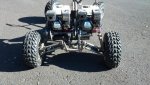
Enough of the theory, this is what I did. I wanted to use the 3 link tailing arm similar to the Long travel kart, but was concerned about the strength of the links. So, I tried a different type of rear suspension called the simi trailing arm. The benefit of this design, is that arms travel on an angle that adds lots of negative camber on the turns, suffers no scrub (outward push when suspension is compressed), and can be built very stout. I placed the engine behind the driver, and reused all the kart I had built but with some changes. The seat was centered (good thing), the rear frame was added to base, and shock tower was moved outward and slopped back.

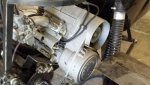
Now, the disadvantage of the semi trailing arm rear suspension is the requirement to telescope the rear drive line to account for the change in axle length as it operates. However, I used the same design as with the long travel kart using 3/4" square tubing (1/8" wall) for the ID and 1" (1/8" wall) square tubing for the OD. The solution worked well, but I did make an improvement later and changed the 3/4" tubing out for 3/4" bar, as the torque from the engine was twisting the tubing.

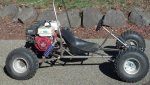
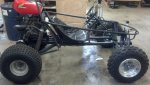
Since this designed worked well, I completed the design and used .1" polycarbonate to wrap the frame and provide lightweight protection from the ground and create finders to keep dirt from flying off the tires and landing on me. One trick I learned long ago, is that you can paint the inside of the polycarbonate and it will look like thick perfect strayed paint with a ton of gloss on top.

Only one problem remained, shifting a clutch in a mountain trail can be a real pain. Part 3 build perhaps.........
 

Attachments

  • IMG_20130626_185718_034.jpg
    IMG_20130626_185718_034.jpg
    73.2 KB · Views: 18
  • IMG_20130626_185602_477.jpg
    IMG_20130626_185602_477.jpg
    70.2 KB · Views: 16
  • IMG_20130626_185630_290.jpg
    IMG_20130626_185630_290.jpg
    71.2 KB · Views: 18
  • IMG_20130626_210824_504.jpg
    IMG_20130626_210824_504.jpg
    69.5 KB · Views: 17
  • IMG_20130626_210908_201.jpg
    IMG_20130626_210908_201.jpg
    64.3 KB · Views: 14

Russell ATV

New member
Messages
154
Reaction score
2
Location
Southern Washington State
Twin Engine, Twin CVT, Gravel King

When you have just too many parts lying around, you hate to not build something. One day with the family, I came across a key part at a yard sale. I am not a yard sale guy, but I know value when I see it. In a pile of parts from a snowmobile, I saw a couple of Fox shocks for $5. I also saw a primary and driven CVT from a snowmobile for $10, but did not see an immediate need for it (kicked self later). Having always been limited by the cheap shocks from Surplus Center or extracted from something, I finally had a quality adjustable shock. Now, I would have to build something.

I had built twin engine karts before with a centrifugal clutch, but I had a couple of TAV2 (clones) that would bolt up perfectly to a couple of mildly tuned 6.5HP clones. The TAV2 really did not respond to one modified motor on a kart, since the CVT would bog down (not enough reduction, not enough power) and not really go much faster than a standard centrifugal clutch. But two engines allowed me to drop the final drive with a smaller sprocket.

I also had better tires for this build. Surplus Center had the Kenda 18" tire for $25, so I stocked up on a few. Perfect tire for this build. Since I had built a good mountain trail kart, I thought about an off road race kart. Something with about 8" of ground clearance and 7" of suspension travel. As before, once you have a fully independent suspension for an off road kart, nothing else will do. I liked the 3 Link trailing arm setup and for this build, wanted to try it once again.

So, from what I learned from previous builds, the 2 links and the driveline would need to be parallel (if viewed from the rear). If done right, I could use the U-Joints I had extra without any complicated telescoping design.

For the engines and CVTs, I came up with something novel. I pulled out the 2 5/8" shafts from the CVTs, and replaced them with one keyed 5/8" shaft tying the two motors and CVTs together. This allowed one sprocket to drive the rear independent axle. Worked like a charm. Also, from previous builds, I learned that the two motors throttles coule be syncronized fairly easily. Just run the throttle cable from each one to the throttle pedal and tension them identically. This may take a little trial and effort, but is not that difficult.

The result was great. The suspension was plush, the driveline had no binding, and the engines pulled strong. I had gone with a 4:1 reduction from the CVTs to the rear axle. There was enough torque to spin the tires on asphalt, yet get the kart above 60MPH. In snow (less than 6"), on gravel, or light off road, the kart is unstoppable. Best part, is the redundancy the 2 engines provides. You can really appreciate this when you are 10 miles away from your truck/trailer along lonely logging roads.

Russ
 

Attachments

  • IMG_20141019_145049_595.jpg
    IMG_20141019_145049_595.jpg
    163 KB · Views: 13
  • IMG_20141019_145022_264.jpg
    IMG_20141019_145022_264.jpg
    141.7 KB · Views: 15
  • IMG_20141019_145147_386.jpg
    IMG_20141019_145147_386.jpg
    113.5 KB · Views: 19
  • IMG_20141019_145136_862.jpg
    IMG_20141019_145136_862.jpg
    127.8 KB · Views: 22
  • IMG_20141019_145005_528.jpg
    IMG_20141019_145005_528.jpg
    115.6 KB · Views: 19

Russell ATV

New member
Messages
154
Reaction score
2
Location
Southern Washington State
High Power Kart part 3

When off road, crawling up some gravel (and by gravel I mean softball to basketball size rocks) can be a be real pain with a hand operated clutch and a cantankerous sequential shifter from an old motorcycle engine. So, I started to research the pure evil of snowmobile engines. No shortage of them on Craigslist, and assuming you can find one in good order, they can be had on the cheap. I found a 1972 JLO 440 engine that looked almost brand new. The owner noted that it was his fathers and used on a homemade trike. Eventually he tired of roasting the tires off the trike and shelved it for 40 years.

The owner wanted $200, but I could barely pull the cable pull start. It turned over, and sounded like it had compression, but it was stiff and would need a full tear down. If you cannot test spark and compression, you basically have a science experiment. So, I offered him $100 and he accepted. It did have a functional primary clutch, fuel pump carb, and 90 degree exhaust header, so I had little to loose.

Upon tear down, the engine was perfect. The piston was as clean, the bore was smooth and still crosshatched, and the rigs sealed nicely. The crank was perfect as well. So what was the problem. The engine has an axial fan belt driven from the crank. The bearings in the fan were open and dry as a bone. Cleaned them up and rebuilt the engine, and it operated as it should. Still requires a good pull to get it going, but not bad for 153 and 151 PSI of compression on the two pistons. The ignition was old school points and condenser. I set the points as best I could and it managed to work. The spark was bright and strong at the plugs.

The carb was a bit of a pain, since it was an ancient fuel pump type (Walbro). I was able to get it running without replacing the diaphragms (which seemed good), but the more research, the more people recommended I toss it. Besides, I was going to have the fuel tank above the engine, so I converted over to a Mikuni VM34 slide carb. I had some problems with overflow, but after some work, got the bugs out. You can get carbs brand new for less than $75.

With the engine taken care off, I had to figure out what to do for the Secondary or Driven part of the clutch. Unfortunately, I knew nothing about snowmobiles, but through some research, found out that there are only two popular belt/sheave profiles. If I remember right, it was Ski-Doo and everyone else. The JLO had a Salsbury clutch, which is not made anymore, but I could use many different secondaries. I came across a brand new secondary made for UTVs at my favorite parts place, Surplus Center. I had to do some machining to change it out from a spline shaft to a keyed shaft, but I managed.

Finally, I had to drop it all into the Kart. I pulled the Honda Motorcycle engine and then welded in two pieces of angle iron on an angle to act as the motor mount. I put slots in the angle to allow for fine tuning of the belt in the CVT. I had to build a Jackshaft to get the necessary reduction. At first I calculated a 9:1 assuming the max the CVT would be a 20% overdrive. The jackshaft would use mounted bearings that had slots for tensioning of both the chain to the drive axle sprocket and CVT. I would prefer to get some reduction from a gearbox of chain assembly, but did not have a donor snowmobile or knowledge of a good low cost solution.

I should note, that it took about 8 months of work here and there to get it all done. It was tough having to learn everything from scratch, but reliable data on putting together a snowmobile engine on a kart is tough to find. I even searched here with no luck. You can buy an entire snowmobile and hope everything works well, or like me, put together a bunch of unrelated parts. All in all, I am ready to get another snowmobile engine and put it to work.

Amazingly, it all worked nearly perfectly. The engine is good for 39HP from the factory. With a proper tuned pipe, and the slide carb, I think I can easily get 45HP out of it. First test, it spun the tires on grass for about 150 yards, and the front wheels were almost off the ground. After about 20 minutes of testing, I realized it was geared too low, and eventually the jackshaft slipped and I lost a few teeth on the sprocket and blew a U-joint. I have since changed the reduction to a 7:1 and it is just right on for my 21" wheels. I have an optical tach tool, so I measured everything before I went with the new ratio. Engine at 6500 RPM, CVT all the way out at 7200, top speed of just under 70MPH. Acceleration is brisk. I have a 400HP car, and 26HP racing kart, and they accelerate well. This Kart is faster. Total weight of the Kart is around 260 pounds. Engine is 71 pounds of that. Now, I will start to work out the weak spots so I do not have to worry about problems when I am out on the trail. I have found some good CV joints and wheels hubs. Will there be a part 4 build?????????

Russ
 

Attachments

  • IMG_20141019_145656_617.jpg
    IMG_20141019_145656_617.jpg
    80.6 KB · Views: 17
  • IMG_20141019_145441_519.jpg
    IMG_20141019_145441_519.jpg
    85.4 KB · Views: 15
  • IMG_20141019_145611_323.jpg
    IMG_20141019_145611_323.jpg
    75.8 KB · Views: 16
  • IMG_20141019_145553_880.jpg
    IMG_20141019_145553_880.jpg
    57.2 KB · Views: 19
Status
Not open for further replies.
Top