Scorpion Build

Status
Not open for further replies.

FULLSCALE

Member
Messages
44
Reaction score
0
Hey all, I'm kind of new here. I've lurked around for a few months but I figured I'd post up one of my current projects. It's nearly completed... well I guess nearing "drivable". It'll probably never be complete! It'll need quite a few test runs before I pull it apart again and either paint or bed line it... or maybe even powdercoat.

I know a few of you are over there on the Spidercarts forum so it may not be new to all of you!

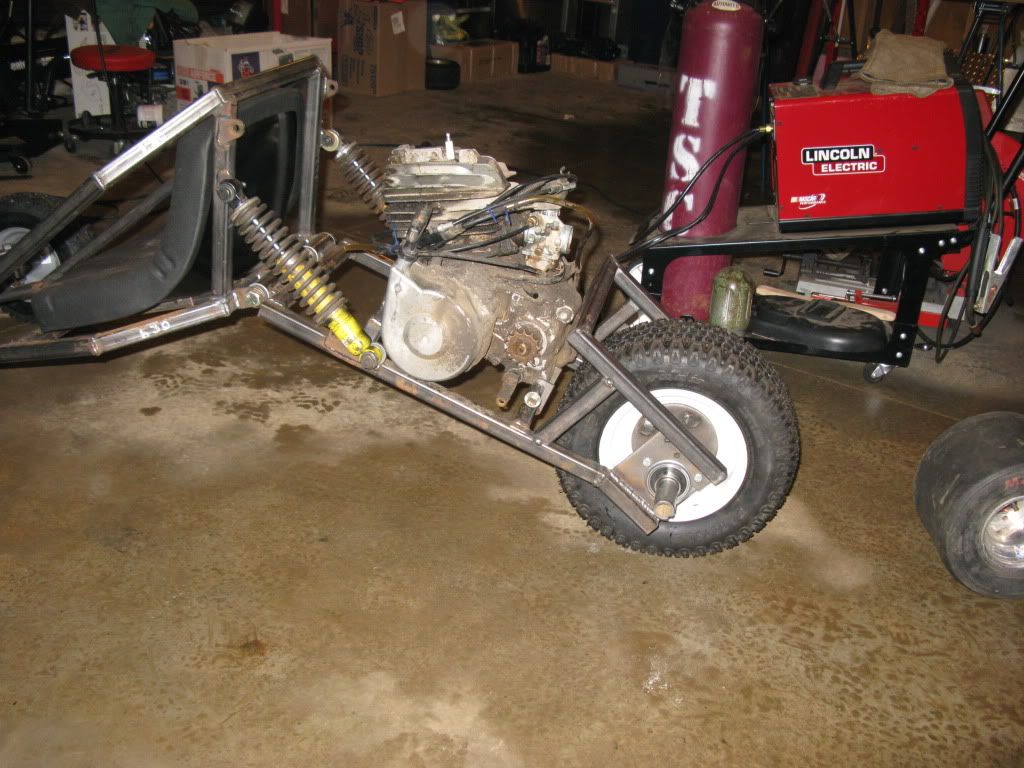
I started off with the basic frame from their plans and the farther I got in, the more I changed them. I'm still happy I bought the plans as it gave me a real head start! The main modification from the plans was my decision to use a 125cc 2-stroke w/ a 5 speed trans from an '81 Yamaha Tri-Moto.

Here's kind of a quick run through of my build so far!
 

FULLSCALE

Member
Messages
44
Reaction score
0
Old trailer shackes work great with some screws and washers to hold your frame while tacking everything in place!


Front section of the frame nearly finished.


No pics of the rear section being build, but here it is attached to the front.


If you are familiar with the plans you can see how I've changed the pivot designs. Instead of spindle brackets I used some tubing with bearings and 5/8" bolts for mine.


FULLSCALE

Member
Messages
44
Reaction score
0
Spindle brackets were welded on next as well as shock tabs. I need to find some heavier shocks/springs as these ones nearly bottom on when I'm on it!


Next came some more tubing for the seat mount. I drilled three sets of holes in the tubing for seat adjustment and then bolted some angle iron onto the bottom of the seat.


FULLSCALE

Member
Messages
44
Reaction score
0
Time for some steering parts. For the lower mount I cut a hole out of a short piece of tubing with my plasma cutter and welded in a piece of 1-1/2" OD exhaust tubing at a 45 deg angle. 1-3/8" OD wheel bearings fit inside the tubing almost perfectly. I used the same bearings for my suspension pivot.


The plans called for some 3/16" x1" flat stock for the top steering shaft mount... but I didn't think it'd be heavy enough for me!


I welded two pieces of tubing together and used a 1-1/2" hole saw right in the middle to make room for some more tubing.


FULLSCALE

Member
Messages
44
Reaction score
0
I made it so I can swap back and forth between those slicks and these tires. Fronts are 4.10/3.50x6 and the rear is a 16x6.50x8.


FULLSCALE

Member
Messages
44
Reaction score
0
With the amount of travel in the rear of the kart, I didn't like how close the front bar was to the ground when the suspension was topped out. Out came the sawzall.... I cut it off about 3" back at a 10 deg angle and then flipped it over and welded it on.


With no weight on the kart:


With my wife sitting on the kart:


FULLSCALE

Member
Messages
44
Reaction score
0
Next I made another cross bar for the front engine mount, then cut out a couple tabs and tacked them on. I didn't do anything fancy on the rear as I was running out of tubing and didn't want to risk messing any of it up and or I wouldn't have enough to finish! I needed it fairly wide at the top anyways because I'll be putting a bit of a fender on as the carb/filter is directly ahead of the tire. Don't mind the dirt on the motor, it'll be cleaned up with time!


FULLSCALE

Member
Messages
44
Reaction score
0
I tacked together a tray out of some angle iron... for my ammo can fuel tank!


I bought a master cylinder, reservoir and caliper off eBay from the rear of an '08 Kawasaki Ninja. Took a bit of time to getting everything working properly but I'm happy with it...especially the $10 price tag!


FULLSCALE

Member
Messages
44
Reaction score
0
As you can see I had to cut off a bit of the rear part of the swingarm for the pads to make full contact with the rotor, but I think it worked out well! I used one of the bearing plate holes for the lower caliper bolt and then welded a tab on top for the other one. The rotor is from BMI. I'm not sure what my front flex line is off of, I found it it work. But the rear one at the caliper is off of an early 80's Buick.


Doc Sprocket

*********
Messages
15,677
Reaction score
142
Location
Ontario, Canada
Very nice work- I like your upgrades. I'm also having a giggle over the ammo can- I have one on my kart as a battery box! And I also recognize the Mastercraft steel sawhorses that they keep putting on sale- I have four myself! Cheers!
 

FULLSCALE

Member
Messages
44
Reaction score
0
I was having some issues with the rod in the master cylinder pulling down when the brakes were applied, but a little bit of tubing did the trick. Not pretty, but it works!


Next up was mounting the pedals. It was tougher than it looks because the holes aren't perpendicular to the tubing. I enlarged the pedal holes and welded some 1/2" OD tubing inside. The tubing was the same ID as the OD of 3/8" steel fuel line... and that line's ID is the same as the OD of the pedals I have. Kind of confusing but I made the brake line inside of the tubing just slightly longer than the tubing I welded into the frame. That way, I could tighten the pedal on the fuel line and the fuel line turns inside the welded tubing. If it happens to wear, all I need to do is pull the pedal off and put a new piece of 3/8" steel fuel line on. Hope that makes sense!

Got the aluminum diamond plate floor installed with self tappers as well.


FULLSCALE

Member
Messages
44
Reaction score
0
Don't mind the ratchet straps in these pics... I used them to bottom everything out and check for clearance issues!

I got the third and final engine mount done as well as the exhaust in place. Still need to grind off the original mounting tabs though!

I'm done the shifter linkage except for the handle part. For now a pair of vise grips will have to do... That rod will be cut off shorter and the handle will come up to the right of the seat. It'll float with the rear swingarm but I don't think it'll be an issue. If it is, I'll deal with it later! I figured it'd be simpler this was. I used the tie rod bars that came with my steering kit that were too short for this build.. then connected it to another tab welded on some 5/8" rod which is set on bearings on the rear swingarm.

Next up is wiring... and I just need to see if I get a vacuum pulse out of it to run my fuel pump! If I do, I can run my fuel lines and throttle linkage and shortly after it'll be time for a test drive!

Here's some more pics (in no particular order)...


FULLSCALE

Member
Messages
44
Reaction score
0
That's where I'm at for now! I just got it running again tonight and it looks like the fuel pump I have will work! I still have to finish wiring and make some brackets and plates for the coil, fuel pump, etc., run the throttle cable up and make a rod to connect to the pedal. The shifter handle still needs to be made and then a chain and tensioner! It's the small stuff that takes forever!
 

FULLSCALE

Member
Messages
44
Reaction score
0
Very nice work- I like your upgrades. I'm also having a giggle over the ammo can- I have one on my kart as a battery box! And I also recognize the Mastercraft steel sawhorses that they keep putting on sale- I have four myself! Cheers!

Thanks a lot! Those ammo cans work for nearly everything! I have a couple around... one is even mounted under my lifted Ranger. I use it to hold my regulator, gauges and solenoid for my twin Freightliner air horns!

Those sawhorses are great too... can't go wrong for $10! I've got four as well!
 

redsox985

Active member
Messages
4,092
Reaction score
11
Location
PA
That thing is very nice. What kind of motor is that? Let's see a bigger tire in the back now! What kind of clearance does the rear end permit. That current one just looks a bit narrow IMO. :p Nice build!
 

FULLSCALE

Member
Messages
44
Reaction score
0
Thanks. Not really any room for a taller tire. I wouldn't mind finding something wider but this will have to do for now! The motor is a Yamaha 125cc 2-stroke.
 

bighead

New member
Messages
4,022
Reaction score
50
Location
Pacific Northwest USA
How is the turning radius? The pitman arm looks a little on the small/short side.

Make sure the pitman arm pushes the tie rod all the way. Sometimes a short pitman arm can over turn and turn with the steering shaft and not push the tie rod all the way out. Looking at one of your pics it looks like the pitman arm is over turning on the shaft.
 
Status
Not open for further replies.
Top