requested pic of mikunui on 212 preditor mikecoinc

mikecoinc

Member
Messages
27
Reaction score
31
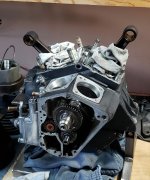
this is a picture of how I mounted my mikuni on my 212 preditor using a copper sweat solder 90 and hose with clamps. this gets it out of the way also no air leaks. not pretty but works good. goes without saying use good tight fitting hose and hose clamps.
 

Attachments

  • WIN_20260201_19_16_43_Pro.jpg
    WIN_20260201_19_16_43_Pro.jpg
    267.9 KB · Views: 19

mikecoinc

Member
Messages
27
Reaction score
31
Good Question: That was the reason for this aproach. The carb comes with an adaptor that transitions from a flange mount carb that is the stock way to a "spigot" type. All that means is stock is a two bolt flat flange and a bolt hole on either end. The mikuni has a round extention of the throat out the back. Mounted like that your carb and air filter are sticking straight out the side about 6" or more. with 90 fitting you any way you want. try to keep carb level front to back and side to side. run it back over the rear fender. Cheap and effective. Mike
 

Hellion

Moderator
Messages
8,620
Reaction score
3,694
Many thanks.

The way the carburetor and/or the intake port are oriented on these OHV canted-cylinder engines leaves a lot to be desired. The larger carburetors and sometimes the aftermarket intake manifolds allow the carb to jut-out well past the frame on minibikes. It's like a liability on that side of the engine should you drop the bike. This looks like a nice solution and is certainly a bit more aesthetic.

Can't tell if the components are home-brew or factory/OEM/off the shelf products.... I request more photos so's we can see the components better. (y)

Looks like a 45° elbow might also work, allowing the carb to orient itself parallel to the frame. :unsure:
 

mikecoinc

Member
Messages
27
Reaction score
31
Many thanks.

The way the carburetor and/or the intake port are oriented on these OHV canted-cylinder engines leaves a lot to be desired. The larger carburetors and sometimes the aftermarket intake manifolds allow the carb to jut-out well past the frame on minibikes. It's like a liability on that side of the engine should you drop the bike. This looks like a nice solution and is certainly a bit more aesthetic.

Can't tell if the components are home-brew or factory/OEM/off the shelf products.... I request more photos so's we can see the components better. (y)

Looks like a 45° elbow might also work, allowing the carb to orient itself parallel to the frame. :unsure:

guys: When I bought my carb it came with an adaptor and a short piece of hose. take those with you and go to the hardware store and in the plumbing section where they have the fittings for sweat soldering copper pipe find the size that best fits, I think its around 1 1/4 . pick out whatever combination you think might work.Their cheap get extra so when you can play around and find out what works for you don't over think it. Also get a few good quality stainless worm drive (the ones with the screw) hose clamps. squeek it all together and go. Mike
 

Hellion

Moderator
Messages
8,620
Reaction score
3,694
I like the idea of your idea: polished copper. Makes me want to incorporate copper into an engine build but it’s just not a common hue in a world of chrome plate and billet aluminium. I’ve got a can of high-heat copper paint that I never used to put on the other (exhaust) side… could look nicely “steampunk”.
 

Wicked_Daddy

Gimme fuel, gimme fire, gimme that which I desire!
Messages
130
Reaction score
209
Location
Texas, Y'all
Wicked, is that yours, or just a picture for illustration?
No, not mine. As WTR said, those lines would ultimately cause problems. I did a polished copper fuel line on a bike I built some years ago. I wrapped tubing around 1.5" dowl to create a spiral and promote flex. It still leaked fuel at the fitting after a few months. They look cool but really just for show. The attached is a Shovelhead I have been restoring. I bought this "basket case" literally as an entire bike separated into 5 boxes of various size. I bought it from a guy that inherited the "project" from his Dad and didn't even know for sure what it was. The picture of the block is how that was. The current picture is current progress. It's an 1984 FLHX - #389 of 467 - the last of the Shovels. Its a kicker and electric start, even more rare.

Not really a mini-bike project so doesn't qualify for DIYGK.
 

Attachments

  • Shovel Block Before.jpg
    Shovel Block Before.jpg
    559.1 KB · Views: 11
  • Shovel in Frame.jpg
    Shovel in Frame.jpg
    1.4 MB · Views: 11

mikecoinc

Member
Messages
27
Reaction score
31
I have a 72 shovelhead and have rode it to: Arizona, Colorado, Nevada, Wyoming, Oregon, even Sturgis. Never breaks down hard to beat a Harley. Simplisity and what I most is when I turn the throttle it goes: BAWADAH! can get that on a jap bike. Mike
Also in my opinion the only way to make oil lines is AN fittings and teflon inner liner and braided steel outer. That is all I ever run on my Harleys. Mike
 

Wicked_Daddy

Gimme fuel, gimme fire, gimme that which I desire!
Messages
130
Reaction score
209
Location
Texas, Y'all
BAWADAH!

That's great. You nailed the spelling. Shovels probably have the most true Harley sound.
 

mikecoinc

Member
Messages
27
Reaction score
31
To me goin down the road on a big twin Harley With the throttle open straight pipes (with some attempt having been made as far as diameter and equal length etc) roaring is it. Mike
 
Top