its a 26mm chinese walboro copy. shuendeng standard is what it says on it.its the same as the ones that say mikuni and kehin but they are phonys too. small round kehin jets fit. i got it for 26 bucks on feebay. i want to cast a new bowl with a flat bottom on it to put an adjustable main jet in it.
You are using an out of date browser. It may not display this or other websites correctly.
You should upgrade or use an alternative browser.
You should upgrade or use an alternative browser.
Project Orange Krate: formally manco american express duraforce
- Thread starter rwd4evr
- Start date
- Status
- Not open for further replies.
i'm on trans redesign about 3.5 now. got it to wood and pulley mock up arrangement and found i didn't have enough slack for the other pulleys to spin free when not tensioned. moved a bunch of stuff around and it actually is packaged as a whole better now but makes a couple of thing more difficult. getting every thing right in 3d and reality is not quite the same. i wish i had solidworks so you can move stuff around in 3d easier.
After frustration set in i decided to figure out some cosmetic details. the three spoke azusa(?) wheels will get cleaned up on the lip and outer wheel flange, and painted lawn boy green in the holes on the hub side and black in the holes on the tire side. black and green will be throughout. after firing up the motor again in my vice on the work table for s%$#@ and giggles, the sound of the motor and all my crap vibrating and falling off the table, it sounded like a pissed off hornets nest! it will be "THE GREEN HORNET!"
After frustration set in i decided to figure out some cosmetic details. the three spoke azusa(?) wheels will get cleaned up on the lip and outer wheel flange, and painted lawn boy green in the holes on the hub side and black in the holes on the tire side. black and green will be throughout. after firing up the motor again in my vice on the work table for s%$#@ and giggles, the sound of the motor and all my crap vibrating and falling off the table, it sounded like a pissed off hornets nest! it will be "THE GREEN HORNET!"
Attachments
-
 kartsidePAINT WHEELS.JPG45.3 KB · Views: 40
been real busy with other stuff but i got some work done a couple nights ago. wood pattern for the side plates of the trans are about done, just need to plane it down to 1/2 inch for casting. gonna order some shaft couplings that will be the center for the pulleys.
i build rc air planes also and i'm thinking about trying one of the cdi ignition boxes that are used to convert weedwacker motors for planes. they have auto advance and retard timing curve and you can set initial timing where you want it. it only takes a 4.8 - 6 volt battery pack to run it for hours. i dont see why it wouldnt run my lawnboy just fine. they are only like 40 bucks too! any body tried this on a kart?
i build rc air planes also and i'm thinking about trying one of the cdi ignition boxes that are used to convert weedwacker motors for planes. they have auto advance and retard timing curve and you can set initial timing where you want it. it only takes a 4.8 - 6 volt battery pack to run it for hours. i dont see why it wouldnt run my lawnboy just fine. they are only like 40 bucks too! any body tried this on a kart?
Doc Sprocket
*********
Groovy! Can't wait to see the transmission come together. Multi-speed belt drives have been discussed here before, but off the top of my head, I cannot think of a completed and functional example.
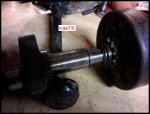
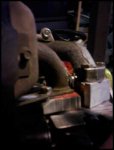
i hit a snag with the duraforce, it needs bearings. after a run on the stand i noticed some scrapes on the flywheel and found some play in the flywheel end bearings. i can get new ones pressed on but haven't had it apart to know the exact size,russ do you know?
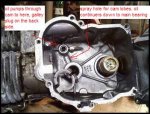
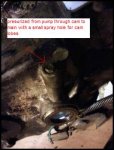
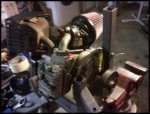
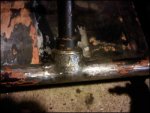
anyway, i just finished a mechanical restoration on my buddy's childhood carter superwheels for his daughters Christmas present, he did the paint. we ripped it around yesterday and it got me all worked up for mine. i have a Tecumseh 6.75 horse flathaed vertical that runs great. i tore it apart and figured out basically i can use the pressure oil system tapped from the oil galley plug under the flywheel with a tube down into the sump(now the side of the engine away from the valve train, it will be laying almost cylinder horizontal). i am also using crankcase pressure and vacuum with one way valves and an external tank to spray oil at the rod and pto side of the crank. since its a freebie i did my first crank turning on my mini lathe and its 3/4 inch now! clutch fits great but the keyway is too shallow now i'll just use the grubb screws i think. i'll post some more pics when the oil system is done.
anyway, i just finished a mechanical restoration on my buddy's childhood carter superwheels for his daughters Christmas present, he did the paint. we ripped it around yesterday and it got me all worked up for mine. i have a Tecumseh 6.75 horse flathaed vertical that runs great. i tore it apart and figured out basically i can use the pressure oil system tapped from the oil galley plug under the flywheel with a tube down into the sump(now the side of the engine away from the valve train, it will be laying almost cylinder horizontal). i am also using crankcase pressure and vacuum with one way valves and an external tank to spray oil at the rod and pto side of the crank. since its a freebie i did my first crank turning on my mini lathe and its 3/4 inch now! clutch fits great but the keyway is too shallow now i'll just use the grubb screws i think. i'll post some more pics when the oil system is done.
Attachments
-
 tecumseh crank.jpg20.1 KB · Views: 24
 -
 tecumseh innards.jpeg26.1 KB · Views: 26
 -
 tecumseh oil galley.jpg33.1 KB · Views: 22
its coming along now. frame is straightened and the Tecumseh is running. i have the conversion in another thread. motor mounts are designed and fabbed, gonna weld em in tomorrow. i think i'm going to raise the steering shaft up on top of the hoop for some extra room( its a little tight where you dont want it to be!).
Attachments
-
 tecmseh flathead kart.jpeg19.5 KB · Views: 21
 -
 tecmseh flathead 2.jpeg24.2 KB · Views: 11
 -
 tecmseh flathead 1.jpeg22.3 KB · Views: 22
Doc Sprocket
*********
Pity about the LB. Ahh, you'll get it fixed up. Unfortunately, Russ has been AWOL for a bit. You could try PMing him, though.
i got the motor mount rails done last night. gonna get the front bumper and pedals done tonight. i might do a front porch type bumper like a seventies race kart. the steering wheel raising should be the last fab work. i'll take some pics before it all gets taken apart and painted. it has to come apart to easily get it out of my basement anyway. i got the gas hooked up on my welder and i don't EVER want to use fluxcore again. you can actually see what your doing. i haven't used a real mig since welding school and forgot how nice it is. so easy to build up metal where a gap is too large.
i made the rail spacing 1 1/2 inches so i can mount different engines on different cradles easily. one inch tube on the cradle keeps the engine square to the axle. the engine mount rails are square to the axle. don't square up to the frame it can be out of square to axle, will cause chain issues. the 1/2 inch square bar just takes up the extra room an makes it all nice and tight. it is rock solid when all tightened up. if this isn't clear ask and i'll try to explain better.
Attachments
-
 tecmseh flathead kart rails w mount.jpeg40.4 KB · Views: 12
 -
 tecmseh flathead kart rails w mount apart.jpeg37.1 KB · Views: 11
 -
 tecmseh flathead kart engine w mount.jpeg33.3 KB · Views: 16
souperman000
New member
You are probably right. That is not a manco steering wheel, and the AmEx engines are placed more in the middle of the frame, if not slightly to the left of center.
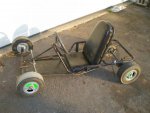
Here is a rearend pic for reference:
Here is a rearend pic for reference:
Attachments
-
 MancoAmEx4.jpg118.7 KB · Views: 23
yup. the motor mounts were the one difference i could find between mine and the american express. what ever it was, its a JBE (Jason Birch Engineering) now!
i raised and changed the angle of the steering shaft. had an old exercise machine i got 3/4" oil impregnated bushings in steel sleeves for the shaft mounts, fit beautifully. made a steering wheel hub out of and old power steering pump pulley turned down to size, drilled and tapped. pedals made from a fold up chair frame with pivots turned down from 3/4 bar stock and drilled 5/16 welded to the bottoms. i'm working on the front bumper now, it started as a pair of handle bars from a kids bike but i think i have to cut up another pair for the last part in the middle. i grab steel anything off the side of the road delivering pizza and its paid off big on this build! motor, frame parts,steering gear,even a couple tools i've made, free! i'll get some pics up tomorrow probably.
i raised and changed the angle of the steering shaft. had an old exercise machine i got 3/4" oil impregnated bushings in steel sleeves for the shaft mounts, fit beautifully. made a steering wheel hub out of and old power steering pump pulley turned down to size, drilled and tapped. pedals made from a fold up chair frame with pivots turned down from 3/4 bar stock and drilled 5/16 welded to the bottoms. i'm working on the front bumper now, it started as a pair of handle bars from a kids bike but i think i have to cut up another pair for the last part in the middle. i grab steel anything off the side of the road delivering pizza and its paid off big on this build! motor, frame parts,steering gear,even a couple tools i've made, free! i'll get some pics up tomorrow probably.
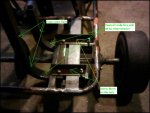
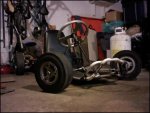
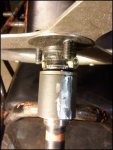
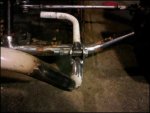
ok, got some pics of the frame mods. the last one is of it when i picked it up.you can see the original steering shaft goes under the hoop and over the front frame rail. front bumper and pedal mounts are broken off, hard to tell but the left front is pushed back a good bit too. second one is lower steering moved down inside and molded into the frame. third is upper steering, moved on top of the hoop in a sleeve with bushing. also the wheel adapter made from a pulley cross drilled to retain it. fourth is the bumper and brake pedal(laid backwards here). the bumper was two pairs of kids bike handle bars cut and spliced to get the right angles. the butt weld was a real b!@#ch because i was having some welder(or welding) issues. still gotta smooth it out a bit to look like one piece. i'm pretty happy with the way it came out, and it will give a little more protection in a front end hit than just a flat hoop sticking straight out. now i'm gonna finish the pedals with a cable hookup for the gas and an adjustable shackle mount on the brake. keeping the band for now but a disk setup from a yzf426 dirt bike is going on when i get a disk hub.
and it is an orange krate.I found the sears catalog listing. should i change the thread name?
and it is an orange krate.I found the sears catalog listing. should i change the thread name?
Attachments
-
 krate full view.jpeg33.8 KB · Views: 24
 -
 krate lower steering.jpeg31.7 KB · Views: 11
 -
 krate upper steering.jpeg36.5 KB · Views: 11
 -
 krate bumper pedals front view.jpeg27.7 KB · Views: 13
 -
 kartfront.jpg59 KB · Views: 26
and it is an orange krate.I found the sears catalog listing. should i change the thread name?
It might make it easier for noobs who are searching for particular karts. If you want to change it, let me know and I will do it for you. Just tell me what you want it called. You will not be able to change it yourself.
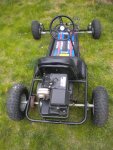
I got It all put together out of the basement today on the back deck. Hooked up the tach(not working properly, need to put separate magnet in.)a kill switch and throttle. I used a bicycle brake for the throttle control and cable hookup.ill get some pics tomorrow.five minutes till I had to work I had it idling pretty nicely. I gassed her up and felt it out carefully for a block or two. Then I hit it, it pulls pretty good. I didn't rev it too high, when the tach was right intermittently I didn't go over 4000. It was tempting, cause its got way more in it. Big *** grin on my face. Then I went to work.
  More tomorrow.
More tomorrow.I got It all put together out of the basement today on the back deck. Hooked up the tach(not working properly, need to put separate magnet in.)a kill switch and throttle. I used a bicycle brake for the throttle control and cable hookup.ill get some pics tomorrow.five minutes till I had to work I had it idling pretty nicely. I gassed her up and felt it out carefully for a block or two. Then I hit it, it pulls pretty good. I didn't rev it too high, when the tach was right intermittently I didn't go over 4000. It was tempting, cause its got way more in it. Big *** grin on my face.
I love those big *** grins...
rushking19
Active member
Try to upload a video to YouTube or something, i must see this
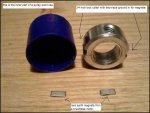
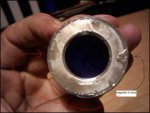
i redid the tach sensor setup last night. i took the lock collar off the pto shaft that was keeping my clutch where it needed to be. then i used a grinder and carefully cut basically keyways opposite eachother on the outside of it. i was looking for some thing to sit it on while the jb weld set up and found that the inner snap on part of a spraypaint can fit the lock collar perfectly. i cut it out and jb'ed them in the keyways. then i slid the cap part over it bieng carefull not to get any in the set screw threads. i dont think i'll have any issues with balance or the magnets coming off now. i'm gonna throw it on the lathe and clean it up when its dry. i built a aluminum holder for the sensor but dont have pics of it right now. by the way jb weld is actually steel. it gets attracted to the magnets and piles up on it, pretty cool!
Attachments
-
 tach collar parts.jpeg42.5 KB · Views: 10
 -
 tach collar epoxyed.jpeg33.1 KB · Views: 6
 -
 tach collar loose.jpeg27 KB · Views: 6
jpwaltz
ORANGE KRATE TOO
Hey, I can send you pictures of a near-perfect original Sears Orange Krate if you think you might want to restore the kart to its original appearance.
E-mail me at jpwaltz@eraenergy.com and I'll send photos if you like.
Good luck!
E-mail me at jpwaltz@eraenergy.com and I'll send photos if you like.
Good luck!
- Status
- Not open for further replies.