thebozz
New member
By request of Firemanjim, I'm posting about a cheap, $10ish tube/pipe notcher that works just about perfectly. All you need is two thick scrap pieces of wood (I used two blocks about 6x6), a piece of wood substantial enough to drill on the bottom of the jig and be able to clamp it firmly to a surface of your choice, you need four bolts long enough to reach through the two pieces of your wood and the gap that will be inbetween but not stick out at all because you will want a flush surface, four washers for these bolts, find a nut that will dig itself into the wood and not move (I forgot what these are called but they have little barbs so when you tighten them into the wood, they will dig themselves in and won't move unless you want them to), and you will need a hole bi-metal holesaw that matches the O.D of your pipe/tube (or at least very close), and last but not least you will need a couple screws.

This is the side view. I cut a "V" in both blocks of wood in order to grip the tube and it will not damage your tube at all. I have not had any problems with it in any way, shape, or form. You can see my bolts sticking out, there are four of them and they connect all the way to the bottom of the jig. The nice thing about this setup is that it's infinately udjustable until you run out of threads on the bolts.

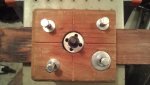
This is the top view. You can see the crosshairs that I cut into it, this is to help me line up the hole saw with the tube. This part is more critical for the first cut because after you have made the initial cut, you will have a hole and you can visually line it up using the crosshairs on the inside of the jig.

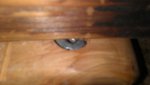
This is the inside of the jig. These croshairs are visable from the outside, looking down the hole. You push the tube up until it is even with the crosshair and then you lock it down. The only issue I had with this is you need to tighten all the bolts down equally.

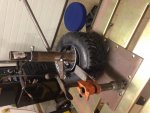
Heres an example how it looks when the tube is inside it. You can make a jig like this for a ton of differant angles. I used this for manufacturing a new rear end assembly for my sprint car.
step 1) get your two scrap pieces of wood for the jig itself and make them flush on both sides so they will sit evenly on each other. You will also want to make sure these two pieces are the same size.
step 2) cut a "V" in both pieces of wood and make sure they are lined up perfectly on both pieces.
step 3) Cut crosshairs into both the bottom piece of wood that is facing up (The piece that the tube will be resting on). Also cut crosshairs onto the top piece of wood's side that is facing up, make sure these crosshairs are lined up perfectly witht the bottom ones so you will get a proper fishmouth.
step 3) drill holes that go completely through both pieces of wood, try to make these as even as possible so the pressure on the tube is even throughout (not a big deal).
step 4) countersink the bottom-most side so the nuts will not protrude the surface (making the bottom completely flat is crucial).
step 5) find appropriate length bolts, this length will vary depending on the O.D of the tube you will be using but again, make sure they do not protrude the surface. Find the special nuts and washers to go along with these bolts
step 6) put the bolts into the holes and tighten down so they are inside the nuts on the bottom
step 7) screw on your third piece of wood onto the bottom, make sure the screws do not hit the nuts on the bottom of the jig. Make sure this is ridgid enough so when you clamp on this piece of wood, the jig does not move at all
step 8) insert tubing into the jig and make sure the end of it is even with the crosshair. then clamp it to a table and cut the hole on the top so it is even with the crosshairs
step 9) you are ready to go!
Important thigs to remember: Make sure the bottom is completely flat or else your fishmouths will vary. Also make sure that the wood on the bottom is firm so the jig does not move at all while drilling or the fishmouths will vary. If you use larger pieces of wood for the jig (Lenght and Width), you can't fishmouth many tubes that have bends in it. Make sure to go slow and ALWAYS remember to oil it pretty frequently. Sorry about the length of this by the way.
This is the side view. I cut a "V" in both blocks of wood in order to grip the tube and it will not damage your tube at all. I have not had any problems with it in any way, shape, or form. You can see my bolts sticking out, there are four of them and they connect all the way to the bottom of the jig. The nice thing about this setup is that it's infinately udjustable until you run out of threads on the bolts.
This is the top view. You can see the crosshairs that I cut into it, this is to help me line up the hole saw with the tube. This part is more critical for the first cut because after you have made the initial cut, you will have a hole and you can visually line it up using the crosshairs on the inside of the jig.
This is the inside of the jig. These croshairs are visable from the outside, looking down the hole. You push the tube up until it is even with the crosshair and then you lock it down. The only issue I had with this is you need to tighten all the bolts down equally.
Heres an example how it looks when the tube is inside it. You can make a jig like this for a ton of differant angles. I used this for manufacturing a new rear end assembly for my sprint car.
step 1) get your two scrap pieces of wood for the jig itself and make them flush on both sides so they will sit evenly on each other. You will also want to make sure these two pieces are the same size.
step 2) cut a "V" in both pieces of wood and make sure they are lined up perfectly on both pieces.
step 3) Cut crosshairs into both the bottom piece of wood that is facing up (The piece that the tube will be resting on). Also cut crosshairs onto the top piece of wood's side that is facing up, make sure these crosshairs are lined up perfectly witht the bottom ones so you will get a proper fishmouth.
step 3) drill holes that go completely through both pieces of wood, try to make these as even as possible so the pressure on the tube is even throughout (not a big deal).
step 4) countersink the bottom-most side so the nuts will not protrude the surface (making the bottom completely flat is crucial).
step 5) find appropriate length bolts, this length will vary depending on the O.D of the tube you will be using but again, make sure they do not protrude the surface. Find the special nuts and washers to go along with these bolts
step 6) put the bolts into the holes and tighten down so they are inside the nuts on the bottom
step 7) screw on your third piece of wood onto the bottom, make sure the screws do not hit the nuts on the bottom of the jig. Make sure this is ridgid enough so when you clamp on this piece of wood, the jig does not move at all
step 8) insert tubing into the jig and make sure the end of it is even with the crosshair. then clamp it to a table and cut the hole on the top so it is even with the crosshairs
step 9) you are ready to go!
Important thigs to remember: Make sure the bottom is completely flat or else your fishmouths will vary. Also make sure that the wood on the bottom is firm so the jig does not move at all while drilling or the fishmouths will vary. If you use larger pieces of wood for the jig (Lenght and Width), you can't fishmouth many tubes that have bends in it. Make sure to go slow and ALWAYS remember to oil it pretty frequently. Sorry about the length of this by the way.
Attachments
-
 IMAG0051.jpg51.1 KB · Views: 15
 -
 IMAG0076.jpg55.1 KB · Views: 15
 -
 IMAG0075.jpg28.2 KB · Views: 16
 -
 IMAG0074.jpg78.1 KB · Views: 16

 , however, I had a long chat with a fella in the city planning and development office, he basically made me feel as though I might be able to get a special permit, I simply need to draw the plans (I forget what he called them but I wrote it down at work) and submit them to the planning office, only problem is, they work when I do...