• OFF TOPIC fun forum - NO politics - NO religion - NO jerks. It's not complicated. Thanks!

Poboy can crusher TWO,,,,,

Status
Not open for further replies.

Poboy kartman

Senior Moments Member
Messages
12,461
Reaction score
69
Location
White Settlement Texas
Ok...so...first place to start....the piston......

Yeah....did you guys think it was going to stay whole??????

Bwaahahahaha......grab a beverage....and sit back.....it's only starting......
 

Attachments

  • 14183458440970.jpg
    14183458440970.jpg
    53.9 KB · Views: 38

Poboy kartman

Senior Moments Member
Messages
12,461
Reaction score
69
Location
White Settlement Texas
Did a little parts shopping today.....had to go to Wal-Mart anyway...so while I was there....I went to sporting goods looking for skate bearings....nothing.....

Just across the street....was a used appliance place....so just on an outside chance ...I checked to see if they had any large v-pulleys.......nope.....

So then I headed to Academy to look for skate bearings.....the only thing they had was a set of replacement wheels for a Razor scooter.....it had the four bearings I was looking for in the two wheels.....but.....ummmmm $13....I don't think so.....

So....since it was only a block away....I decided to drop in at Northern Tool....and look around....I found some pillow blocks.....but at $8 ea. ....they're not in the budget either.....found some wheel bearings I could use to make my own pillow blocks...(and I need for some other parts)..... but at $10 a pair....not happening.....

I need to find a deal like someone posted up on the forum a while back....for HS wheel bearings for 10 for $10......

So as I was getting in the truck....I saw a couple of NT employees having a smoke break.....so I asked if they might know where I could get skate bearings.....One guy said...."Sure.....right down the street"....(actually halfway back to my house)....."Silver Wheels Skating Rink".....DOH!!!!! Why didn't I think of that!!!!! I was a little concerned they might be pricey there though.....

Then I had an idea....two blocks before the skating rink is a Goodwill.....got a pair of inline skates for $5......got 16 skate bearings now.....so at least I got something......
 

Poboy kartman

Senior Moments Member
Messages
12,461
Reaction score
69
Location
White Settlement Texas
Ok....My phone is giving me fits loading pictures.....so...I'm going to post another post....and try to edit them.....bear with me.....
 

Attachments

  • 14217077396110.jpg
    14217077396110.jpg
    174.7 KB · Views: 18

Poboy kartman

Senior Moments Member
Messages
12,461
Reaction score
69
Location
White Settlement Texas
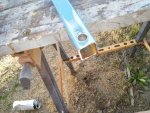
Ok...So....I played around a little with "Crusher 2" .....first off...the "connecting rod": There wasn't really anything wrong with the old wooden one.....but here's the upgrades: ....1x1" steel....(instead of wood)....bolt size upgraded from 3/8" to1/2", .....steel bushings tacked in place...and center to center changed from 14 1/2" to 15"........

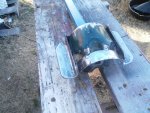
Now....the "piston" : First, it's now steel.....the "wrist pin" pivot point has been shortened, ....while the "ears"....that keep the piston on track have been lengthened significantly....which should help greatly reduce the jamming tendency on the backstroke.....as the other mods should as well.....

I added a lip to keep the cans from bailing out as easily.......

Way more mods to come.....grab some :popcorn: and I'll be back!!!!


Edit: phone is still being a pill....so the previous post is the bushed connecting rod.....a couple of other things...if you look close ....in another pic...you can see I drilled an oiling hole in those bushings......

Also....my welding ain't pretty....but it should work.....
 

Attachments

  • 14217079949070.jpg
    14217079949070.jpg
    166.7 KB · Views: 19
  • 14217080172611.jpg
    14217080172611.jpg
    133.7 KB · Views: 20
  • 14217080301562.jpg
    14217080301562.jpg
    152 KB · Views: 16

chancer

ɔ ɥ ɐ u ɔ ǝ ɹ
Messages
9,358
Reaction score
93
Location
COMFORT, TEXAS
Can you post a link here to "Can crusher 1. Without that this is hard to follow.
Yes. I can search for it just trying to help others and make your post better :)
 

chancer

ɔ ɥ ɐ u ɔ ǝ ɹ
Messages
9,358
Reaction score
93
Location
COMFORT, TEXAS
Ok just finished reading can crusher 1. Not sure why but I was laughing out loud a couple times. :lolgoku: Not at you, just the comments and the pic of that propane cylinder taped to a drill press. The idea is great here in CA. we get almost 2 bucks a pound. I have a great can crusher.... Teenage daughter who wants her go kart worked on!:thumbsup:
 

Poboy kartman

Senior Moments Member
Messages
12,461
Reaction score
69
Location
White Settlement Texas
No....and I know where you are going with this.....this all started with a need for a can crusher able to accommodate cans taller than 16 oz.

I asked where to get one....also considering building a manual one.....now....with a good quality manual crusher capable of crushing the taller cans available online for @ $50.......it didn't even seem worth jackin' with building my own.....then someone linked a motorized version and the wheels started turning......

And so the monster was created.....it's not about practicality anymore....it's about problem solving and just building something cool.....

The percentage of tall cans I need to deal with is not that overwhelming.....I can step on them .....or even leave them whole......and I crush them flat when I step on them.....

But....the prototype is started a different way....and I want to follow it for now.....

Edit: But please feel free to share....or build your own.....taking the track idea I had and substituting a wedge and possibly rollers....you could smash them flat.....but to eject them.......??????? trap door?????
 

Poboy kartman

Senior Moments Member
Messages
12,461
Reaction score
69
Location
White Settlement Texas
With the "piston" and "connecting rod" semi-finished.....time to move on to the "drive/ flywheel "........

On the prototype.....it had a bit of "wheel hop".....that was caused by creating the outside diameter with a small pivot hole....then enlarging that for a bushing.....the small amount of bit walk and inaccuracy in centering was multiplied by radius distance.....

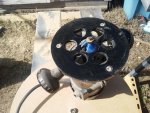
So....to combat that....I drilled the center hole and installed a bushing...then made a pivot for the router with a bushing and used a bolt to get a nearly perfect circle that should be concentric with the center pivot point.....

So...just in case anyone is interested, the step by step:
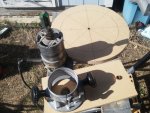
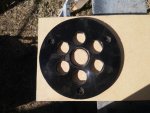
First: I removed the phenolic base plate from the router base and traced it onto a piece of MDF....then drilled the holes..(since it's layed out on one side, that's the most accurate hole locations) ....so it's flipped over before the mounting holes are countersunk......

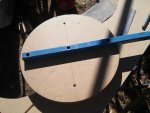
The router base is istalled with longer scews,....the bit and router installed and then turned upside down....a rule is placed against the cutter of the bit....and the center of the pivot marked....in this case...7 1/2" to make a 15" circle.....(the prototype was about 14 1/2".....so...that's an upgrade as well).....

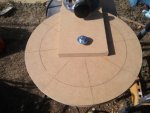
The circle is roughed out with a jigsaw 1/8" larger all the way around....and everything bolted together.....the router plunged down and then the disc rotated to make a circle.....

Step one complete......
 

Attachments

  • 14221252170814.jpg
    14221252170814.jpg
    125.2 KB · Views: 5
  • 14221251970033.jpg
    14221251970033.jpg
    146.4 KB · Views: 5
  • 14221251515672.jpg
    14221251515672.jpg
    123.7 KB · Views: 6
  • 14221251156071.jpg
    14221251156071.jpg
    97.9 KB · Views: 5
  • 14221250947110.jpg
    14221250947110.jpg
    115 KB · Views: 6

Poboy kartman

Senior Moments Member
Messages
12,461
Reaction score
69
Location
White Settlement Texas
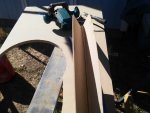
On to the next step: really simple:....a 45° chamfer bit with a bearing....just chamfer the inside of each half....and ....put them together......

Ummmmmm......not really.......

This is how I did the prototype.....and it worked......BUT....it took a lot of tension to keep the belt from slipping.....so....with just a quick look....it's apparent that "V" belt pulleys aren't built on a 45° angle.....so only a small portion of that v-belt's sides were actually making contact with that pulley.....so....the angle is probably closer to 60° .......

My first "knee jerk" reaction was just to go with it....but.....this is "Crusher TWO"......and the time for slapping crap together just to test is over.....so....now I need to solve this problem.....I will check all my router bits to see....but....I probably don't have a bit that will do that as easily......

Soooooooo.......maybe I could buy one.....(remote possibility: "find" one at work).....but....as much as I don't want to have to admit it.....the most likely solution is to create a jig to accomplish that....because even if I found one to buy....it just doesn't make sense to drop $40-$50 on that.......

So.....one step forward....one back......:lolgoku:

Now....the next thing is the bearings I got from the $5 Salvation Army inline skates.....spent some time on that today....took a little bit to make them work.....more on that later......

Grab some more.....whole lotta more 2 come.....:cheers2::popcorn:
 

Attachments

  • 14221366887250.jpg
    14221366887250.jpg
    144.5 KB · Views: 5
  • 14221367128891.jpg
    14221367128891.jpg
    129.4 KB · Views: 4

Poboy kartman

Senior Moments Member
Messages
12,461
Reaction score
69
Location
White Settlement Texas
BTW:......Is it just me.....or does anyone else think this looks more like something Jaques Cousteau would use to explore the deep sea than a "Poboy" would use to crush aluminum cans?????:lolgoku:
 

Attachments

  • 14221390975930.jpg
    14221390975930.jpg
    51.5 KB · Views: 10

Denny

Canned Monster
Messages
11,945
Reaction score
8,444
Location
Mayberry, Indiana
I can picture it now you changing your name from Poboy Kartman to Nuckels Kartman. Your gonna loose a finger with that thing. :lolgoku:

Denny
:feedtroll:
 
Last edited by a moderator:

Poboy kartman

Senior Moments Member
Messages
12,461
Reaction score
69
Location
White Settlement Texas
I can picture it now you changing your name from Poboy Kartman to Nuckels Kartman. Your gonna loose a finger with that thing. :lolgoku:

Denny
:feedtroll:

Oh...ye of little faith....this is going to be auto feed/eject eventually....in the meantime.....I've been around much more dangerous things....and still kept most of my fingers......:lolgoku:

(I did lose a little bit of my index finger on my left hand to a table saw.....):oops:
 

Poboy kartman

Senior Moments Member
Messages
12,461
Reaction score
69
Location
White Settlement Texas
Well...the change angle was successful...however....it threw the v-belt.....into the anticipated hole centers for the wrist pin..and counter balance point ...as well as the roller skate bearings location.....but....I'm glad I did it....more later......
 

Attachments

  • 14222137192330.jpg
    14222137192330.jpg
    131.5 KB · Views: 2

Poboy kartman

Senior Moments Member
Messages
12,461
Reaction score
69
Location
White Settlement Texas
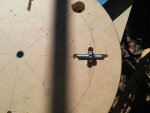
Ok...So...rigged up a quick slanted jig to change the v-belt angle....much more v-belt friendly now.....

Drilled a rod for the flywheel drive.....

Then.....the roller skate bearings ; the prototype had a lot of wobble .....I got that semi-controlled with CD discs......

The roller bearings are going to act as thrust washers to eliminate wobble....

They were some funky metric size....so I was unable to locate a good fitting sjaft......this wasn't all bad...,.as I "turned" down 3/8" all-thread until the bearings just fit.....then left them tapered on the middle...,so I could press on the bearing.....eliminating the need for side locating washers......

Just a couple of more things before I JB Weld those suckers in place......

On to the piston track and tweaking the piston ears......
 

Attachments

  • 14223027204210.jpg
    14223027204210.jpg
    157.3 KB · Views: 5
  • 14223027415801.jpg
    14223027415801.jpg
    98.9 KB · Views: 4
  • 14223027658192.jpg
    14223027658192.jpg
    100.3 KB · Views: 4
  • 14223027816473.jpg
    14223027816473.jpg
    133.1 KB · Views: 5
  • 14223027973524.jpg
    14223027973524.jpg
    112.8 KB · Views: 7

Poboy kartman

Senior Moments Member
Messages
12,461
Reaction score
69
Location
White Settlement Texas
Part of the "tweaking" is to get the sides of these ears parallel and in line with the centerline of the connecting rod......

I knew when I tacked it up that these bedrail angle iron sections weren't parallel.....but figured I'd just dail that in later......

I made some shallow kerfs in a piece of MDF......clamping them to the rails.....I get a measurement at the front of about 7 1/64"....at the back....(which is actually exaggerated due to the extra overhang: 7 1/4".....so....I will get those parallel....because this is going to have tight tolerances.....(unlike the prototype) ......a tight, consistent groove will keep the piston from rocking side to side......

Now.....time for me to "rock" on.......
 

Attachments

  • 14223141064701.jpg
    14223141064701.jpg
    78.8 KB · Views: 4
  • 14223140955180.jpg
    14223140955180.jpg
    69.2 KB · Views: 5

Poboy kartman

Senior Moments Member
Messages
12,461
Reaction score
69
Location
White Settlement Texas
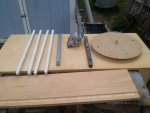
So....I got the sides of "piston" parallel.....I have the "drive bar " fabricated....except for making some indents on the perimeter of the center hole....so I can tack in a bushing.....then it's ready for paint.

I drilled a hole in the side housing for the drive wheel assembly and did a quick check to see where the track should be located....then went to work on the track sides.....made a dado for the bottom floor....a spacer block to locate the track sldes....and ripped some slides......

I was wanting to make the sides much taller than they are....but that was all I had on hand for material....but it's going to be advantageous actually.....

The white slide tracks are from a piece of Corian backsplash I had laying around ......UHMW plastic would have been nice.....but I didn't have any and that stuff is pricey......

So it started raining....and I may not mess with it anymore this weekend.....
 

Attachments

  • 14227493507380.jpg
    14227493507380.jpg
    90.9 KB · Views: 7

Poboy kartman

Senior Moments Member
Messages
12,461
Reaction score
69
Location
White Settlement Texas
Are you going to finish this project? I was looking forward to seeing it.

Maybe......

Well...found a little time today to play with this a little more.....I'll be honest....pretty much had this thing built in my head....dimensions and problems worked out.....but when I pulled this thing back out....I felt like a cow staring at a new gate.....:lolgoku:

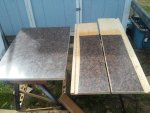
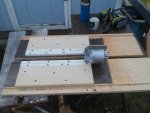
So....covered a couple of pieces with some plastic laminate....and installed the Corian tracks....the plastic laminate is to slow the wear of the moving parts....it'll become clearer as I go....

"It's always something ".....right now...I'm running low on 1 1/4" and 1 5/8" drywall screws,....

So....I haven't abandoned it....just gomna take a little time.....:thumbsup:
 

Attachments

  • 14264567251770.jpg
    14264567251770.jpg
    120.2 KB · Views: 3
  • 14264567402580.jpg
    14264567402580.jpg
    130.9 KB · Views: 4
  • 14264567568120.jpg
    14264567568120.jpg
    105.7 KB · Views: 3
Status
Not open for further replies.
Top