Not a bad deal (I think)

Status
Not open for further replies.

areams

New member
Messages
74
Reaction score
0
Location
Iowa
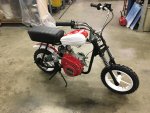
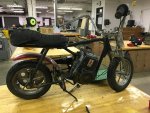
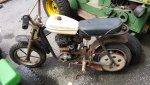
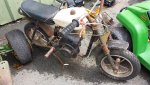
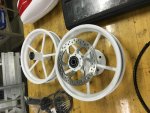
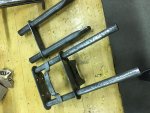
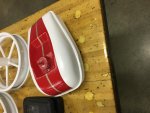
Picked this thing up for 50 bucks. Needs some work but is complete! Was told it runs but carb needs cleaned. Took it apart and they were right, it definitely needed cleaned. Luckily though, it is a 19mm slide carb so going to try and clean it and see what happens.

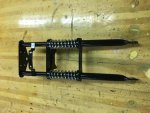
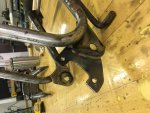
Any ideas what kind it is? Has a Harley Davidson sticker on the front clear plate on the forks that doesn’t look like it was added..
 

Attachments

  • 4725C853-E746-4B65-8744-4D2524FFFCDC.jpg
    4725C853-E746-4B65-8744-4D2524FFFCDC.jpg
    354.9 KB · Views: 40

itsid

Moderator
Staff member
Messages
11,564
Reaction score
116
Location
Ruhrpott [Germany]
looks oddly familiar.. care to show us the other side (the chain guard might be a clue)
I'm getting a Rupp Sprint vibe from that tilted engine.

the wheels trip me off, those are very likely chinese and I assume they do not belong to the mini bike at all...

'sid
 

Joe-405

Enjoying New Projects
Messages
2,673
Reaction score
69
Location
U.S.A.
I’m guessing it looks like this on the other side............
 

Attachments

  • B8233708-6582-402C-AFF2-AEF81FCC82C8.jpg
    B8233708-6582-402C-AFF2-AEF81FCC82C8.jpg
    491.5 KB · Views: 31

areams

New member
Messages
74
Reaction score
0
Location
Iowa
I’m guessing it looks like this on the other side............

That’s it! Mine does have a chain guard but the mounting on that one where the chain gaurd would go is the same.

---------- Post added at 08:48 PM ---------- Previous post was at 08:48 PM ----------

looks oddly familiar.. care to show us the other side (the chain guard might be a clue)
I'm getting a Rupp Sprint vibe from that tilted engine.

the wheels trip me off, those are very likely chinese and I assume they do not belong to the mini bike at all...

'sid

I’ll have to snap another pic tomorrow, but the one joe just posted is it.
 

Joe-405

Enjoying New Projects
Messages
2,673
Reaction score
69
Location
U.S.A.
Here’s the other side...........

They are saying on a page that they were carnival bikes and nobody knows the brand.
 

Attachments

  • 0A4445A7-371A-4C7B-BB99-D3F78D4C46B8.jpg
    0A4445A7-371A-4C7B-BB99-D3F78D4C46B8.jpg
    498.3 KB · Views: 20

Texan

Senor Member
Messages
461
Reaction score
2
Location
Deep In The Heart of Texas
Bird / Phoenix Engineering Nighthawk or Thunderbird. They were out of Nebraska. I have one of each. Those are the correct wheels. I have a thread on here on them if you do a search.
 

Joe-405

Enjoying New Projects
Messages
2,673
Reaction score
69
Location
U.S.A.
Bird / Phoenix Engineering Nighthawk or Thunderbird. They were out of Nebraska. I have one of each. Those are the correct wheels. I have a thread on here on them if you do a search.

Sweet ! Definately then. I googled bird minibike and pulled up a few different nice restored or custom ones. Good job sir.
 

areams

New member
Messages
74
Reaction score
0
Location
Iowa
Any idea how to get the fork tubes unstuck? I assume the springs fully compressed aren't just for show?
 

Texan

Senor Member
Messages
461
Reaction score
2
Location
Deep In The Heart of Texas
No, they shouldn't be fully compressed. The upper and lower fork tubes are metal on metal, so it is likely they are rusted/frozen together. The springs are held in by the "cups" on each end. They can be a pain, because as you turn one end to release it, the other end engages further in, so you have to find a way to block one end from rotating. My forks were bent and slightly stuck together, I think a rubber mallet helped me free them. Here is some pics to show you what you will be working with. :thumbsup:

20170510_184445.jpg

20170510_184514.jpg

20170906_184116.jpg
 

areams

New member
Messages
74
Reaction score
0
Location
Iowa
I was FINALLY able to get the front forks apart. 3 days worth of pb blaster and finally with the help of a jack and ratchet strap, they separated.

Had to cut a spring out because someone had tried to re weld the spring cup for some reason and that welded the spring to the cup so it wouldn’t turn out. New springs and cups are on the way. Made my own flapper wheel with a dowel and some sand paper to clean the inner tubes out. Lots of wire wheel action to the outer tubes.

Also, got half of my seat cover sewed up this weekend. Happy with how it turned out for my first time with vinyl.
 

Attachments

  • 84326CF5-896D-48B4-B06C-5712A6E7953F.jpg
    84326CF5-896D-48B4-B06C-5712A6E7953F.jpg
    308.1 KB · Views: 3

areams

New member
Messages
74
Reaction score
0
Location
Iowa
Texan

Did you have any trouble reassembling after forks were painted? Mine seem like they have good clearance now but I’m worried if I paint if that will cause binding.
 

Texan

Senor Member
Messages
461
Reaction score
2
Location
Deep In The Heart of Texas
Texan

Did you have any trouble reassembling after forks were painted? Mine seem like they have good clearance now but I’m worried if I paint if that will cause binding.

I wire wheeled the upper forks really smooth, then used a Dremel flex shaft to clean the inside of the lower forks. I didn't have any trouble sticking them back together, even with multiple coats of enamel paint. I also lightly coated the contact areas with a good multipurpose grease. :thumbsup:
 

areams

New member
Messages
74
Reaction score
0
Location
Iowa
Here’s my progress so far. Got the motor all finished up today with my carb adapter finally showing up. Can’t wait to fire it up. Got the wheels painted and bracket for the rear disc brake welded up also. No more scrub brake. Got most of the fender painted, still need to add the red and gold stripe. The tank needs resprayed since the stinkin clear reacted poorly with the paint. But will get repainted with the same color scheme.
 

Attachments

  • F2004054-A038-4DAD-BD83-1D84C43D2EED.jpg
    F2004054-A038-4DAD-BD83-1D84C43D2EED.jpg
    240.6 KB · Views: 5
  • 452AB890-9887-4A04-A3EF-EBC1A0D09A0A.jpg
    452AB890-9887-4A04-A3EF-EBC1A0D09A0A.jpg
    267 KB · Views: 6
  • 5B7EECC9-99ED-4269-96A9-30750A3DD701.jpg
    5B7EECC9-99ED-4269-96A9-30750A3DD701.jpg
    327.7 KB · Views: 6
  • E52EC8D5-9223-4478-947A-97E87F4AEA4D.jpg
    E52EC8D5-9223-4478-947A-97E87F4AEA4D.jpg
    340 KB · Views: 5
  • 05A5E893-5631-4483-A51F-095F66AB1B45.jpg
    05A5E893-5631-4483-A51F-095F66AB1B45.jpg
    303.8 KB · Views: 5
  • DA6DEB52-B7AE-4E1E-8EE6-1DB529F21119.jpg
    DA6DEB52-B7AE-4E1E-8EE6-1DB529F21119.jpg
    276.6 KB · Views: 7

pRoFiT

Can't buy it?, build it!
Messages
1,135
Reaction score
32
Location
California
Wow this thread seemed vaguely familiar. i Looked at Texan threads and sure enough i helped Texan figure out what bike this was when he got one. :)

Nice find areams, looks like you are making good progress. um..Are you in high school? looks like shop class :)
 

areams

New member
Messages
74
Reaction score
0
Location
Iowa
Thanks, I figured those that had helped out with some questions would like to see some progress.

You’re not wrong! It is shop class. It’s been a great project for the kids to learn with. Love having people with experience on this site help me out with some tips (like how the forks come apart). First mini bike for me so even I’m learning some stuff!
 

areams

New member
Messages
74
Reaction score
0
Location
Iowa
Got the front forks painted and reassembled today. I was worried about painting the tubes that slide inside the lower fork tubes but after greasing and assembling, no problems at all!

Replaced both springs and cups with some from omb warehouse. Little larger diameters than the originals but look great and are a little stiffer than I thought. Should be perfect though.
 

Attachments

  • 56AA67A5-2249-4078-854E-383BDE8BAE97.jpg
    56AA67A5-2249-4078-854E-383BDE8BAE97.jpg
    286.4 KB · Views: 9

areams

New member
Messages
74
Reaction score
0
Location
Iowa
And finished. Still need to strip and repaint the tank, but it’ll do for now. I was a little disappointed I wasn’t able to use my torque converter with this chassis and motor Combo but oh well. It will get the original motor put back on eventually, just wanted to break in my GX140 build first. :wai:
 

Attachments

  • 6129DE0A-5A22-4156-9D07-91454DB55E3A.jpg
    6129DE0A-5A22-4156-9D07-91454DB55E3A.jpg
    315.3 KB · Views: 12

areams

New member
Messages
74
Reaction score
0
Location
Iowa
Sweet!!!!

Does the air filter not get in the way of your leg?


Thanks! I added a wood dowel for now for an extension foot peg. Without it I could get my heel on the peg and clear the carb and filter. With the peg added it’s much easier to get most of my foot on there.

Once I put the HS40 back on there, I will get new foot peg grips and make it appear more original. That puts the carb straight back instead of to the side.
 

Texan

Senor Member
Messages
461
Reaction score
2
Location
Deep In The Heart of Texas
Nice job bringing it back to life :thumbsup: I sourced some of the original style Hunt Wilde foot peg grips for my bikes, had to buy them in bulk, so I have extras if you need a pair.
 
Status
Not open for further replies.
Top