Noob questions

Status
Not open for further replies.

Shadow9

New member
Messages
13
Reaction score
0
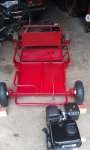
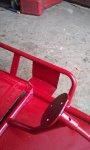
Picked up what I believe is a carter bros super wheels from the 60s or 70s. It is a 2 seater, no roll bar, no belts, no engine so I got a predator 212cc at HF. Next I will need a clutch and chain; possibly brakes. Should be a good first project for me and 2 boys, 7 and 9, so we can work our way up to a cobra replica in 8 years or so.

So my first question is how do I determine whether the sprocket on the drive wheel accepts a #35, 40 or other chain size?

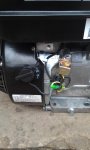
The brake setup on this cart is neither a friction strap, drum nor disc brake. It is basically a flat metal flap attached to a lateral torsion bar which is connected by a rod to the brake pedal. It is the same brake technology as a covered wagon so i call it a buckboard setup. I want to convert it to a friction strap setup but need to know what sort of bracket or other hardware I need for a friction strap.

Can someone post pics of a friction strap set up for me to use as a go by?

I will post a couple of pics when I figure out how to do so.

Thanks
 

Shadow9

New member
Messages
13
Reaction score
0
I realize now my brake setup description is incomplete. The flat metal flap applies directly to the rear tires when the brakes are actuated.
 

souperman000

New member
Messages
2,466
Reaction score
10
Location
Westlake Village, CA
To determine what size chain you need, measure the distance fromm tooth tip to tooth tip.

3/8" = #35
1/2" = #40/41 I believe

Your brake set up is called scrub brakes. Maybe that will help you in searching.

:welcome2: to the forum!
 

Shadow9

New member
Messages
13
Reaction score
0
Kill Switch for a 212cc

I want to add a kill switch on this kart rebuild and I have a Pred 212 engine for it. There is an on/off switch on the front of the engine.

Would it be as simple as mounting a switch and bracket somewhere near the driver side seat, and wiring it directly into the engine on/off switch in series so that either the driver switch or the engine switch would kill the engine?

Is there a way to determine the minimum voltage/amperage I would need for the kill switch?
 

mckutzy

Well-known member
Messages
8,353
Reaction score
108
Location
bc, canada
You can disconnect (if you haven't already, you should) the low oil shutoff sensor, (simply a wire connection), and hook up a momentary on switch to that, and to a ground in contact with the motor. Just a press and it shuts off. A couple of feet of wire and a button is all you need.
 

Shadow9

New member
Messages
13
Reaction score
0
Low oil sensor

Which wire is the low oil sensor? I assume it is one of these near the on/off switch. The third pic is where I would mount the kill switch.
 

Attachments

  • Eng off switch.jpg
    Eng off switch.jpg
    77.6 KB · Views: 23
  • Front view 1 after.jpg
    Front view 1 after.jpg
    91.1 KB · Views: 15
  • Swich mount point.jpg
    Swich mount point.jpg
    75.6 KB · Views: 11

KartFab

Active member
Messages
3,381
Reaction score
57
Location
Dallas, TX
The yellow wire that comes out of the lower portion of the block is the low oil wire. Disconnect it and the engine will run just fine.

If you want to hook up a kill switch all you need to do is ground out the wire that leads into the kill switch on the engine (e.g. Cut or disconnect the black wire that runs from that plastic wire holder to the kill switch on the engine). Connect the kill switch wire to the end coming from the wire harness, and tada! (When I say ground out I mean it. Make sure the new kill switch is mounted to a spot with bare metal or your kill switch wont work)

(also, if you want the original kill switch to work, just "tie in" to the wire between the plastic wire harness and the kill switch, then both switches will work).
 

KartFab

Active member
Messages
3,381
Reaction score
57
Location
Dallas, TX
You can disconnect (if you haven't already, you should) the low oil shutoff sensor, (simply a wire connection), and hook up a momentary on switch to that, and to a ground in contact with the motor. Just a press and it shuts off. A couple of feet of wire and a button is all you need.

That way works too! Just ignore what I said, it is much simpler to do it his way.
 

OzFab

Well-known member
Messages
15,615
Reaction score
69
Location
Warwick Qld, Australia
You can disconnect (if you haven't already, you should) the low oil shutoff sensor, (simply a wire connection), and hook up a momentary on switch to that, and to a ground in contact with the motor. Just a press and it shuts off. A couple of feet of wire and a button is all you need.

That's a great idea, I never thought of using the low oil sensor as a kill switch
 

mckutzy

Well-known member
Messages
8,353
Reaction score
108
Location
bc, canada
Ya that wire connector is a good connection point. It doesnt studder and it at one push, in an emergency(It did come in handy for me in a chain fly off, at speed) works well with no modification of the engine.
Also you can restart easy after stopping, where as if you forgot the off switch(modified kill/stop) in the off position, you would be there all day and nothing.

Another Idea, is with a small bracket and a pin, a momentary OFF switch, could be used to make a brake-away kill(like on a jet ski or the like) with a lanyard.
 

Shadow9

New member
Messages
13
Reaction score
0
3/4 axle to a 1 in hub

My kart has a live axle but was set up as one wheel drive when I got it. To convert it back, I need a live axle hub for the passenger side rear, but cannot find a matching hub with a 3/4 inner diam. There are many hubs available with a 1 in inner diam so if I could use a 1 incher, it would be less costly.

So does anyone have a solution to fit a 1 in ID hub to a 3/4 in live axle with a 3/16" key way?

This forum makes rebuilding a kart easy, but also makes you want to build another, and another . . .
 

OzFab

Well-known member
Messages
15,615
Reaction score
69
Location
Warwick Qld, Australia
There's two ways to go here, depending on how much money you want to spend:
1. You could get a spacer for the 1" hub, keeping in mind, you'll need a rectangular key.
2. Upgrade to a 1" axle. The beauty part here is 3/4" bearings & 1" bearings have the same OD so, you wouldn't need to mess around changing the axle mounts, only the bearings & axle itself, then find 2 1" hubs to fit your existing wheels & you're good to go
 

Shadow9

New member
Messages
13
Reaction score
0
The HF wheels were on sale for $4 apiece so I had to get them. I will switch to Kenda tires soon, after burning through the HF tires.
 

landuse

Moderator
Staff member
Messages
18,763
Reaction score
545
Location
Pietermaritzburg, South Africa
The HF wheels were on sale for $4 apiece so I had to get them. I will switch to Kenda tires soon, after burning through the HF tires.

That means you are going to buy Kendas the same day you start riding. That is generally how long those HF tyres last. The rims just buckle and break, and the rubber wears through in hours.
 

Shadow9

New member
Messages
13
Reaction score
0
Correct you are. The first HF hub broke after 1 hour; I rebuilt the old wheel with the tube and tire from the broken HF. The second HF broke after the second hour, but had a spare lawnmower wheel at hand so was only down for a few minutes.

Next week, I convert it back to a live axle once I get the other LA hub I ordered today.
 
Status
Not open for further replies.
Top