My Ken-Bar Streaker build.

Seventy Won

Member
Messages
33
Reaction score
16
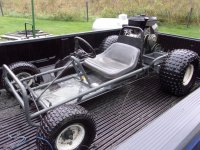
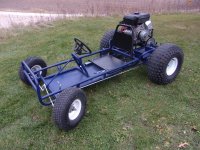
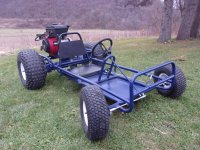
This is my first cart. Since you guys have kindly answered a few of my dumb questions, I thought I'd post up a few pics of my progress.

It was given to me by a friend. It had been given to him by one of his friends to repair in small engine class in High School. According to my friend "I never touched it. We just goofed around in small engine class". "The guy who gave it to me told me that all he thought it needed was a carb".

He had tried to give it away but the guy never came for it. I asked about it one day and it became mine on the spot.

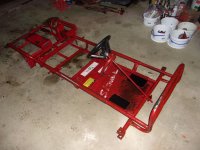
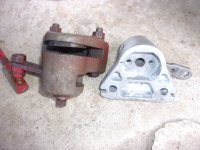
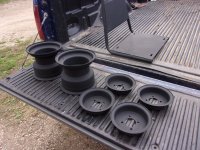
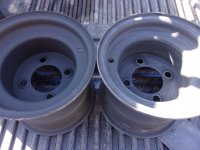
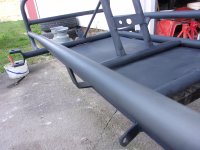
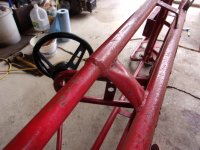
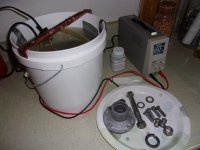
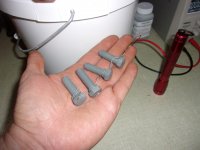
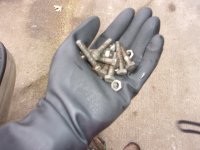
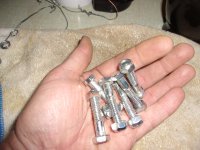
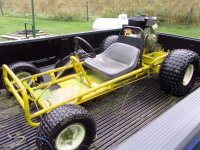
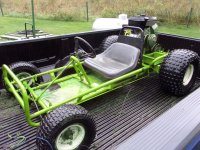
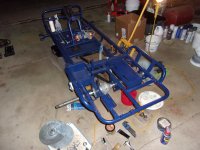
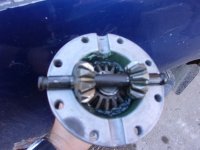
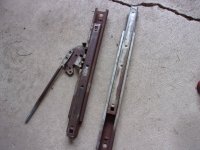
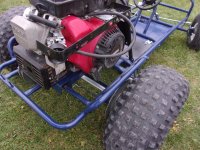
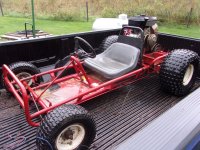
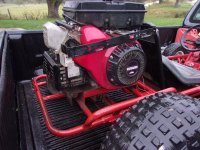
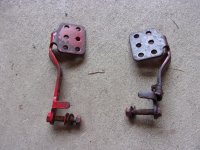
I didn't know if it was junk or not. The front tires were badly cracked. The rear tires had multiple plugs and didn't hold air. The carb, elbow and air box were missing. The battery, key and seat were also long gone. The front wheel bearings were bad. The rear axle bearings were questionable. One brake lever (on the caliper) was literally broken. The gas peddle had been cut/broke and re-welded...poorly. The fuel tank was badly cracked. The rope starter was missing.

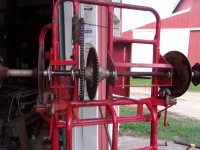
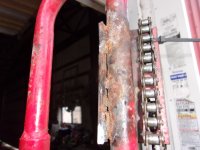
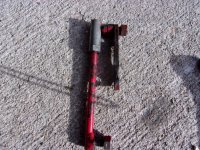
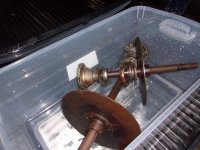
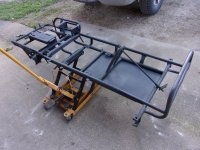
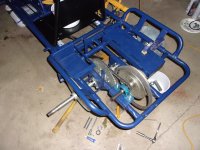
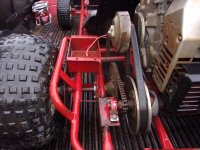
Midway into the resto I learned that the jack shaft was shot. The bearing nearest the drive had gone south and allowed the shaft to wobble. This wobble was masked by the belt tension. This wobble eventually cracked the frame under the bearing pillow block.

The rust was pretty extensive.

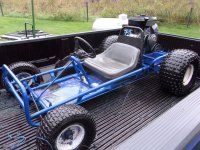
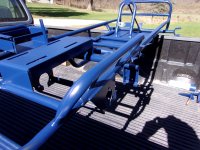
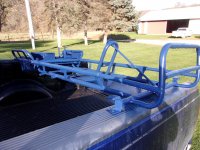
Despite this, I'm redoing it.


.
 

Attachments

  • 101_0841.JPG
    101_0841.JPG
    2.4 MB · Views: 42
  • 101_0842.JPG
    101_0842.JPG
    2.3 MB · Views: 41
  • 101_0843.JPG
    101_0843.JPG
    2.5 MB · Views: 37
  • 101_0844.JPG
    101_0844.JPG
    2.4 MB · Views: 33
  • 101_0870.JPG
    101_0870.JPG
    2.4 MB · Views: 33

Seventy Won

Member
Messages
33
Reaction score
16
I got it running for about $30. A $22 Chinese carb, $7 rope starter, quart of oil and plug was all that it needed. The test ride shocked me...and almost killed me. It's really got some punch. It doesn't have brakes...at all. Nothing.

The engine idled for 30 minutes without overheating, smoking or rattling. There is no valve noise, no piston slap, no rod knock and no smoke.

Tear down was a chore. Everything had to be pressed apart. Heat and beat. Heat and beat. Rinse and repeat.

2nd pic shows the rather clobby looking repair under jack shaft.
3rd pic shows broken brake arm.

This one has a differential. It must have been a relatively spendy rig when new. It was sold locally in 1995 so I headed across town and talked to the man who sold it new but he didn't have too much information on it. He did praise the engine. According to him these Briggs and Stratton Vanguards were assembled in Japan for the Japanese market and were of very high quality. They were commonly used on generators. This one is 9 HP.
 

Attachments

  • 101_0882.JPG
    101_0882.JPG
    2.5 MB · Views: 14
  • 101_0885.JPG
    101_0885.JPG
    2.4 MB · Views: 12
  • 101_0889.JPG
    101_0889.JPG
    2.4 MB · Views: 12
  • 101_0899.JPG
    101_0899.JPG
    2.6 MB · Views: 15

FlyFrog

Active member
Messages
467
Reaction score
127
Location
Kankakee Illinois
Very impresive that it didnt burn oil or anything, i have a newer briggs and it had about 15 hours on it (hard riding time) and at the end it had absolutley no compression to speak of
 

Seventy Won

Member
Messages
33
Reaction score
16
I will be watching the progress you make on this

Thanks. If you have any questions, just ask.

Down to the frame. I started each day by brushing phosphoric acid on the more heavily rusted areas. I love this stuff. It's a bit safer than Muriatic acid and does pretty much the same thing, just slower. Without a sandblaster, it allowed me to see how bad things really were. Thankfully I didn't find any holes or soft spots.

The frame was covered in about 22,000 weld BB's. I could hardly pick it up or roll it over without a weld BB digging into my hand. This thing was rougher than a cob and that won't do. The plan is to knock all the weld BB's off it, get it sandblasted and put into epoxy primer.


Note the ice cream buckets. Every nut, bolt, screw, spring and washer has been bagged, tagged and labeled (twice). Each bag has it's own bucket.

I bought an 18lb. HF vibratory Tumbler and 10lbs of their abrasive media (highly recommended). The contents of each bag and bucket will be taking a trip through it. I added a little phosphoric acid to it and things cleaned up exceptionally well.
 

Attachments

  • 101_0895.JPG
    101_0895.JPG
    2.4 MB · Views: 11
  • 101_0923.JPG
    101_0923.JPG
    2.6 MB · Views: 8
  • 101_0973.JPG
    101_0973.JPG
    2.5 MB · Views: 7
  • 101_0975.JPG
    101_0975.JPG
    1.6 MB · Views: 7
  • 101_0971.JPG
    101_0971.JPG
    2.8 MB · Views: 11

Seventy Won

Member
Messages
33
Reaction score
16
Very impresive that it didnt burn oil or anything, i have a newer briggs and it had about 15 hours on it (hard riding time) and at the end it had absolutley no compression to speak of

That's a shame. Sadly things just aren't built like they used to be. This cart has had a rough life and yet the engine is still solid. There is evidence of previous collision repair to the front of the frame. This thing has been a real wallet cleaner. A junk engine would have certainly forced me to abandon the project.

Back in black!

The seat frame, rims and chassis got sandblasted and primed in PPG epoxy primer. The guy who did it has a 175 CFM industrial blaster. It got rid of the weld BB's my grinder couldn't reach.

I spent the next two days hand sanding every inch of it with 600 grit wet/dry paper. I've had girlfriends that didn't feel this nice. What a change!

You gotta have good flat primer to get good paint.
 

Attachments

  • 101_0927.JPG
    101_0927.JPG
    2.8 MB · Views: 8
  • 101_0936.JPG
    101_0936.JPG
    2.6 MB · Views: 8
  • 101_0943.JPG
    101_0943.JPG
    2.8 MB · Views: 9
  • 101_0951.JPG
    101_0951.JPG
    2.8 MB · Views: 9
  • 101_0903.JPG
    101_0903.JPG
    2.7 MB · Views: 9

Seventy Won

Member
Messages
33
Reaction score
16
I bought a kit from Caswell (including 5amp DC power supply) and got started zinc plating the hardware. The biggest disappointment I had with my 3 wheeler restoration was how all the hardware rusted immediately after it was completed. On that project, all the hardware had been cleaned with a wire wheel, repainted and re-installed.

I didn't want that to happen on this project.

Even the brake rotors got zinc plated. It took all 5 amps to do it but they came out pretty well. The finish can't be scratched, is corrosion resistant and is non-dimensional at just .0001 thick.

Pic 1. If zinc plating hardware in my kitchen is wrong, then I don't want to be right.
Pic 2. Freshly zinc plated bolts. Starting with clean hardware, the process just takes 5-20 minutes.
Pic 3. Plating the rotors required a larger bucket.

You can even make 'em nice and shiny.

Pic 4. Differential bolts. Before.
Pic 5. Differential bolts. After.
 

Attachments

  • 101_0992.JPG
    101_0992.JPG
    2.4 MB · Views: 7
  • 101_0995.JPG
    101_0995.JPG
    2.7 MB · Views: 6
  • 101_1018.JPG
    101_1018.JPG
    2.6 MB · Views: 5
  • 101_1038.JPG
    101_1038.JPG
    2.7 MB · Views: 5
  • 101_1047.JPG
    101_1047.JPG
    2.7 MB · Views: 8

Seventy Won

Member
Messages
33
Reaction score
16
Color selection.

I liked the stock red w/white wheels. I also wanted something different. Yellow w/silver wheels was my first choice but the primer was black and yellow was gonna be tough to do. Green looked good too.

To visualize it I opened up Gimp, loaded the photo and tweaked the color range. https://www.gimp.org/
 

Attachments

  • Stock.JPG
    Stock.JPG
    2.4 MB · Views: 10
  • Yellow.JPG
    Yellow.JPG
    9 MB · Views: 11
  • Green.JPG
    Green.JPG
    8.2 MB · Views: 10
  • Silver.JPG
    Silver.JPG
    7.4 MB · Views: 9
  • Blue.JPG
    Blue.JPG
    8.3 MB · Views: 10

Denny

Canned Monster
Messages
8,435
Reaction score
4,669
Location
Mayberry, Indiana
Looking good! Should have wet sanded with 400 grit though. It’s got more tooth for the paint to bite. I dig the blue or the green. The silver just lays there and red. Is too loud and easy for the cops to find you!
 

Seventy Won

Member
Messages
33
Reaction score
16
In the end I chose "International Gloss Blue". It's an Ace Hardware color and should be commonly available for easy touch-ups.

I'm really not a blue guy, but it's growing on me. I wet sanded it with 600 grit wet/dry paper. It's a tad darker than what I came up with on the computer but think it'll look sharp with white wheels and red engine.

Then re-assembly began.
 

Attachments

  • 101_0953.JPG
    101_0953.JPG
    2.6 MB · Views: 7
  • 101_0954.JPG
    101_0954.JPG
    2.5 MB · Views: 6
  • 101_0962.JPG
    101_0962.JPG
    2.7 MB · Views: 7
  • 101_1052.JPG
    101_1052.JPG
    2.4 MB · Views: 6

Seventy Won

Member
Messages
33
Reaction score
16
Looking good! Should have wet sanded with 400 grit though. It’s got more tooth for the paint to bite.

Thanks! I was torn on whether to use 400 or 600 grit. I know 600 is generally recommended for metal flake paint since it won't allow the flakes to "stand up"....it basically forces the flakes to lay down and that gives metal flake its best appearance.

Hopefully it sticks. Lol.

This is also a gloss paint and was warned against using it on a beat-up old go kart like this. Satin was the recommended choice but I had that on a motorcycle and hated it.

In the end I decided that I might be able to pull off gloss due to the effort I put into sanding it and making it as clean and level as possible.
 

Seventy Won

Member
Messages
33
Reaction score
16
Pic. 1. Differential assembly was a tad trickier than I expected. The sprocket will only mount to one side. I sealed it with a tube of black RTV, packed both side full of grease and then had to do it all over again..twice.

Pic. 2. The new jack shaft assembly is perfect. New bearings, new shaft and new bearing pillow. Cast iron too! (as recommended by a member here). Good call Sir!

Pi.c 3. New pedals looked nice but had under-sized holes for my control rods. These holes were also located at the edge of the pedal and could not be simply drilled over-size. The solution? Hand file them with my chain saw file. My hands still hurt.

Pics. 4 and 5. The seat rails wouldn't even move last month. They were rusted solid. A soak in Muriatic acid, a quick wash in de-greaser and a 5 amp soak in the zinc plating bath brought them back to life....mostly. My unit ran out of power on them. Also, plating the outside is easy. Plating the insides was nearly impossible. They sure look good but in the end I decided to replace them with new. You can't save everything.
 

Attachments

  • 101_1058.JPG
    101_1058.JPG
    2.6 MB · Views: 13
  • 101_1070.JPG
    101_1070.JPG
    2.5 MB · Views: 15
  • 101_1060.JPG
    101_1060.JPG
    2.5 MB · Views: 11
  • 101_0873.JPG
    101_0873.JPG
    2.8 MB · Views: 10
  • 101_1026.JPG
    101_1026.JPG
    2.8 MB · Views: 11

Seventy Won

Member
Messages
33
Reaction score
16
As it looks today...

The to-do list is getting shorter. I need to rebuild the seat. It came with an old lawn mower seat but that was never attached to it and I'd like to try and get this thing as close to stock as possible.

The silver paint I used for the control rods absolutely does not stick. It's also very soft. I have no idea what happened but that needs to be re-done.

I need to hook up the throttle cable to the engine.
I need to install the choke, wire-up the push button starter and get a battery for it.
I have new grip tape to place under the pedals.
The K&N style air filter should be here soon.

This winter I plan to remove the tins from the engine and repaint them. I also need to source a cover for the starter motor. The bracket for the air box is also going to be changed/ altered or replaced. Without the stock air box, it's pretty useless and very crappy looking.

I'm getting closer though. LOL.

THANK YOU FOR ALL THE HELP!!!

I've read a lot of posts here and found a ton of very useful information.

~ John
 

Attachments

  • 101_1077.JPG
    101_1077.JPG
    2.8 MB · Views: 20
  • 101_1078.JPG
    101_1078.JPG
    2.4 MB · Views: 18
  • 101_1087.JPG
    101_1087.JPG
    2.5 MB · Views: 18
  • 101_1082.JPG
    101_1082.JPG
    2.4 MB · Views: 18

FlyFrog

Active member
Messages
467
Reaction score
127
Location
Kankakee Illinois
That's a shame. Sadly things just aren't built like they used to be. This cart has had a rough life and yet the engine is still solid. There is evidence of previous collision repair to the front of the frame. This thing has been a real wallet cleaner. A junk engine would have certainly forced me to abandon the project.
i have a 60s/70s brigg and all it needed was a diaphragm in the carb
 

Seventy Won

Member
Messages
33
Reaction score
16
Bad news about the blue paint though. In the state of California it has been known to cause cancer. So you better stay out of California! :thumbsup:

California doesn't have to worry about seeing me anytime soon. Although a road trip on the cart does sounds fun.

Now, where to mount the saddle bags... :unsure:
 

Denny

Canned Monster
Messages
8,435
Reaction score
4,669
Location
Mayberry, Indiana
You could also bend up a cover quite easily. But I got to warn you, in the state of California it has been known to cause reproductive harm to unborn babies.
Do not ride in California.
 
Top