

You are using an out of date browser. It may not display this or other websites correctly.
You should upgrade or use an alternative browser.
You should upgrade or use an alternative browser.
My First Build - Modifications
- Thread starter souperman000
- Start date
- Status
- Not open for further replies.

Doc Sprocket
*********
http://www.napaonline.com/Catalog/CatalogItemDetail.aspx?R=BK_7651210_0361074268
That is the closest thing I could find at NAPA (Don't want to spend 20 bucks on sealant either). Is that the right kind?
Being a brush applicator, how would be the best technique to apply it? Just rub around the edges of the pump or open it up?
That'll do it. Disassemble the pump, apply goo, re-assemble.

jamyers
Well-known member
I picked up a jar of the Permatex Avation #3 yesterday at O'Reilly, iirc it was 6-7 bucks for a huge jar that'll last me several years unless I leave the cap loose and ruin it before then.

souperman000
New member
I picked up a jar of the Permatex Avation #3 yesterday at O'Reilly, iirc it was 6-7 bucks for a huge jar that'll last me several years unless I leave the cap loose and ruin it before then.
Just picked up the bottle in my link. That, and a new spark plug for my goped cost me under 8 and a half bucks at NAPA.
The new plug basically fixed my scooter. I'll get around to using the sealent in a few hours. Should I just brush it around the inside edges as ToyStory suggested? I'm a bit uncomfortable doing that because there are gaskets and stuff inside. I would hate to restrict gas flow where I actually want it to flow.

souperman000
New member
It's my understanding that this is a diaphragm pump, and if it is, it isn't much different than an outboard pump, which I have had a good deal of experience with as of late.
Have you identified why it is leaking? i.e. tear in gasket, flaw in plastic housings, etc..
Once you identify the issue, you can effectively fix it, and may be able to identify future issues and prevent them as well.
If you were to post a few pics of the internal components in the order of assembly, I might be able to pinpoint where and how much to apply, aviation permatex holds on for dear life, so be careful applying it to gaskets as you stated above, parts are not readily available.
Yeah, I'll try and get some pics this afternoon. I think just the gaskets are bad. I have yet to find a compatable rebuild kit on ebay.

Yeah, I'll try and get some pics this afternoon. I think just the gaskets are bad. I have yet to find a compatable rebuild kit on ebay.
Have you thought about cutting your own out of something like this?
http://www.lawnmowerpartsoutlet.com/Gasket-Material-Sheet-Universal_p_4692.html

denhammotors
Member
Have you thought about cutting your own out of something like this?
http://www.lawnmowerpartsoutlet.com/Gasket-Material-Sheet-Universal_p_4692.html
You can also find the same stuff at the hardware store.
souperman000
New member
Here are the pics.
Build order - left is the back plate, right is the top. Pic 2 is just everything flipped over.
Build order - left is the back plate, right is the top. Pic 2 is just everything flipped over.
Attachments
-
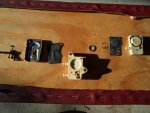 SAM_1167.jpg114.1 KB · Views: 22
 -
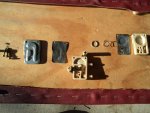 SAM_1168.jpg121.1 KB · Views: 21
souperman000
New member
Anyone who has worked on any Briggs engine, specifically lawnmowers and flatheads, know that the gaskets they use have a check valve 'flap' made into them, thus not allowing anyone to effectively DIY a gasket, due to the bowl not filling up without that all important 'flap'.
Let me do some fancy paint work on the 2 photos to show you where NOT to put the permatex.
Sounds good! thanks a bunch.
Doc Sprocket
*********
Yup- That's about the extent of it. Please note that Briggs didn't just do it to be a PITA for the DIY-guy. In all cases, it is a necessity for fuel pump operation. I have 2 of those pumps for my 18hp Oppy Twin. All I can hope is that at least one works!
souperman000
New member
OK, well I suck at photo shop, but I can fix anything. The raised rib on the center housing is where you need to apply a thin coat. This stuff is pretty thin, so use sparingly to keep it from running into places it shouldn't be, if memory serves, the instructions say to allow to become tacky prior to assembly. I'm thinking that since there aren't any visible tears in the gaskets, that they are just old and compressed beyond their service life. You may want to apply 2 coats to be sure.
Is the raised rib the part I circled in red?
Attachments
-
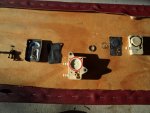 fuel pump.jpg212 KB · Views: 9
Doc Sprocket
*********
I might be over thinking it, but if you have access to a straight edge(metal ruler in like new condition, finished edge of a piece of glass) make sure the outer half's mating surface is true. Do this by holding the tool of choice perpendicular to the surface and holding it up to a light source, if you can see light peeking through, it is warped, and should be milled true. This can be achieved simply by using some 200-300 grit sand paper and a window, since the glass is flat, lay the paper down on the glass and apply firm pressure squarely on the half, and move in a figure 8 motion. It wont take much with plastic, but it will ensure a good seal.
Good tip!
souperman000
New member
Finally have some time freeing up after school (Just took the SAT ) so hopefully I will apply the sealent either today or tomorrow.
I'll make sure to take my time and stay right on that ridge. .
.
) so hopefully I will apply the sealent either today or tomorrow.I'll make sure to take my time and stay right on that ridge.
.I'll make sure to take my time and stay right on that lip
That sounds like something out of a cheap smut novel.


souperman000
New member
 edited.
souperman000
New member
Well...just did the deed. Brought it inside to dry overnight, out of the cool and damp. We will see how it works tomorrow I guess!
souperman000
New member
I intalled it and tried to start the engine. No go, Engine wouldn't start. Gas was on, kill was on, tried it with choke on/off, spark plug boot was in, Gas in the tank.
Only thing I can think of is either not enough gas in the tank (it has run on less before) or I put the hoses on wrong. From the pics I have, I'm pretty sure I put them on correctly.
Any ideas? I will try again tomorrow after school.
Only thing I can think of is either not enough gas in the tank (it has run on less before) or I put the hoses on wrong. From the pics I have, I'm pretty sure I put them on correctly.
Any ideas? I will try again tomorrow after school.

That doesn't mean two seats simultaneously, Could be one after the other! I did sumpin' like that! No seat belt. Lap belt. Shoulder belt. 4-pt harness. My upgrade list coulda looked like this:
Restraints
Engine tweaks
Speedo
Restraints
Front suspension
Restraints
Rear suspension
Bike engine
LOL...
jamyers
Well-known member
I intalled it and tried to start the engine. No go, Engine wouldn't start. Gas was on, kill was on, tried it with choke on/off, spark plug boot was in, Gas in the tank.
Only thing I can think of is either not enough gas in the tank (it has run on less before) or I put the hoses on wrong. From the pics I have, I'm pretty sure I put them on correctly.
Any ideas? I will try again tomorrow after school.
Still have Gas in carb float bowl? Oughta start/run for a minute or so on just that...
I'll look and see if I have my old pump and if it has any markings on it.

OzFab
Well-known member
Did you prime the whole system?
- Status
- Not open for further replies.