FreeRunner15
=======
These pages will be me either:
Tuning a part
Adding a part. whether it be visually,electronically, or performance wise & much more etc.
Will also include Me putting the kart to the tests i set up with these tires i am currently using. Keep scrolling down and you will see them later. The Fronts AND the Backs.
--------------------------------------------------------------------------------
So...
Beginning .. i really don't want to type that far long ago right now, Let's just skip to the good stuff.
-----------------
and i have an ARC Billet material Connecting Rod as shown below \\//

----------------------------------------------------------------
So THAT being accomplished and said, I installed 18 pound valve springs to DOUBLE the stock rpm and power output. It put out more Horsepower but it took away some Torque but i plan on gaining that lost torque with a carburetor bore and the already-accomplished fuel tune known as main jetting and emulsion tube jetting.
It took me a few days to learn when to adjust the carb .
Doing what i did for a fuel upgrade will nearly eliminate the ability to idle correctly but the power gained really makes up for it.
---------
some Flair
Under Glow :
i bought a waterproof led strip with color choices of Blue, Red, or Green. This pic happens to be the color Blue. :

It looks like a blue/purple in the pic but its real blue in person.
-------------------------------
\\ Electricals :
Tachometer mounting spot:

----------------------------
Ignition :
Purchased a spark plug that is able to ignite a slightly richer-than-normal combustion ratio. Has more spark than stock:

Definitely looks different and can handle a tougher Load.
-----------
-- ----------------
Air Intake
*Will be boring carburetor and show progress And with Video.
*Will be experimenting and test how much boost of air and fuel this thing can compress.
Unit of measurement: P.S.I.
---------------------------------------------
-----------------------------------
Removed Governor :
Did not want to limit my RPMs in fact i wanted to gain them So i removed the governor.
-----------------------------
---------- Post added at 03:12 AM ---------- Previous post was at 03:01 AM ----------
Gearing:
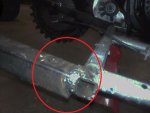
Here is the 48 tooth sprocket:

and i made a 12tooth vs 10 tooth visual comparison of the TAV30 :
https://www.youtube.com/watch?v=GaUjikKtZec
The 12 toother is what i currently use therefore giving me a 4:1 ratio.
Transmission:
got the TAV30 torque averter. Has 3 gears: Low, Medium, High and an overdrive.
Here is the TAV30 in action:
https://www.youtube.com/watch?v=xYcNkvKDlzA
//\\ Notice how quickly it "jumps" into high gear. That is how quickly my tires lose traction..great for drifting I just need a live axle but MUCH prefer a limited slip differential so i can turn better.
Tuning a part
Adding a part. whether it be visually,electronically, or performance wise & much more etc.
Will also include Me putting the kart to the tests i set up with these tires i am currently using. Keep scrolling down and you will see them later. The Fronts AND the Backs.
--------------------------------------------------------------------------------
So...
Beginning .. i really don't want to type that far long ago right now, Let's just skip to the good stuff.
-----------------
and i have an ARC Billet material Connecting Rod as shown below \\//
----------------------------------------------------------------
So THAT being accomplished and said, I installed 18 pound valve springs to DOUBLE the stock rpm and power output. It put out more Horsepower but it took away some Torque but i plan on gaining that lost torque with a carburetor bore and the already-accomplished fuel tune known as main jetting and emulsion tube jetting.
It took me a few days to learn when to adjust the carb .
Doing what i did for a fuel upgrade will nearly eliminate the ability to idle correctly but the power gained really makes up for it.
---------
some Flair
Under Glow :
i bought a waterproof led strip with color choices of Blue, Red, or Green. This pic happens to be the color Blue. :
It looks like a blue/purple in the pic but its real blue in person.
-------------------------------
\\ Electricals :
Tachometer mounting spot:
----------------------------
Ignition :
Purchased a spark plug that is able to ignite a slightly richer-than-normal combustion ratio. Has more spark than stock:
Definitely looks different and can handle a tougher Load.
-----------
-- ----------------
Air Intake
*Will be boring carburetor and show progress And with Video.
*Will be experimenting and test how much boost of air and fuel this thing can compress.
Unit of measurement: P.S.I.
---------------------------------------------
-----------------------------------
Removed Governor :
Did not want to limit my RPMs in fact i wanted to gain them So i removed the governor.
-----------------------------
---------- Post added at 03:12 AM ---------- Previous post was at 03:01 AM ----------
Gearing:
Here is the 48 tooth sprocket:
and i made a 12tooth vs 10 tooth visual comparison of the TAV30 :
https://www.youtube.com/watch?v=GaUjikKtZec
The 12 toother is what i currently use therefore giving me a 4:1 ratio.
Transmission:
got the TAV30 torque averter. Has 3 gears: Low, Medium, High and an overdrive.
Here is the TAV30 in action:
https://www.youtube.com/watch?v=xYcNkvKDlzA
//\\ Notice how quickly it "jumps" into high gear. That is how quickly my tires lose traction..great for drifting I just need a live axle but MUCH prefer a limited slip differential so i can turn better.