• OFF TOPIC fun forum - NO politics - NO religion - NO jerks. It's not complicated. Thanks!

My 750cc Suzuki Powered buggy rolling spectacularly!

Status
Not open for further replies.

andrecht

Jup, picture = me
Messages
274
Reaction score
0
Location
Germiston, South Africa
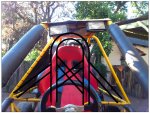
Today we put our Suzuki 750cc Powered Sabretooth buggy to the ultimate test....the roll crash test!!
Thankfully I am particular about safety, so I installed a proper 5-point harness and always ride with a proper helmet.
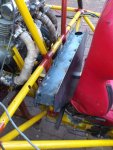
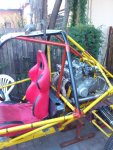
Walked away from the crash unscathed, but the buggy frame did not end-up very well.
I totally underestimated how much force is involved when rolling a buggy.
Here is a video from the crash:

http://youtu.be/cexuUg5KXLY

Any suggestions on repairing the damage on the frame??
 
Last edited:

Joe-405

Enjoying New Projects
Messages
2,673
Reaction score
69
Location
U.S.A.
Glad your ok, But i dont see any roll cage gussets anywhere. Those help alot. They are standard on drag car stuff that im used to working on with my friends stuff..................

Examples...........


OzFab

New member
Messages
15,615
Reaction score
8
Location
Warwick Qld, Australia
Any suggestions on repairing the damage on the frame??

Unfortunately, the only way to properly fix that is to replace the bent pieces, completely, not just the bent section...

Once steel is bent, it can't be unbent; sheet is difficult enough to straighten, tube is almost impossible & not worth the time it takes to get it right. The thing is, metal doesn't just bend, it stretches &, shrinking metal back into shape is not easy...
 

fowler

New member
Messages
5,463
Reaction score
0
Location
Bullsbrook West Aus
Any suggestions on repairing the damage on the frame??

Depends how dodgy u are
The proper way is to live and learn
Chop out the front hoop and roof rails then replace
With some guests in the lower corners of the front hoop

Or how I'd end up doing it on the cheap
Tie the back end to a tree

Get a front end loader or similar device
Weld a brace behind the front bend in the roll bar
Chain it to the bucket
Pull back with the chain at a 15* angle up

Remove brace
Finish any smaller bends with bars/ hammers
Install gussets

It won't look new but it would work
 

andrecht

Jup, picture = me
Messages
274
Reaction score
0
Location
Germiston, South Africa
Ok, stopped at CRD (corporate racing developments) today and chatted to a very friendly gentleman by the name of Arnold.
He proposed to straighten the the frame and replace the kinked tubes. Additionally he suggests that I install a roll-bar behind the seat made from 1' chrome-molly tube mounted directly to the bottom sub-frame independent from the top half of the frame..

Ill take the trailer around tomorrow for a "rough" estimate....
My wife is pretty peeved as it is about my "childish" hobby, hoping Arnold understands my "situation", and is kind with his estimation......
 

Attachments

  • Drawing1.jpg
    Drawing1.jpg
    198.3 KB · Views: 13

fourtogo

New member
Messages
201
Reaction score
0
welds

Glad your ok, But i dont see any roll cage gussets anywhere. Those help alot. They are standard on drag car stuff that im used to working on with my friends stuff..................

Examples...........


Why would they grind the welds on the dimple plates in the photo's ? . I have seen many many rollcages built >in Sport/Compact Cars / Drag Cars / Time Attack / Chris Rado's cars / Team Bergenholzt / D3 Cadillac Racing done at my buddies shop . And never seen him grind down any weld on a cage.
 

andrecht

Jup, picture = me
Messages
274
Reaction score
0
Location
Germiston, South Africa
Realistically, you need more headroom too. Nice roll, that had style points

Additional head room will be one of the changes we intend to make.

1) We want to lengthen the double A arms both front and rear with 150mm per side
2) Include shock mounting adjustment (to increase & decrease ride height)
3) Lower seating position
4) Arm & Leg restraints
5) ***Most Important*** braided fuel hoses with solenoid cut off switch mounted on fuel tank.

Graduating from the school of HAD KNOCKS....
 

redsox985

Active member
Messages
4,092
Reaction score
1
Location
PA
If you're in the market for repairs, I'd suggest some arm restraints to keep the roll cage from pinching off your arm as well as something that resembles a firewall. If gas leaks on the headers, you're gonna get crispy real fast. Overall though, looks like an awesome buggy!
 

andrecht

Jup, picture = me
Messages
274
Reaction score
0
Location
Germiston, South Africa
If gas leaks on the headers, you're gonna get crispy real fast

Jup.. we had that issue when rolling the buggy. One of the fuel tank brackets broke, ruptured the hose and spilled gas all over the hot engine. We had a few really scary moments.
Part of the modifications is replacing the fuel tank with a re-designed unit, mounted behind the driver seat, as low as possible to the ground. The previous unit was mounted right at the top of the A frame creating a pendulum effect when cornering.

Additionally I will install a fuel pump with solenoid valve connected to a dead-man switch, braided hoses and non-return breather on the tank.

A second part of the modifications will be to widen the overall frame.
 

Attachments

  • FUEL TANK 3D1.jpg
    FUEL TANK 3D1.jpg
    25.6 KB · Views: 6

andrecht

Jup, picture = me
Messages
274
Reaction score
0
Location
Germiston, South Africa
Attached see photos of the new roll cage
Received the Laser cut plates for the gas tank yesterday, tack welded the tank together......
 

Attachments

  • DSC_0393.jpg
    DSC_0393.jpg
    113.6 KB · Views: 18
  • DSC_0392.jpg
    DSC_0392.jpg
    140.7 KB · Views: 24

andrecht

Jup, picture = me
Messages
274
Reaction score
0
Location
Germiston, South Africa
First test run after modifications....

http://youtu.be/_QO4VRj6swU


After an extensive repairs to the roll-cage, basically a complete replacement, and modifications to the suspension, fuel supply and sprocket ratios...This is the final product.
Modifications include: New fuel tank mounted behind the seat, now pumping fuel to a intermediate tank, with return.
Modifying the seat mounts & lowering the seating position.
Widening the entire unit by adding extensions to the A-arm mounts.
Moving the battery as far forward as possible.
New sprocket ratios.
The aim was to lower the overall center of gravity, and increase riding stability.
The 15/48 sprockets replaced with a custom 14/57!!!! An bigger gear ratio now giving 28% more torque, and 100% more fun in the corners.

Will upload more videos of the day later this week.
 
Status
Not open for further replies.
Top