Motorized drift trike project

Status
Not open for further replies.

ChrisT

New member
Messages
48
Reaction score
0
Location
Lincoln, UK
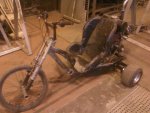
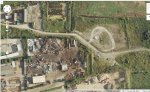
There's some waste land near where I work with a bit of a track on it so I take it up there - the video at the top of the last page is me going round it, there's googlemap view of the area below, workshop is top LH corner.
The track isn't as defined as shown on the map, it's more overgrown and has enough loose surface so sliding the corners isn't a problem.

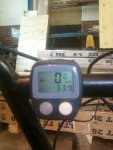
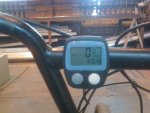
Got a 'cycle computer' to use as a speedo along with it's max speed recall function - managed 30.4mph:thumbsup:
 

Attachments

  • map_zps39122710.jpg
    map_zps39122710.jpg
    136.5 KB · Views: 25
  • SP_A1116_zps561877dc.jpg
    SP_A1116_zps561877dc.jpg
    209.9 KB · Views: 18

ChrisT

New member
Messages
48
Reaction score
0
Location
Lincoln, UK
Sheared another exhaust stud off while 'playing' the other day, don't think the length of the exhaust pipe is helping as it's quite thick tube which, despite the bracing, does shake about.

Struggled to remove the broken stud, other one came out with no problems, but couldn't shift this one so drilled it all out and re-tapped the hole to take an M8 bolt, used a 10.9 grade bolt too so that might help.

Cut down the exhaust and replaced with a stainless bend.

Don't know if it's the new tailpipe design but achieved a new high speed of almost 34mph:thumbsup:

Started work on the rear brakes, there's just enough room below the pull start to fit them in. Found a suitable disc in the workshop, just needs turning down some more to whatever thickness the calipers take, once I've got them.
Made an axle bracket too, the centre tube will be welded in position once I've figured out the best place.
 

Attachments

  • SP_A1143_zps5b541aed.jpg
    SP_A1143_zps5b541aed.jpg
    247 KB · Views: 12
  • SP_A1144_zpsfa9fd7b9.jpg
    SP_A1144_zpsfa9fd7b9.jpg
    231 KB · Views: 15
  • SP_A1138_zps1ac7d350.jpg
    SP_A1138_zps1ac7d350.jpg
    235 KB · Views: 13
  • SP_A1134_zps432d4ca1.jpg
    SP_A1134_zps432d4ca1.jpg
    109.6 KB · Views: 17
  • SP_A1135_zps902ac18a.jpg
    SP_A1135_zps902ac18a.jpg
    115.3 KB · Views: 24
  • SP_A1131_zps55916af0.jpg
    SP_A1131_zps55916af0.jpg
    134 KB · Views: 21

ChrisT

New member
Messages
48
Reaction score
0
Location
Lincoln, UK
Little update, decided rather than try and machine a brake disc to just get one from a mini-moto and caliper to match.
Had to make up a carrier to fix it to the axle and then weld in a section of angle for the caliper to mount to.
Wasn't sure the cast lug for the cable on the caliper would be up to the abuse it'll get so made up a more substantial bracket to mount to the frame, along with an adjuster from an M8 caphead bolt.

Seems to work ok, can lock up the wheel which is good:thumbsup:
 

Attachments

  • SP_A1205_zps5cb1ff41.jpg
    SP_A1205_zps5cb1ff41.jpg
    194.5 KB · Views: 20
  • SP_A1199_zpsf62b2464.jpg
    SP_A1199_zpsf62b2464.jpg
    194.5 KB · Views: 22
  • SP_A1197_zpse73b217f.jpg
    SP_A1197_zpse73b217f.jpg
    231.4 KB · Views: 29
  • SP_A1152_zpsb85d17a8.jpg
    SP_A1152_zpsb85d17a8.jpg
    208 KB · Views: 15

ChrisT

New member
Messages
48
Reaction score
0
Location
Lincoln, UK
Been having a slight problem with the chain, when rotating it goes from slack to tight, guess something's slightly off, either the axle tube or the sprocket carrier.
So rather than finding the root of the problem I opted to slacken the chain off so it wasn't tight at any point and add a chain tensioner.

Managed to break it quite quickly - bent the arm and stretched the spring, so straightened out the arm and added reinforcement and got a better spring.
Photo's not very good but the spring's now hooked round a bolt through the arm, pulled round the frame and the other end attached to another bolt wound into the tube.

Also got some better fuel pipe, the stuff I had seems to have reacted with the petrol - the outside's swelled up and the inside become brittle. That, along with a new fuel tap, means it no longer leaks fuel which is nice.
 

Attachments

  • SP_A1208_zps6d1923ca.jpg
    SP_A1208_zps6d1923ca.jpg
    235.5 KB · Views: 21
  • SP_A1207_zps324b139d.jpg
    SP_A1207_zps324b139d.jpg
    234.5 KB · Views: 24
  • SP_A1221_zpsd0e5d384.jpg
    SP_A1221_zpsd0e5d384.jpg
    91.7 KB · Views: 21
  • SP_A1210_zpsb401acfd.jpg
    SP_A1210_zpsb401acfd.jpg
    198 KB · Views: 24
  • SP_A1206_zpsc98e9f78.jpg
    SP_A1206_zpsc98e9f78.jpg
    100 KB · Views: 21

bigair49

Member
Messages
226
Reaction score
9
Location
Southern Ontario Canada
cool I like this one.for your chain problem I would start by checking to see if the sprockets are lined up. I do this by taking off the chain and using a ruler or suitable straight edge put the straight edge on the axle sprocket so it is flat on one side and slid it up the the engine sprocket this way you will see if they are in line with each other and also if they are parallel with each other the slightest bit either way will make it easy for the chain to jump off
hope this helps
 

machinist@large

Active member
Messages
2,865
Reaction score
28
Location
West Michigan, 49331
Been having a slight problem with the chain, when rotating it goes from slack to tight, guess something's slightly off, either the axle tube or the sprocket carrier.
So rather than finding the root of the problem I opted to slacken the chain off so it wasn't tight at any point and add a chain tensioner.

Managed to break it quite quickly - bent the arm and stretched the spring, so straightened out the arm and added reinforcement and got a better spring.
Photo's not very good but the spring's now hooked round a bolt through the arm, pulled round the frame and the other end attached to another bolt wound into the tube.

Also got some better fuel pipe, the stuff I had seems to have reacted with the petrol - the outside's swelled up and the inside become brittle. That, along with a new fuel tap, means it no longer leaks fuel which is nice.

While the tensioner is a good idea, it looks like (from your pictures) that you currently have it installed on the load side of your chain- i.e. the drive side when moving. For a spring loaded tensioner to be of any help, it needs to be on the unloaded side of the chain when in operation. That side under load want's to be a strait shot from the driven sprocket to the drive; the other side, being under no load is usually where you would put a spring tensioer.

:cheers2::thumbsup::popcorn:
 

ChrisT

New member
Messages
48
Reaction score
0
Location
Lincoln, UK
Yeah, I kinda knew that but couldn't figure out a simple way of mounting it the other side with the chain guard being there in close proximity to the chain, hoped this might work instead......
 

ChrisT

New member
Messages
48
Reaction score
0
Location
Lincoln, UK
cool I like this one.for your chain problem I would start by checking to see if the sprockets are lined up.

Got round to checking this today, they were slightly out - the sideways action must have pushed the axle over, that's now sorted.

Noticed one of the axle bearings has a lot of play in it too, not surprising as they were designed for roller shutter doors and not the high speed they've been experiencing, will upgrade/replace soon...

And V.3 chain tensioner is looking better, just enough room under the chain cover to fit it in, mounted to the chain cover bracket.
Not shown in the pictures but the spring runs to a lug I've welded to the other side of the bracket, nice and neat and removable as a complete unit.
 

Attachments

  • SP_A1226_zpsb12b398f.jpg
    SP_A1226_zpsb12b398f.jpg
    189.8 KB · Views: 16
  • SP_A1227_zps9029015c.jpg
    SP_A1227_zps9029015c.jpg
    177.1 KB · Views: 13

Doc Sprocket

*********
Messages
15,677
Reaction score
143
Location
Ontario, Canada
ATTEMPTING to unlock at OP's request. ChrisT, I apologize. I'm not sure if it's a software glitch or what. I'm gonna get out and come back in and see if it takes this time.
 

ChrisT

New member
Messages
48
Reaction score
0
Location
Lincoln, UK
Thanks Doc.

Not had chance to do anything with this project for a while but the other day on ebay I found a rear axle assembly from a ride on mower with a nice looking diff.

Stripped it down and cleaned up it says Peerless 100 on it, which sounds like it should be up to the job from what I've read on the interwebs.

Made up an axle sprocket carrier and bolted it to one side and fitted a brake disc to the other.

More to come..........
 

Attachments

  • SP_A1282_zps1114f434.jpg
    SP_A1282_zps1114f434.jpg
    174.5 KB · Views: 10
  • SP_A1280_zps08423837.jpg
    SP_A1280_zps08423837.jpg
    220.9 KB · Views: 9
  • SP_A1278_zpsadcb620e.jpg
    SP_A1278_zpsadcb620e.jpg
    227.5 KB · Views: 12
  • moweraxle_zps098aed39.jpg
    moweraxle_zps098aed39.jpg
    125.8 KB · Views: 17

ChrisT

New member
Messages
48
Reaction score
0
Location
Lincoln, UK
Trial fitting shows that it does just fit under everything, will probably lower the axle and move it back a bit for a little more clearance, there's room to slide the motor back if need be.

I've made up some spacers for the brake caliper so it'll fit over the new thicker disc.

Also cut down the mower frame that contains the bushes so I can use them to support the diff either side.
 

Attachments

  • SP_A1284_zpsad530de4.jpg
    SP_A1284_zpsad530de4.jpg
    199.4 KB · Views: 8
  • SP_A1286_zpsd3854272.jpg
    SP_A1286_zpsd3854272.jpg
    236.5 KB · Views: 8
  • SP_A1290_zps5e254592.jpg
    SP_A1290_zps5e254592.jpg
    230.1 KB · Views: 11
  • SP_A1288_zps1d4da25d.jpg
    SP_A1288_zps1d4da25d.jpg
    42.6 KB · Views: 7

zbuck

New member
Messages
781
Reaction score
3
Location
Ft. Wayne, IN
:wai:I do not know if the diff drive was a good idea. You went from both wheels driving to one wheel driving. Where as when one tire starts slipping the other tire will go to drive. Unless you welded the spider gears in the diff or some other method to make it posi traction?
 

ChrisT

New member
Messages
48
Reaction score
0
Location
Lincoln, UK
When I had both wheels driving it wouldn't turn on anything but loose surfaces so I changed it to one wheel drive which solved the turning issue but meant it would only drift RH turns.
My theory with the diff is if I lean into the corner it will hopefully unload the outside wheel enough for it to lose traction and, as it's only an open diff, spin up that wheel........
 

ChrisT

New member
Messages
48
Reaction score
0
Location
Lincoln, UK
Bearings I had been using had failed on one side so found some replacements but instead of using the bulky cast casing they were in I've bought some pressed steel carriers and made up some brackets to attach to the frame, once I've decided on how best to widen it.

Dug out some 30m steel bar to match the new bearings, cut it down and machined it out to fit over the 19mm diff shaft -secured with roll pins at the moment.

Also had to make up a 3mm spacer so the hubs would fit on the new axle.
 

Attachments

  • SP_A1293_zps73e652aa.jpg
    SP_A1293_zps73e652aa.jpg
    226.2 KB · Views: 8
  • SP_A1296_zpsc90f2002.jpg
    SP_A1296_zpsc90f2002.jpg
    204.7 KB · Views: 7

ChrisT

New member
Messages
48
Reaction score
0
Location
Lincoln, UK
Hubs attached to axle with 8mm shoulder bolts.

New bearing carriers joined to frame with sections of tube, just tacked until I know it's all square.

Brake caliper test fitted along with cable, seems to work - may have to make up an under tray to protect it.
 

Attachments

  • SP_A1306_zpscacff618.jpg
    SP_A1306_zpscacff618.jpg
    61 KB · Views: 11
  • SP_A1304_zpsf25d0953.jpg
    SP_A1304_zpsf25d0953.jpg
    214.9 KB · Views: 8
  • SP_A1301_zps76028a03.jpg
    SP_A1301_zps76028a03.jpg
    220.8 KB · Views: 11
  • SP_A1300_zps7cea38a3.jpg
    SP_A1300_zps7cea38a3.jpg
    215 KB · Views: 9
  • SP_A1299_zpsd36fbc19.jpg
    SP_A1299_zpsd36fbc19.jpg
    225.6 KB · Views: 9
  • SP_A1297_zps18e567bc.jpg
    SP_A1297_zps18e567bc.jpg
    246.9 KB · Views: 10

ChrisT

New member
Messages
48
Reaction score
0
Location
Lincoln, UK
Decided that the with the brake caliper located where it is now it could probably do with a bit of protection from debris/stones/rocks etc to welded on a couple of brackets and cut a piece of thin steel sheet to rivet on between them.

All additions to the frame are now welded up so threw a bit of black paint on just to tidy it up a little - still tempted to do it a lairy colour like Kawasaki green....

Got a new longer chain as I've moved the axle down and back, and I wanted to move the engine back a little more so the seat is quite so far forward.
 

Attachments

  • SP_A1312_zps565348f6.jpg
    SP_A1312_zps565348f6.jpg
    216 KB · Views: 8
  • SP_A1313_zpsc54c6f69.jpg
    SP_A1313_zpsc54c6f69.jpg
    210.2 KB · Views: 9
  • SP_A1315_zps47b0cd12.jpg
    SP_A1315_zps47b0cd12.jpg
    253.4 KB · Views: 8
  • SP_A1317_zps6f05b754.jpg
    SP_A1317_zps6f05b754.jpg
    59.3 KB · Views: 9
  • SP_A1320_zpsd92ab23c.jpg
    SP_A1320_zpsd92ab23c.jpg
    221.8 KB · Views: 22

ChrisT

New member
Messages
48
Reaction score
0
Location
Lincoln, UK
Thanks, no the dirt's still on there from last xmas I think, not had chance to take it out yet the engine's not running too well........
 
Status
Not open for further replies.
Top