kendelrk
redneck engineer
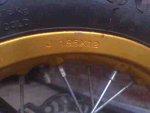
landuse what size sprocket are you using on your rear tire?
landuse what size sprocket are you using on your rear tire?
48th on the wheel.

 .
.OK....so I got the bike back from the small engine repair shop (I had taken it to them to sort the engine out that wasn't starting again), and then got it back on Saturday. It sort of ran for a few minutes and then didn't want to start again
The guy at the shop had told me that the 2 pick-ups on the carb had gotten some rust in them, and they had cleaned them out. He said it might happen again, and that they couldn't clean the tank properly.
I decide to take the carb off again, clean it and do some reverse electrolysis on the tank. As I am taking the carb off, I notice that the 2 bolts that connect the carb to the engine block are loose!!!. The whole carb can wiggle back and forth!! I then notice that they have replaced the one bolt with another one that has a smaller diameter and a totally different thread!! I can’t believe that these people who are supposed to be the best would stiff me like this!!
They had wanted the whole bike to test the engine under load, but they would have had to remove the engine to work on the carb cos there is not enough space in the frame to do it while it is in. Obviously they didn't do that. I am now going to go over there over lunch and see what they have to say for themselves.
The gas tank is still undergoing reverse electrolysis in my garage. It has been going since Saturday, and there is a whole lot of rusty rubbish frothing out the tank. I guess it is working
I will keep you al updated.

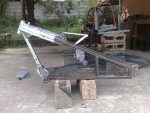

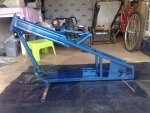

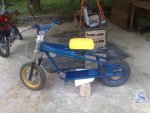
I will do the vid next week when I get the engine running again, but here are the pics of jackshaft and sprockets. It has a 16th clutch, 38th in, 14th out and 48th on the wheel.
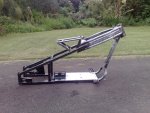
The jackshaft now has the two sprockets swapped around. I had stupidly given myself pretty much a 1:1 ratio before I realised I should have had them on the other way around. I will take better pics and post them over the weekend.
I wanna start off by saying great build so far can't wit to see it finished, but i had a question for you. Did you take the current videos with the 1:1 ratio or the 8.14:1 ratio because if it was the 1:1 that would explain a lot of things. My little two horse Briggs minibike was geared 5:1 with 8in tall tires and was clocked at 35mph with the gps. it didn't have much for low end torque but I knew that was due to gear ratios. I swapped my 5.5 clone on it with the same gear ratio and now has plenty of torque to put you on your but.
Ok just had to make sure. I hope you get the desired speed out of your new ratio. With gearing that low I would sure hope so.