Milling a VW engine case, etc.

Status
Not open for further replies.

n3480h

New member
Messages
286
Reaction score
2
Location
NW Iowa
Nope, sorry poboy, gentle etching and then alodine is the correct treatment for aircraft aluminum parts. It acts a little like anodize, but has a much higher resistance to corrosion, especially dissimilar metals corrosion (electrolytic) and faying, but does not change the metal dimensionally or cause embrittlement as anodizing can. The alodine process has been in use for a very long time in commercial and military aircraft. If I were to anodize ANY structural aluminum in this aircraft, no FAA Designated Airworthiness Representative would sign the Airworthiness Certificate. They are a fussy bunch, with no sense of humor until the inspection is completed. I have to do everything right concerning about 20,000 details, or they go away until I correct the issues. They get $500 per trip, so . . . .
 

jeepguy79

New member
Messages
24
Reaction score
0
Location
texakana
annuals and airworthiness inspections are not cheap. One reason I want to stay in FAR103 at least for now. I have enough logged hours to get my LSA, but planes are so expensive to maintain/hanger/etc. I really don't like the idea of renting a plane I don't keep up myself so that is a whole headache for me.

I would like to see this projects progress as it comes to completion. It is going to be a nice craft.
 

n3480h

New member
Messages
286
Reaction score
2
Location
NW Iowa
Thanks jeepguy. One of the cool things about experimental aircraft is, if you build the airplane AND the engine, you can get a certificate which says you are authorized to do the annual inspections. Makes sense, because who knows the aircraft better? With annuals running $1,000 and up every year, this is significant. A complete overhaul of the VW at 1500-1800 hours, will run maybe $800 tops. Can't do that with a Continental or Lycoming. My fuel burn will be 4.5 gph and that's better than 30mpg. This is why I went experimental.

As I make significant progress worth pics, I will post them on Sonerai.net., and maybe occasionally here.

Appreciate the positive comments.
 

firemanjim

Just kartin' around....
Messages
5,247
Reaction score
83
Location
Houston Texas
It's always :thumbsup::thumbsup: For you, you old fart! :lolgoku:
That other plane you used to own, that was very sleek/slick..... Looks like it was a speed freak..... I'd love to build something I could fly in/under..... I really like the thing where you strap an engine powered fan to your back and fly around with the parasail/chute..... Or one of those powered glider whatchamacallits that you sit in,under the big kite wing...... I just want to fly with the birdies..... :cornut:
 

Poboy kartman

Senior Moments Member
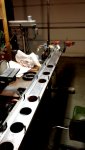
Messages
12,461
Reaction score
63
Location
White Settlement Texas
Nope, sorry poboy, gentle etching and then alodine is the correct treatment for aircraft aluminum parts. It acts a little like anodize, but has a much higher resistance to corrosion, especially dissimilar metals corrosion (electrolytic) and faying, but does not change the metal dimensionally or cause embrittlement as anodizing can. The alodine process has been in use for a very long time in commercial and military aircraft. If I were to anodize ANY structural aluminum in this aircraft, no FAA Designated Airworthiness Representative would sign the Airworthiness Certificate. They are a fussy bunch, with no sense of humor until the inspection is completed. I have to do everything right concerning about 20,000 details, or they go away until I correct the issues. They get $500 per trip, so . . . .

Wow......that blows my mind....I thought it was a typo on your part....I painted aircraft parts for 4 years for General Dynamics.....F-16's......sometimes F-111's.....(including the Thunderbirds planes).....and many structural parts were anodized.....

At least that's what they called it......the finished product had a grain effect to it....

This is the first time I've heard of alodine....
 

n3480h

New member
Messages
286
Reaction score
2
Location
NW Iowa
It's always :thumbsup::thumbsup: For you, you old fart! :lolgoku:
That other plane you used to own, that was very sleek/slick..... Looks like it was a speed freak..... I'd love to build something I could fly in/under..... I really like the thing where you strap an engine powered fan to your back and fly around with the parasail/chute..... Or one of those powered glider whatchamacallits that you sit in,under the big kite wing...... I just want to fly with the birdies..... :cornut:

Jim, neither of those was fast, 115 in the Ercoupe and 120 in the biplane. The Ercoupe was deemed the safest aircraft available, and it was. In 1946-1947 you could buy one from Sears Roebuck. One was even used as a test bed for the Army's (then) new JATO rockets. The biplane was one of only five in the world. It had ailerons on top and bottom wings which produced a roll rate of about 1.5 seconds for a complete 360°. Span of the upper wing was just 15 feet. My pilot friends were afraid to fly it, but it was a *****cat. Both planes were great fun in their own way.
 

n3480h

New member
Messages
286
Reaction score
2
Location
NW Iowa
Spar riveting setup

I set up a spar riveting "production line" of sorts. Adjustable height supports at both ends, leveled to the little arbor press. The arbor press ram is fitted with a flat polished anvil, and the arbor press plate holds a polished receiver for the rivet heads (so the rivet heads do not get distorted).

Rivets are inserted from the back, the head is positioned in the receiver, the arbor ram is lowered and smacked with a 3 lb hammer. This flattens the shop head of the rivet and slightly expands the shank. The shop head diameter must end up being 1.5 times the diameter of the rivet shank, with a height of 1/2 the rivet diameter. The single spar cap strip shown in the pic will have several others like it stacked before riveting begins. It all winds up being an I beam, capable of withstanding +/- 6G's. Stronger than most production aircraft wings.
 

Attachments

  • Spar setup.jpg
    Spar setup.jpg
    208.4 KB · Views: 11

n3480h

New member
Messages
286
Reaction score
2
Location
NW Iowa
Jim, that would be a lot of rivets for a sane man. But, this is just the start. After the wing spars are completed, the ribs and wing skins get around 2200 pulled rivets. 2000 of those are flush countersunk rivets - which require drilling 2000 holes, dimpling the 2000 holes so that the countersunk head rivets fit flush to the wing surface, and riveting all 2000 holes. THAT's a lot of rivets, and it's the reason I bought a pneumatic rivet puller for those rivets. I figure by the time I've done all that, I will have developed a s-s-s-stutter and a n-n-n-nervous t-t-t-twitch. But it will be a beautiful pair of very strong wings.
 
Status
Not open for further replies.
Top