MIG weld advice for noob

Status
Not open for further replies.

techfab

New member
Messages
13
Reaction score
0
Location
South Bay, CA
Hi All,

Sunny Southern California chiming in looking for a little MIG welding advice. My 8 year old son and I are building a kart using a stretched version of the Spidercarts Recluse plans. I have been lurking on this sight for a few months and have found all of your advice incredibly useful. I will start a thread on our build soon; but, need some input on MIG so we can move forward.

I have had very little welding experience (did a lot of soldering copper pipe as an apprentice plumber when I was in college a LONG time ago).

I purchased a Lincoln 140 MIG with 75/25 and am running practice beads with .025 wire on the 14 gauge 1"x1" mild steel tubing that will be used for the kart. I am having an absolute blast learning and have made every rookie mistake imaginable: burned fingers, forgetting to turn gas on and wondering what was wrong with my technique, birds nest in feeder, accidentally hitting the trigger numerous times requiring a fresh wire cut, etc (and this was all in the 3 hours I practiced yesterday).

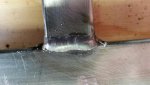
Anyway, we are anxious to get to welding on the actual frame; but, I am still concerned that I may have some cold welds (weld seems a bit "piled" to me). The welder is set to the recommendations on the chart (wire speed at middle setting of 5 and voltage at "C") and the sound is really good. I have played with adjusting speed down a little but got a lot of popping.

Can someone with some mig knowledge take a look to ease my concern that this kart won't split in half with my kid on it.

I have attached a standard looking example of one of my better welds. Does it look superficial to you?
 

Attachments

  • Weld pics 1.jpg
    Weld pics 1.jpg
    61.1 KB · Views: 63

Badot

New member
Messages
677
Reaction score
2
Can't comment on the strength but it looks pretty at least :D

My rule of thumb test... quick, dirty butt weld on a single side of flat stock. Throw it in the vice with the weld a bit above the clamp point then pick your favorite hammer and smack it from the opposite side you welded until it's bent over. Should show any welding deficiencies pretty clearly.

Then use lap joints or plugs where possible. Should be no way to break them at that point.
 

techfab

New member
Messages
13
Reaction score
0
Location
South Bay, CA
Thanks! Pretty is part of my concern. I understand pretty can equal weak. I have tried breaking one of my tube T joint welds (after welded on all 4 sides) and it held really well (gave up when the vice looked like it would tear from mounts). I don't have any 14 gauge flat; but, I will try to butt weld one side of tube and smack test.
 

KartFab

Active member
Messages
3,381
Reaction score
57
Location
Dallas, TX
Looks fine to me. If you are that worried about penetration, hold the tip closer to the workpiece and/or reduce your travel speed.

For short bits of welding you can increase speed/volts to the setting for the next thickness of steel. You may have issues with burn through then.
 

techfab

New member
Messages
13
Reaction score
0
Location
South Bay, CA
Thanks guys. I am feeling more confident. The butt weld smack test resulted in the metal around the weld failing. I could also see good penetration.

Going to jump in and start welding for keeps.
 

n3480h

New member
Messages
286
Reaction score
2
Location
NW Iowa
3 hour's practice? You are doing remarkably well. Another way to determine penetration is to cut a test piece weld diagonally with a hack saw (or metal band saw if you have one), file the cut surface smooth, and take a close look at it. You'll see right away whether or not there is sufficient penetration. It looks to me that the weld in the pic is going to hold. Fun, isn't it?
 

techfab

New member
Messages
13
Reaction score
0
Location
South Bay, CA
Thanks. Not all of them look that good; but, I do feel that I at least know what I should be doing and how to dial it in on the basic stuff. The key for me is reminding myself to be patient once I pull the trigger.

It is a bunch of fun. I thought flying and scuba diving were exhilarating and liberating; but, learning to weld... I feel like I can build or repair anything! I was stressing about spending so much on a welder; but, if only for the fun my son and I had with it this weekend it is money well spent.
 

landuse

Moderator
Staff member
Messages
18,763
Reaction score
545
Location
Pietermaritzburg, South Africa
Thanks. Not all of them look that good; but, I do feel that I at least know what I should be doing and how to dial it in on the basic stuff. The key for me is reminding myself to be patient once I pull the trigger.

It is a bunch of fun. I thought flying and scuba diving were exhilarating and liberating; but, learning to weld... I feel like I can build or repair anything! I was stressing about spending so much on a welder; but, if only for the fun my son and I had with it this weekend it is money well spent.

Welding is a skill that you can carry with you for the rest of your life, and believe me when I say that it will come in usefull often
 

OzFab

Well-known member
Messages
15,615
Reaction score
69
Location
Warwick Qld, Australia
I am still concerned that I may have some cold welds (weld seems a bit "piled" to me). The welder is set to the recommendations on the chart (wire speed at middle setting of 5 and voltage at "C") and the sound is really good.

Remember that the "recommendations" on the chart are just that, recommendations, not steadfast rules; you can play with the settings a little...

The weld in the pic looks good, maybe a tiny bit cold IMO but, any hotter & you may burn through; follow grann_panns advice (he's the master welder), slow down a touch...

I have played with adjusting speed down a little but got a lot of popping.

Sounds like you found "the sweet spot", stick to it :thumbsup:

Relax, you're doing well...
 

machinist@large

Active member
Messages
2,865
Reaction score
32
Location
West Michigan, 49331
Everyone else has added excellent advice; here's my addition to it.

Condition of your contact tip, gas nozzle and diffuser; you bit the bullet for an excellent machine (I really like my 135), but you are learning. The contact tip is what the wire run's through as it leaves the gun. They are one of the consumables that are part and parcel with the mig welding process. If you run clean wire you can get a couple of days out of one full time. When you are starting out, though, be prepared to swap out the old one pretty regularly.

The key is to learn when you start having arc problems; if you're running clean steel, properly gounded with all the correct settings and it still spits and sputters, try replacing the tip. You also need to swap tips when you change wire sizes.

The gas nozzle is the sleeve that surrounds the contact tip and focuses the shielding gas. This is another consumable, and it's outlet position related to the contact tip can seriously affect the welding process. You'll have to experiment to find out what works for you.

The diffuser is the part that the contact tip screw's into. You just need to pay attention to the conditions of the thread's, and make sure that the gas holes aren't plugged. On most small units like this there's only four, 90° from the wire path center line.

Hopefully this helps. Pat
 

techfab

New member
Messages
13
Reaction score
0
Location
South Bay, CA
Good stuff. Thank you. Along those lines, a welding instructor told me to spray the tip and diffuser with non-stick spray (i.e. Pam). I did and it has worked very well. All the splatter and gunk wipes away.
 

jmills

New member
Messages
4
Reaction score
0
weldingtipsandtricks and chucke2009 are my youtube favs for learing new welding tricks, I'm learning new tig stuff everyday, been using a mig for years but still learned a lot I didn't know.
 
Status
Not open for further replies.
Top