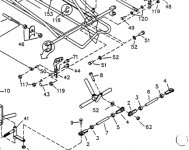
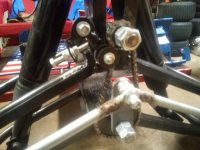
got a manco quicksilver 2×5 the steering shaft rattles at the bottom right before it meets the tie rods looks like it's missing a bushing or rubber spacer also it's a little wobbly at the top of the shaft right below the steering wheel Did they come with any bushings here is pics of the lower steering shaft
You are using an out of date browser. It may not display this or other websites correctly.
You should upgrade or use an alternative browser.
You should upgrade or use an alternative browser.
Manco steering shaft
- Thread starter AVENDANO
- Start date
Denny
Canned Monster
No bushings that I know of factory. It’s up to you bud. We’re rooting for you!
USAMAC
Member
My 2x5 Fox does this too.. also, I don't think you're pics came through. I'd be interested to see what you do to resolve it, if you do!got a manco quicksilver 2×5 the steering shaft rattles at the bottom right before it meets the tie rods looks like it's missing a bushing or rubber spacer also it's a little wobbly at the top of the shaft right below the steering wheel Did they come with any bushings here is pics of the lower steering shaft
FlyFrog
Active member
look on his other post it has the picturesMy 2x5 Fox does this too.. also, I don't think you're pics came through. I'd be interested to see what you do to resolve it, if you do!
Karttekk
Well-known member
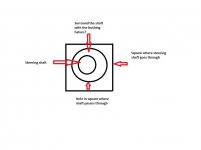
There are no bushings illustrated in this image. Maybe pick up an assortment of different size nylon bushings, find one that's a close match to the inside diameter of where the steering shaft goes through, cut it in half and push the halves into the gap with some adhesive. You'll have to get creative here. I drew up an image of what I'm suggesting. Pretty sad image but it might work. Place bushing halves on either side of shaft to take up play.
Attachments
-
 no bushing.jpg51.3 KB · Views: 10
 -
 Steering solution.jpg40.1 KB · Views: 10
madprofessor
"Loose Cannon Creations"
I've got the sloppy fit of steel 3/4" round stock going through common 3/4" EMT conduit about 10" long for my steering, 2 of them in fact. (Changes from left-drive to center-drive.) My material for accurately and evenly filling the slop space is extremely thin aluminum sheeting called "valley flashing", comes in rolls, and is used in roofing to cover the inside bend angle of different roof sections where they meet. It's the first material after the tarpaper to get laid down, shingles follow after.
My roll is 14" wide x 10' long, other widths are available, came from Home Depot. It's as thin and workable as notebook paper, have it wrapped around the steel shaft about 3 times, ends are touched with solder so a turn won't wind it tighter. Washer at each end of the EMT keeps it inside.
My roll is 14" wide x 10' long, other widths are available, came from Home Depot. It's as thin and workable as notebook paper, have it wrapped around the steel shaft about 3 times, ends are touched with solder so a turn won't wind it tighter. Washer at each end of the EMT keeps it inside.
Attachments
-
 IMG_20210815_152522.jpg2.5 MB · Views: 8
 -
 IMG_20210815_152558_1CS.jpg1.4 MB · Views: 8
FlyFrog
Active member
clever, does both rods conect to the same tierods or do you have 2 sets?I've got the sloppy fit of steel 3/4" round stock going through common 3/4" EMT conduit about 10" long for my steering, 2 of them in fact. (Changes from left-drive to center-drive.) My material for accurately and evenly filling the slop space is extremely thin aluminum sheeting called "valley flashing", comes in rolls, and is used in roofing to cover the inside bend angle of different roof sections where they meet. It's the first material after the tarpaper to get laid down, shingles follow after.
My roll is 14" wide x 10' long, other widths are available, came from Home Depot. It's as thin and workable as notebook paper, have it wrapped around the steel shaft about 3 times, ends are touched with solder so a turn won't wind it tighter. Washer at each end of the EMT keeps it inside.
madprofessor
"Loose Cannon Creations"
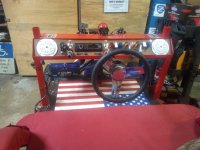
Half and half there, Flyfrog. On the back side of the dashboard arch there's a U-joint in the center that goes forward and down to the next U-joint. That's a permanent single setup for both driving positions. From that top U-joint a permanent 3/4" shaft goes straight through the center-drive dash tube and terminates at a steering wheel quick-release.
There's another permanent 3/4" shaft going through the left-drive dash tube, also terminates at a quick-release. What makes that side turn the center steering shaft (with the U-joints) is a sprocket on that shaft on the back side of the dash arch. It makes up that part of a chain-drive system that makes both 3/4" shafts turn simultaneously. Attaching a pic of the chain before getting a tensioner.
I just quick-release the short steering shaft on the back of the steering wheel to move it over and click it in. There's a third quick-release also, on the steering wheel itself, can just pull off the wheel or click it back on.
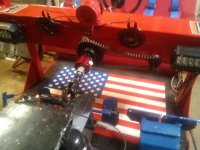
There's also another chain-drive system at the front of the kart to get the steering motion down to where the pitman arm goes. Attaching a pic of it, all the metal still unfinished. NOTE: All sprockets have different tooth counts to create reduction ratios. Left-drive's like power steering.
EDIT: Just ignore that fourth red quick-release on the U-joint shaft. It's just being used as a slide joint, because the steering shaft screws in/out.
There's another permanent 3/4" shaft going through the left-drive dash tube, also terminates at a quick-release. What makes that side turn the center steering shaft (with the U-joints) is a sprocket on that shaft on the back side of the dash arch. It makes up that part of a chain-drive system that makes both 3/4" shafts turn simultaneously. Attaching a pic of the chain before getting a tensioner.
I just quick-release the short steering shaft on the back of the steering wheel to move it over and click it in. There's a third quick-release also, on the steering wheel itself, can just pull off the wheel or click it back on.
There's also another chain-drive system at the front of the kart to get the steering motion down to where the pitman arm goes. Attaching a pic of it, all the metal still unfinished. NOTE: All sprockets have different tooth counts to create reduction ratios. Left-drive's like power steering.
EDIT: Just ignore that fourth red quick-release on the U-joint shaft. It's just being used as a slide joint, because the steering shaft screws in/out.
Attachments
-
 IMG_20210815_152648.jpg2.6 MB · Views: 5
 -
 IMG_20210710_163000.jpg2.5 MB · Views: 5