choppergirl
New member
- Messages
- 4
- Reaction score
- 0
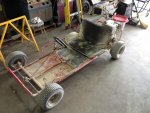
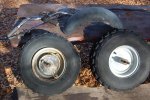
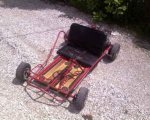
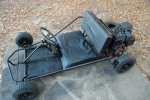
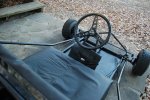
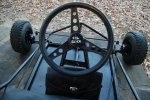
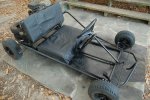
Here is my Manco Red Fox, which I've converted to single seater which I've named "Oil Slick" (see pictures of black cart below) and done some other mods to this week. I've named it the Oil Slick, because that's going to be all that's left of you on the road if you get run over by a car driving this puppy...
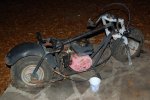
What a stock Manco Red Fox looks like (yuck! fire up the welding torch!):
The Manco Red Fox is a two seater little kiddie minimalist go cart, with the steering wheel normally located on the left half side of the cart, with the seat scrunching you far forward. Well, I think two seaters are dangerous, only the driver can anticipate what's going to happen next because he's in control. Plus, who wants extra baggage on the cart slowing you down. Get off my cart! No passengers!
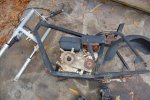
This puppy was my nieces abandoned go cart - the engine was froze up, as the intake valve was rusted solid to the head... which is where I gave up a long time ago restoring this engine.
Just recently, I got tired of watching the pathetic show of the kids pushing it around (field of dreams), so I decided to revisit the engine. I figured the engine was fubar, so I broke out the crowbar, and started prying, and with a lot of fiddle farting and brutal force, was able to get the valve to wiggle, move, and then unstuck. I then restored the entire engine and put it all back together, which was not easy to do, as all the parts had been scattered to the four winds.
I then decided if I was going to restore it, to go all the way:
--Cut the backseat frame off, moved it far backwards, and rebolted onto frame using 6 stove bolts. No more scrunch crunch with a steering wheel jammed in your stomach
--Relocated the gas pedal to the far right side
--Cut the 14" and 8" steering tie rods in half, and rewelded them to be two 12"
--Cut the steering section off, and moved it to the middle, and rewelded it just slightly off center, after removing some pieces that were in the way.
--Made two brand new seats for it, out of foam, plyboard, roofing tin, and motorcycle seat faux leather I had from when I restored my Honda Rebel
--Totally re-engineered the pull cord starter, as the spring was shot out and the rope broke. Used a motorcycle clutch cable instead of a starter rope, and made the starter so it could be disassembled using one bolt.
--Made a storage compartment for it (old black battery box) and support... to hold tools, starting fluid, etc
--Got the engine fired up and running (woot) for 5 minutes, but my gas tank was so full of cloudy crap I gunk up my carb and will have to clean it out again, after dumping the gas with precipitate floating in it (mostly rust). No problem
--Made a replacement 44 tooth sprocket for it, from a found car engine cam sprocket.
--Fixed and reassembled the centrifugal clutch. Is slap wore out, but I did some tweaking
--Ordered chain and diaphram for it off ebay
--Built an electric drill starter adapter for it, so I don't have to pull cord it any... take my hammer drill, with right socket on it, and put it up against the axle bolt, fire it up, engine turns over as long as you want until it fires up. Hella yeah! No more pull cord BS.
--Set the air filter on fire twice when running it off ether/starting fluid. Stomp stomp dirt, wash off that was fun.
--Going to swap out the smaller tires on the front, with the 1" bigger ones, so they are all the same size all the way around
--Going to add a motorcycle battery which I have, and I'll add some strobe hazzard lights used for logging trucks which I have), a Honda Rebel horn, and maybe electric start later
--Would like to make it live axle some day, or differntial.
--If I have time and my interest continues, I'm going to get some pit bike tires for it somehow, and build a fiberglass body for it so it looks like a Champion 250 microcar ( http://zumann.com/champion-250.html )
--
What a stock Manco Red Fox looks like (yuck! fire up the welding torch!):
The Manco Red Fox is a two seater little kiddie minimalist go cart, with the steering wheel normally located on the left half side of the cart, with the seat scrunching you far forward. Well, I think two seaters are dangerous, only the driver can anticipate what's going to happen next because he's in control. Plus, who wants extra baggage on the cart slowing you down. Get off my cart! No passengers!
This puppy was my nieces abandoned go cart - the engine was froze up, as the intake valve was rusted solid to the head... which is where I gave up a long time ago restoring this engine.
Just recently, I got tired of watching the pathetic show of the kids pushing it around (field of dreams), so I decided to revisit the engine. I figured the engine was fubar, so I broke out the crowbar, and started prying, and with a lot of fiddle farting and brutal force, was able to get the valve to wiggle, move, and then unstuck. I then restored the entire engine and put it all back together, which was not easy to do, as all the parts had been scattered to the four winds.
I then decided if I was going to restore it, to go all the way:
--Cut the backseat frame off, moved it far backwards, and rebolted onto frame using 6 stove bolts. No more scrunch crunch with a steering wheel jammed in your stomach
--Relocated the gas pedal to the far right side
--Cut the 14" and 8" steering tie rods in half, and rewelded them to be two 12"
--Cut the steering section off, and moved it to the middle, and rewelded it just slightly off center, after removing some pieces that were in the way.
--Made two brand new seats for it, out of foam, plyboard, roofing tin, and motorcycle seat faux leather I had from when I restored my Honda Rebel
--Totally re-engineered the pull cord starter, as the spring was shot out and the rope broke. Used a motorcycle clutch cable instead of a starter rope, and made the starter so it could be disassembled using one bolt.
--Made a storage compartment for it (old black battery box) and support... to hold tools, starting fluid, etc
--Got the engine fired up and running (woot) for 5 minutes, but my gas tank was so full of cloudy crap I gunk up my carb and will have to clean it out again, after dumping the gas with precipitate floating in it (mostly rust). No problem
--Made a replacement 44 tooth sprocket for it, from a found car engine cam sprocket.
--Fixed and reassembled the centrifugal clutch. Is slap wore out, but I did some tweaking
--Ordered chain and diaphram for it off ebay
--Built an electric drill starter adapter for it, so I don't have to pull cord it any... take my hammer drill, with right socket on it, and put it up against the axle bolt, fire it up, engine turns over as long as you want until it fires up. Hella yeah! No more pull cord BS.
--Set the air filter on fire twice when running it off ether/starting fluid. Stomp stomp dirt, wash off that was fun.
--Going to swap out the smaller tires on the front, with the 1" bigger ones, so they are all the same size all the way around
--Going to add a motorcycle battery which I have, and I'll add some strobe hazzard lights used for logging trucks which I have), a Honda Rebel horn, and maybe electric start later
--Would like to make it live axle some day, or differntial.
--If I have time and my interest continues, I'm going to get some pit bike tires for it somehow, and build a fiberglass body for it so it looks like a Champion 250 microcar ( http://zumann.com/champion-250.html )
--
Attachments
-
 go%20cart_135596_md.jpg23.6 KB · Views: 35
 -
 DSC_6969.jpg142.9 KB · Views: 29
 -
 DSC_6970.jpg155.7 KB · Views: 32
 -
 DSC_6971.jpg128.3 KB · Views: 20
 -
 DSC_6972.jpg125 KB · Views: 20
 -
 DSC_6974.jpg125 KB · Views: 26
Last edited by a moderator: