Manco Fox II rebuild

Status
Not open for further replies.

firemanjim

Just kartin' around....
Messages
5,228
Reaction score
1
Location
Houston Texas
:funnypost::roflol:
After I got my first sport bike, I bought a helmet. Bike was green,helmet was black. That's not gonna work. So i sanded down my helmet one day at work. Got a nice surface for fresh paint. I do a quick couple coats of white as a base. Then a green that closely matched the bike. I was super impressed with how professional it came out. Even my boss, who is super picky,said it looked great.... Only thing left was a couple of clear coats, and it's done..... The day I decide it's time for the clear coat, I cleaned up a paint area, took my time and did everything I read..... The trains don't run at night on the tracks next to the shop. They are pretty much just to feed the company's along the track. So i figure, it's 8pm, and the weather conditions are in my favorite, for painting in an open shop. No winds,dirt flying floating...... :thumbsup:
Man,I put the first coat down, and had the urge to answer nature's call. No sooner than I closed the bathroom door,I hear a faint train horn..... ?? After zipping back up and washing my hands, I could "feel" a train coming..... I open the door and get 2 feet out,and a big gust of wind and dust go rushing through the shop. ALL OVER the fresh clear..... A loooonnnngggggg train of army trucks,humvees,tanks,and stuff that was covered, but you could tell it was some type of vehicle with a long attachment on the roof. (humvees with missile launchers?? Wheels and tires looked like all the humvees...... ) The army trains use this track when shipping goods to war,and when coming back. These were headed out........ When they're coming back in,they're about half beat to heck.....

:oops::backtotopic:
I can't wait to see the finished product! I know it's gonna be a "stunner"! :thumbsup:
 

JMINDY

Member
Messages
254
Reaction score
0
Location
Indianapolis, IN
Dirt in the paint sucks cause it means redoing it. Dirt in the clear is not a problem, just more work in the wet sanding. I had a furnace kick on (thought is was powered off) when clearing my 55 Chevy, blew dirt in the hood and top of roof. Can't see a spec after it was finished out.

Looking forward to seeing this kart come together!
 

n3480h

New member
Messages
286
Reaction score
1
Location
NW Iowa
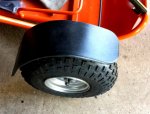
Got the sparrow tracks wet sanded and the cage repainted. Salvaged some thermoformed black plastic and made fenders, I used a heat gun to form the material in the required arcs. This material is a little flexible and extremely hard to break. The outside surface has a "haircell" pattern on it, a kind of light texture. Personally, I wouldn't put fenders on, but I think the grandkids will stay cleaner with the fenders, and mom will like that.
 

Attachments

  • fender.jpg
    fender.jpg
    346 KB · Views: 10

n3480h

New member
Messages
286
Reaction score
1
Location
NW Iowa
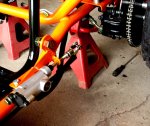
Decided to rework the mount for the brake cylinder. It was positioned about 2" below the frame tube. Certain to get banged up in a high center situation. I was able to fab a new mount which is welded to the frame tube and positions the cylinder higher than the frame tube. The cylinder can be unbolted if it ever needs fluid or seals. I like this system with the cylinder, the hose, and the caliper as an integrated unit. The brake line has a banjo fitting at each end so the line can be optimally positioned.
 

Attachments

  • Brake Mount Sm.jpg
    Brake Mount Sm.jpg
    528.1 KB · Views: 19

n3480h

New member
Messages
286
Reaction score
1
Location
NW Iowa
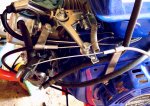
Chonda Throttle and Choke setup

Today's work included setting up the throttle and choke cables. With the stock air filter removed, the locknut retaining the stock throttle arm was loosened enough to allow more or less free movement of the arm, with just a little resistance. The throttle cable is a standard type with the braided wire inside and a vinyl covering on the outside. The choke cable is solid wire inside and was modified from a push mower throttle control from the local hardware store. The guide ends were unscrewed and welded to 1/2" wide steel standoffs. Cables were cut to length and the ends screwed back into the standoff/ends weldments, then the standoffs were bolted to the engine using existing bolts. The throttle arm capture for the throttle cable is just a 1/4" x 1" full thread bolt, drilled perpendicularly just under the head. The cable slides through the hole and a nut is threaded on and tightened up (with blue loktite) against the cable. If you do this, do NOT tighten that nut too much, as it can shear off the cable. The end of bolt is then inserted into the drilled throttle arm and a washer and locknut added on the bottom end. This permits the cable stud to rotate to prevent chewing up the cable. When cutting off the excess end of the braided cable, you can prevent it from fraying by adding a small diameter shrink tube to cover where you will cut, or you can coat it with hot melt as I did, then cut it. A 1/32" hole was drilled near the outboard end of the throttle arm, and another near the throttle limit screw. A stout spring was added at those locations to provide a good throttle return.

The choke arm at the carb was drilled with a 1/32" hole, with the hole location determined by the distance the choke cable can move (locating the hole on the arc made by the lever as it traveled from Off to Full Choke). The choke cable wire was then bent 90° and inserted into the hole, then the bottom is bent in another 90° to secure it onto the choke lever.

Blue loktite was used at all attaching bolts and nuts, with the exception of the locknut at the bottom of the throttle cable capture bolt.

I have full movement of the throttle pedal and the throttle arm on the engine, and at the choke lever and choke slide control on the panel at the steering support. Happy happy.
 

Attachments

  • Thottle&Choke setup Chonda Sm.jpg
    Thottle&Choke setup Chonda Sm.jpg
    493.6 KB · Views: 14

n3480h

New member
Messages
286
Reaction score
1
Location
NW Iowa
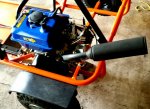
Pipe painted with "2,000°" paint and installed. Sounds better than I thought it might. Far less back pressure, but still a little. Rear fenders mounted. Mud control for the grandkids.

All that's left is wiring, panel installation, and seat construction.
 

Attachments

  • Pipe.jpg
    Pipe.jpg
    346.5 KB · Views: 14

Poboy kartman

Senior Moments Member
Messages
12,461
Reaction score
1
Location
White Settlement Texas
Pipe painted with "2,000°" paint and installed. Sounds better than I thought it might. Far less back pressure, but still a little. Rear fenders mounted. Mud control for the grandkids.

All that's left is wiring, panel installation, and seat construction.

.........And delivery to White Settlement in time for my birthday! !!!!
 

n3480h

New member
Messages
286
Reaction score
1
Location
NW Iowa
You guys are funny. The downside to all this is that I have one aircraft to finish building and another to finish refurbishing.
The kart takes time away from that, but I don't regret rebuilding the kart. I showed it to my 5yo granddaughter this week. Her eyes lit up. Said she didn't know how to drive, but I explained that this was a two seat kart and I would teach her how to drive it. It was clear that this made her feel like a bigger girl. Her triplet siblings are only 6mo, so she'll be a pro by the time they are ready for rides. No doubt I will have to look for another two seater eventually, maybe with front suspension and a swing arm rear. We can build birms, moguls, banks, and even a climbing hill on the property. I suspect this might be so much fun that I will have to build some kind of overpowered long arm shifter buggy for myself. See the monster you've created, DIYGK????
 

n3480h

New member
Messages
286
Reaction score
1
Location
NW Iowa
Ow . . . ow . . . OW!

Pretty sure it's your fault, Poboy. And Jim, Fabroman, Itsid, and a few others.

I've come to thoroughly enjoy DIYGK. Excellent technical help, and I get to laugh my butt off at least once a day.
 

n3480h

New member
Messages
286
Reaction score
1
Location
NW Iowa
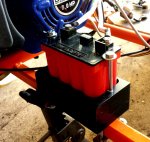
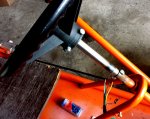
Building carbon fiber seat pans today, so while waiting for the epoxy to cure I managed to throw a block of Delrin on the mill and made a battery box. I love machining Delrin, always gives a nice finish. Battery only weighs 1.4 pounds, so 1/4" hardware retains it in the box and the box is secured to the dead axle tube. Got on the welder and lathe and made a 6" steering post extension, (in case someone big wants to drive the cart to give grandkids a ride :thumbsup:). The extension is removable to allow the steering wheel to return to stock position.
 

Attachments

  • BattBoxSm.jpg
    BattBoxSm.jpg
    416 KB · Views: 9
  • Steering ExtSm.jpg
    Steering ExtSm.jpg
    403.2 KB · Views: 13
Status
Not open for further replies.
Top