Introduction:
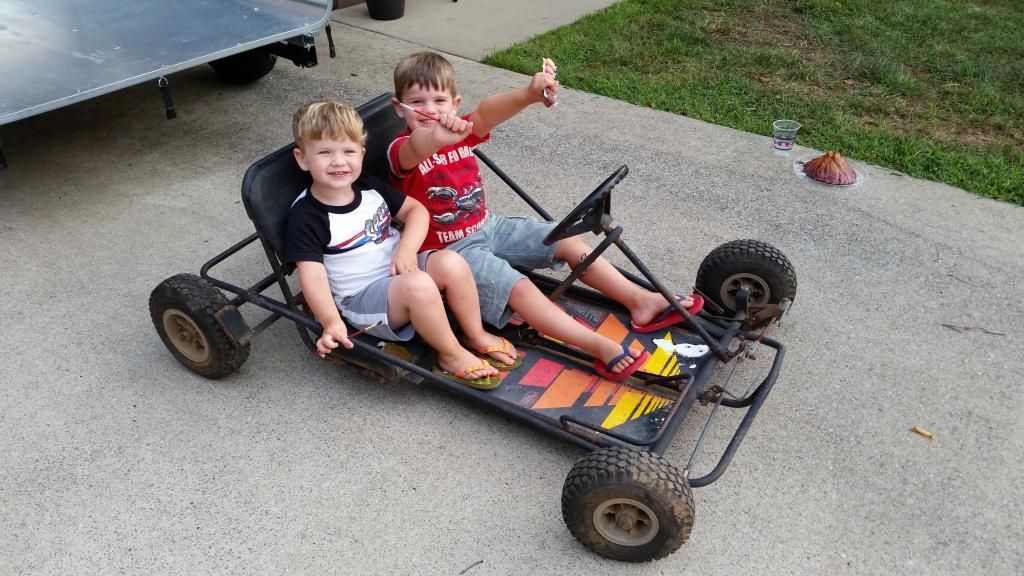
Hello all. I signed up a few months ago to learn about electric go kart conversions and see the pics. I lurked for a bit and eventually got the bug. I found a used kart frame that needed a motor. I worked on it slowly and now have an operational kart for my 2 boys who are 5 and 3.
List of Parts:
Build:
I set my initial budget @ $500 USD. My total cost (not including labor) was ~$550.
One concern was braking, but this cart has a tire friction brake which works great for my purposes.
Gearing was another issue. The kart had a 60T one-wheeled wonder sprocket and I kept it. I found a 12T sprocket for the motor. My calcs put top speed about 18MPH and need to verify with gps.
I originally had 2 solenoids in series but the kelly controller had issues driving both of them. I ended up using 1. The foot pedal is 3wire only so it doesn't have a switch. I debated whether the switch for on/off would be a safety issue but think operation is ok for now.
Motor sprocket mounting was awkward but I ended up drilling it out with a stepper bit to fit on the motor shaft, tightened the set screws with loctite, and used the original shaft nut to secure.
Foot pedals were re-located for access by my 5yo. I used left over 80/20 rail for adjustability and rigged the gas pedal to operate the foot pedal. I re-worked the hard line to the brake with a cable and spring.
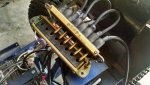
Motor and batteries were mounted to an 80/20 frame. Nylon cutting boards were used for electronics backplate. Conduit clamps secured the 80/20 frame to the kart chassis. I know some poo-poo 80/20 but has fit my needs since i dont have a welder yet and provides a fair amount of adjustability and re-use.
I wired it all up per the Kelly Controller documentation provided. The original ignition switch is now my on/off for 48V to the controller and 48/12v regulator. The second switch is 12V power for the lights.
Reflections:
This kart was an upgrade from a power wheels toy. I used the controller setup software without issue. Max speed is limited to 33%. Run time has been ~30min up/down driveway and in the yard. As for charging, I started charging @ 12v in parallel but got tired of swapping connectors. I am now using (4) 12v 1.5A chargers with quick disconnects.
My boys have enjoyed helping with the build and it is extremely popular in the neighborhood. Now I need one.
http://youtu.be/irDtJnWAm08


Hello all. I signed up a few months ago to learn about electric go kart conversions and see the pics. I lurked for a bit and eventually got the bug. I found a used kart frame that needed a motor. I worked on it slowly and now have an operational kart for my 2 boys who are 5 and 3.
List of Parts:
- (1) manco (415??) kart chassis (craigslist-$100)
- (1) my1020 48V motor (eBay-$99)
- (1) 11T sprocket (amazon.com-$10)
- (1) #30 chain (amazon.com-$10)
- (1) Kelly KDS 100A controller (kellycontrols.com-$89)
- (1) generic throttle pedal 0-5V (kellycontrols.com-$29)
- (4) 12V 12AH SLA batteries (chromebattery.com-$100)
- misc. 1515 80/20 rail and hardware for mounting (free)
- (3) 3/4" conduit clamps for mounting 80/20 rail to chassis ($5)
- (2) plastic cutting boards (walmart-$15)
- (2) boat cushions and slats for seats (academy sports-$20)
- (1) 12V 100A continuous duty solenoid (amazon.com-$15)
- (1) 48V/12V regulator (eBay-$20)
- (2) misc LED lights (walmart-$10)
- (1) LED chaser light (superbrightleds.com-$20)
- (2) 10A toggle switches (walmart-$10)
- misc. wire (free)
- misc. 3M connectors ($10)
- misc. fastening hardware ($10)
Build:
I set my initial budget @ $500 USD. My total cost (not including labor) was ~$550.
One concern was braking, but this cart has a tire friction brake which works great for my purposes.
Gearing was another issue. The kart had a 60T one-wheeled wonder sprocket and I kept it. I found a 12T sprocket for the motor. My calcs put top speed about 18MPH and need to verify with gps.
I originally had 2 solenoids in series but the kelly controller had issues driving both of them. I ended up using 1. The foot pedal is 3wire only so it doesn't have a switch. I debated whether the switch for on/off would be a safety issue but think operation is ok for now.
Motor sprocket mounting was awkward but I ended up drilling it out with a stepper bit to fit on the motor shaft, tightened the set screws with loctite, and used the original shaft nut to secure.
Foot pedals were re-located for access by my 5yo. I used left over 80/20 rail for adjustability and rigged the gas pedal to operate the foot pedal. I re-worked the hard line to the brake with a cable and spring.
Motor and batteries were mounted to an 80/20 frame. Nylon cutting boards were used for electronics backplate. Conduit clamps secured the 80/20 frame to the kart chassis. I know some poo-poo 80/20 but has fit my needs since i dont have a welder yet and provides a fair amount of adjustability and re-use.
I wired it all up per the Kelly Controller documentation provided. The original ignition switch is now my on/off for 48V to the controller and 48/12v regulator. The second switch is 12V power for the lights.
Reflections:
This kart was an upgrade from a power wheels toy. I used the controller setup software without issue. Max speed is limited to 33%. Run time has been ~30min up/down driveway and in the yard. As for charging, I started charging @ 12v in parallel but got tired of swapping connectors. I am now using (4) 12v 1.5A chargers with quick disconnects.
My boys have enjoyed helping with the build and it is extremely popular in the neighborhood. Now I need one.
http://youtu.be/irDtJnWAm08
Last edited: