Flash550
New member
Sorry in advance for the long read, feel free to scroll down to the pictures and skip the overly descriptive narrative to follow...
Hey guys, I figured that after I posted an introduction I should probably start a build log here. I started with a well used Manco Magnum that I found on Craigslist. I chose it because it is a 2 seater and has a full suspension; single a-arms in the front and a swing arm out back. It came with a Robin 6.5 which ran pretty well, but was worn out and pretty much gutless. I had planned on rebuilding the Robin, but after a quick search realized that any sort of performance parts were going to be hard to find and expensive. I decided to ditch it and start fresh with a new HF Predator 212. For $99 out the door with a 2 year warranty and a ton of aftermarket support it was a no brainier.
As soon as I got my new engine home, I promptly screwed it up. Patience is a virtue that I lack, and I was in such a hurry to start modding that I pulled the governor and the low oil shutoff switch before I found out that the stock flywheel and rod have a tendency to explode at higher RPM's. Great. I also slapped on a homemade header and scrapped the stock air box for a high flow air filter without realizing how badly it would screw up my jetting. So what I have now is an engine that is really hard to start and runs like crap until it's fully warmed up. (I deployed before I could get the parts I needed, and won't be home for another month, but everything should be waiting when I get back. See the list below.)
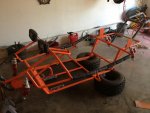
What I did right was the frame. I stripped it down completely, wire brushed, grinded, and sanded all the old paint off, cut off all the useless tabs, smoothed out all the welds, and primed/painted everything in KTM orange, black, and white. It turned out awesome, and my son loves it (he races a KTM SX50). I also covered the floor pan on both sides with truck bed liner to provide a little extra protection. When I was grinding, I noticed that the swing arm had some pretty weak mounting areas around the engine mount, and was actually starting to crack in a few places, so off it went to the local welding shop to get beefed up in all the right areas.
I put it all back together, fabbed up some new adjustable gas and brake pedal assemblies (I can move them back so my son can reach them, then slide them forward when it's my turn to play), and covered most of the roll cage with 1" foam pipe insulation from Lowes. It looks good, and provides cheap protection for the paint job I spent so much time on. I went ahead and used the Predator, and set up the throttle stop to limit RPM's to a near stock level until I get the parts to make it safe to rev to the moon. While I was at it, I put on a new chain and sprockets, and completely went through the Comet 30 series TC. I moved the driven spring to the tightest setting since we ride mostly in sand and hilly/rough terrain.
Here's a copy of my build sheet. Everything under ORDERED is waiting in boxes in my garage for when I get home, everything under NEEDED are ideas, things I'm not sure about, or things I plan on sourcing locally when I get there.
KART
ORDERED:
Top plate with throttle cable attach points
Bolt/stud kit
14cc Head
Billet Flywheel + 4* offset key
Billet Rod ARC6254
Cam (265 lift)
26lb Valve springs
1.3:1 stamped rockers
Valve guide plate
Stainless steel valves
Copper head gasket
Side cover gasket
Intake gasket
Exhaust gasket
Header
Header brace
Header heat wrap
Assembly lube
Fuel pump/line/clips
22mm Mikuni carb
Carb adapter with pulse fitting
3.5 gal polished SS gas tank
130 main jet
12.5 pilot jet
Long carb stud
120" throttle cable
Spark plug x 2
Driver unit spring, 3600 rpm engagement
Driven unit yellow torsion spring
Brake pads
Brake cable/conduit
Hubs/spindles------------------ used from 4-wheeler
Brake lever/handlebar mount ***dual cable***
12.5" gas adjustable shocks x4
4 point harness x 2
Handlebars and grips
Twist throttle
Kill switch
NEEDED:
ENGINE:
Ignition coil
Piston rings
Push rods (length??)
Engine mount bolts
Hose clamps for header wrap
Choke cable
DRIVE:
Wider axle + sprocket hub + wheel hubs + bearings
Current: 9 tooth, 3/4" center
60 tooth, 4.5" hub 6 bolt
Larger Rear sprocket (70+ tooth?)
Tabs for driven
SUSPENSION/FRAME/BRAKES/TIRES:
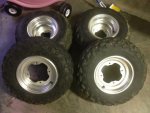
Front wheels/tires 4x144 bolt pattern
Have A-arms lengthened/reinforced/fit to spindles
Front Brake shoes
OTHER:
Mirrors
Fab mount plate for handlebars + tab for headlight switch
- 1/8" steel, bolted to steering stem, 4x U-bolts to hold bars
8ea u-bolts for harnesses
4ea u-bolts for gas tank mount
Seat re-cover/increase padding/new plywood
--jegs race seats?
Longer start rope/pulley to mount on roll bar
MP3 player
Optima battery
MACHINE SHOP:
Head decked
Valve job
Piston machined down flat
Block machined for 0 deck height
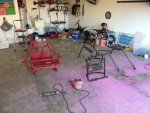
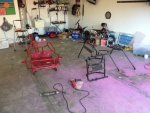
Before:
After:
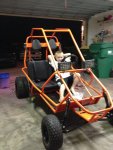
My son was really excited, I still had the TC apart when I took this.

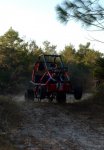
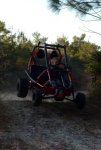
Action shots. Fuller drives this thing like he stole it.
Hey guys, I figured that after I posted an introduction I should probably start a build log here. I started with a well used Manco Magnum that I found on Craigslist. I chose it because it is a 2 seater and has a full suspension; single a-arms in the front and a swing arm out back. It came with a Robin 6.5 which ran pretty well, but was worn out and pretty much gutless. I had planned on rebuilding the Robin, but after a quick search realized that any sort of performance parts were going to be hard to find and expensive. I decided to ditch it and start fresh with a new HF Predator 212. For $99 out the door with a 2 year warranty and a ton of aftermarket support it was a no brainier.
As soon as I got my new engine home, I promptly screwed it up. Patience is a virtue that I lack, and I was in such a hurry to start modding that I pulled the governor and the low oil shutoff switch before I found out that the stock flywheel and rod have a tendency to explode at higher RPM's. Great. I also slapped on a homemade header and scrapped the stock air box for a high flow air filter without realizing how badly it would screw up my jetting. So what I have now is an engine that is really hard to start and runs like crap until it's fully warmed up. (I deployed before I could get the parts I needed, and won't be home for another month, but everything should be waiting when I get back. See the list below.)
What I did right was the frame. I stripped it down completely, wire brushed, grinded, and sanded all the old paint off, cut off all the useless tabs, smoothed out all the welds, and primed/painted everything in KTM orange, black, and white. It turned out awesome, and my son loves it (he races a KTM SX50). I also covered the floor pan on both sides with truck bed liner to provide a little extra protection. When I was grinding, I noticed that the swing arm had some pretty weak mounting areas around the engine mount, and was actually starting to crack in a few places, so off it went to the local welding shop to get beefed up in all the right areas.
I put it all back together, fabbed up some new adjustable gas and brake pedal assemblies (I can move them back so my son can reach them, then slide them forward when it's my turn to play), and covered most of the roll cage with 1" foam pipe insulation from Lowes. It looks good, and provides cheap protection for the paint job I spent so much time on. I went ahead and used the Predator, and set up the throttle stop to limit RPM's to a near stock level until I get the parts to make it safe to rev to the moon. While I was at it, I put on a new chain and sprockets, and completely went through the Comet 30 series TC. I moved the driven spring to the tightest setting since we ride mostly in sand and hilly/rough terrain.
Here's a copy of my build sheet. Everything under ORDERED is waiting in boxes in my garage for when I get home, everything under NEEDED are ideas, things I'm not sure about, or things I plan on sourcing locally when I get there.
KART
ORDERED:
Top plate with throttle cable attach points
Bolt/stud kit
14cc Head
Billet Flywheel + 4* offset key
Billet Rod ARC6254
Cam (265 lift)
26lb Valve springs
1.3:1 stamped rockers
Valve guide plate
Stainless steel valves
Copper head gasket
Side cover gasket
Intake gasket
Exhaust gasket
Header
Header brace
Header heat wrap
Assembly lube
Fuel pump/line/clips
22mm Mikuni carb
Carb adapter with pulse fitting
3.5 gal polished SS gas tank
130 main jet
12.5 pilot jet
Long carb stud
120" throttle cable
Spark plug x 2
Driver unit spring, 3600 rpm engagement
Driven unit yellow torsion spring
Brake pads
Brake cable/conduit
Hubs/spindles------------------ used from 4-wheeler
Brake lever/handlebar mount ***dual cable***
12.5" gas adjustable shocks x4
4 point harness x 2
Handlebars and grips
Twist throttle
Kill switch
NEEDED:
ENGINE:
Ignition coil
Piston rings
Push rods (length??)
Engine mount bolts
Hose clamps for header wrap
Choke cable
DRIVE:
Wider axle + sprocket hub + wheel hubs + bearings
Current: 9 tooth, 3/4" center
60 tooth, 4.5" hub 6 bolt
Larger Rear sprocket (70+ tooth?)
Tabs for driven
SUSPENSION/FRAME/BRAKES/TIRES:
Front wheels/tires 4x144 bolt pattern
Have A-arms lengthened/reinforced/fit to spindles
Front Brake shoes
OTHER:
Mirrors
Fab mount plate for handlebars + tab for headlight switch
- 1/8" steel, bolted to steering stem, 4x U-bolts to hold bars
8ea u-bolts for harnesses
4ea u-bolts for gas tank mount
Seat re-cover/increase padding/new plywood
--jegs race seats?
Longer start rope/pulley to mount on roll bar
MP3 player
Optima battery
MACHINE SHOP:
Head decked
Valve job
Piston machined down flat
Block machined for 0 deck height
Before:
After:
My son was really excited, I still had the TC apart when I took this.
Action shots. Fuller drives this thing like he stole it.
Attachments
-
 ImageUploadedByTapatalk1366532498.683683.jpg86.5 KB · Views: 43