Like I Need MORE Projects...

Status
Not open for further replies.

OzFab

New member
Messages
15,615
Reaction score
8
Location
Warwick Qld, Australia
My daughter has a 7yo (almost 8yo) half sister who live here in town with their mother who lost her father last December in a motorcycle crash; this guy supported & raised MY kids for more than 15 years so, now it's payback time...

While discussing our grandkids karts with my ex, she mentioned she would like to get one for her daughter (who's a bit of a speed freak) so, I started looking online & found the perfect kart for her; while searching, I found another which made me think "I'm NOT passing that up!"

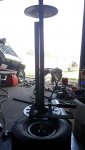
So, yesterday (Sunday) I set off on an 8 hour road trip to collect the two; the white kart cost me the same as the fuel needed for the trip ($100) & the black one cost $250 & came with 2 engines; pretty much all the black one needs is the engine & rear sprocket mounted & a chain; the white one needs a little more work, as you can see from the pics...
 

Attachments

  • 20170925_125201[1].jpg
    20170925_125201[1].jpg
    485.1 KB · Views: 24
  • 20170925_125214[1].jpg
    20170925_125214[1].jpg
    526.3 KB · Views: 22
  • 20170925_125229[1].jpg
    20170925_125229[1].jpg
    554.9 KB · Views: 20
  • 20170925_125251[1].jpg
    20170925_125251[1].jpg
    584.9 KB · Views: 18
  • 20170925_125343[1].jpg
    20170925_125343[1].jpg
    509.1 KB · Views: 15
  • 20170925_135720[1].jpg
    20170925_135720[1].jpg
    441.2 KB · Views: 18

OzFab

New member
Messages
15,615
Reaction score
8
Location
Warwick Qld, Australia
Pic #1: I think this clutch may be damaged; thoughts?

Pic #2: Clutch & sprocket that came with the black kart; anyone else see an issue?
 

Attachments

  • 20170925_152044[1].jpg
    20170925_152044[1].jpg
    280.4 KB · Views: 11
  • 20170925_152054[1].jpg
    20170925_152054[1].jpg
    253.8 KB · Views: 14

mckutzy

Well-known member
Messages
8,353
Reaction score
31
Location
bc, canada
Second on seems good to go... Disassemble and check/clean/re-lube...

Ya..... The first looks a little broken....
 

OzFab

New member
Messages
15,615
Reaction score
8
Location
Warwick Qld, Australia
if that's not the pic it's about 1/8" of an issue or say twelve thereof :D

'sid

Correct, #35 clutch, #40 sprocket...

Since the clutch on the white kart is... umm... a little worse for wear, I'll use the clutch from the black kart & I have a new #40 clutch on the way; I also have sprockets on the way for a jackshaft...

Second on seems good to go... Disassemble and check/clean/re-lube...

It should be, it's brand new...
 

OzFab

New member
Messages
15,615
Reaction score
8
Location
Warwick Qld, Australia
Any ideas on permanently connecting two sprockets besides welding? I could weld them but, I don't want to effect the integrity of the sprocket teeth; I thought about roll pins or even drill & tap to insert high tensile bolts; thoughts?

The two sprockets will run internal needle roller bearings on a fixed shaft as a jackshaft as there's nowhere to mount an active J/S...
 

Attachments

  • 20171007_164741[1].jpg
    20171007_164741[1].jpg
    178.8 KB · Views: 5

itsid

Moderator
Staff member
Messages
11,564
Reaction score
116
Location
Ruhrpott [Germany]
Since I assume you cut the tube yourself to length,
cut another one twice the width of the sprocket longer.

cut the faces of the tube at 45° and 90° one sprocket width deep and cut away the two larger sections on each end (basically converting the tube into some sort of dog clutch.)

cut matching slots in the sprockets.
then either drill and tap small holes per at the shoulder edges of the mating parts to insert a grub screw to locate and fix them in place (right at the seam)
or just solder all together (with some excessive use of flux)
that way you can easily swapp a single sprocket.

downside some excessive filing involved (since IIRC you don't have a milling machine :()

'sid
 

mckutzy

Well-known member
Messages
8,353
Reaction score
31
Location
bc, canada
I'm thinking he's saying make grooves like a lovejoy couplers...

I think however the teeth may be hardend...
A few tacks or a few small welds with immediate cooling.... That won't do much to the heat treat... It'll be fine...
 

OzFab

New member
Messages
15,615
Reaction score
8
Location
Warwick Qld, Australia
I was thinking the same, it's only the teeth that are hardened, the bush is mild steel which can be drilled &/or machined but, with a 130A 240V welder, it takes time to make a tack long enough to hold yet not transfer heat to the teeth...
 

itsid

Moderator
Staff member
Messages
11,564
Reaction score
116
Location
Ruhrpott [Germany]
Umm, what?

Sorry Alex, not quite getting that; any chance of you drawing me a picture?

Yeah I thought this might need an illustrated explanation after I posted it :(

I'm thinking he's saying make grooves like a lovejoy couplers...
And you are correct ;)

Anyways, I attached a lazy rendering;
I hope it's clear enough

slots in the sprocket are easier to file if you open the bore of course (that much is obvious ;))
drilled and tapped at the red arrows (again was too lazy to make proper 3d files)
the sprocket should stay firmly attached.

join_sprocket.jpg

'sid
 

OzFab

New member
Messages
15,615
Reaction score
8
Location
Warwick Qld, Australia
Ah, I see now; however, these are "B type" sprockets with the bush attached...

You have given me an idea though; if I cross drill & bore the bushes I can press them onto a length of tube & set screw them in place...
 

Attachments

  • 20171009_123303.jpg
    20171009_123303.jpg
    493.9 KB · Views: 2

bob58o

SuckSqueezeBangBlow
Messages
8,813
Reaction score
889
Location
Chicago-town USA
Weld or drill/tap/bolt. If bolts can hold a sprocket to a hub, they can hold a sprocket/hub to a sprocket/hub. Insert some rod to center them up and have at it with a drill press.

How thick is the "Bush"?
on the small sprocket? What's the biggest bolt you could use? 4 or 5 bolts should do it?
 

itsid

Moderator
Staff member
Messages
11,564
Reaction score
116
Location
Ruhrpott [Germany]
Ah, I see now; however, these are "B type" sprockets with the bush attached...

You have given me an idea though; if I cross drill & bore the bushes I can press them onto a length of tube & set screw them in place...

Oh B-type.. (that difference in colour from the teeth to the collar suggested otherwise in the first pic you attached (at least to me it did)

Sooo.. just like bob said
it's as easy as drilling an offcenter hole through both sprockets and put a bolt through (or just a steel pin)
think of it as makeshift key.

I think two holes and pins/bolts are better than one, but a single one should already suffice mechanically as once lined up the finished pack
shouldn't see much side load if any at all, right?

tap only the "second" sprocket though,
and if you make two holes tap only one per sprocket that way you can put the two bolt heads on opposite sides and the sprockets can still sit perfectly flush with one another.

'sid
 

OzFab

New member
Messages
15,615
Reaction score
8
Location
Warwick Qld, Australia
The front end of the black kart was built "ok" but, it has issues; when I got them home, I noticed an excessive amount of side "wobble" which usually indicates bad bearings; however pics 1 & 2 show the front stub axles as they were; the plastic sleeve measures around 19mm yet the bearings have an ID of 20mm... no wonder the wheels wobbled...

Also notice the rear spacer flapping in the breeze with a 22mm ID :huh: 
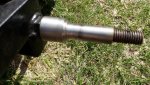
so, I ditched all of that & spun up these neat one piece spacers which provide the correct spacing between the 5/8" stub axle & the 20mm bearing & also provides around 30mm of back spacing to align the castle nut used to secure the wheel with the split pin hole in the axle...

On the white kart, when I first moved it I noticed something amiss with the rear axle; either the sprocket was off centre (nope), the chain was severely stretched (still a possibility) or the axle is bent (BINGO!...

This is gonna be fun because not only are all the wheel bolts corroded in place (steel bolts in aluminium hubs) but, some amateur has welded the brake disc to the axle :censored: 
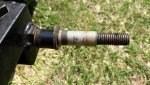
not to mention the sorry state of the axle in general...
 

Attachments

  • 20171011_130120.jpg
    20171011_130120.jpg
    293.1 KB · Views: 2
  • 20171011_130148.jpg
    20171011_130148.jpg
    413.1 KB · Views: 3
  • 20171011_130533.jpg
    20171011_130533.jpg
    183.9 KB · Views: 3
  • 20171011_130158.jpg
    20171011_130158.jpg
    513.9 KB · Views: 3
  • 20171010_171906.jpg
    20171010_171906.jpg
    459.9 KB · Views: 4
  • 20171010_171912.jpg
    20171010_171912.jpg
    226.6 KB · Views: 5
  • 20171011_135655.jpg
    20171011_135655.jpg
    198.1 KB · Views: 4

mckutzy

Well-known member
Messages
8,353
Reaction score
31
Location
bc, canada
I reckon it could be a wee bit outa wack.... Hard to tell with all that light shinning through....;)
 

KingCobra

TROLL CRUSHER INC.
Messages
583
Reaction score
1
Location
TROLL TORTURE ROOM
I will post photos if you don't mind me sharing my experience. Better yet, I think this is your personal build thread and I better hold off as our carts are as different as explained in the Sesame Street video you are about to watch...I will let bob58o explain this with his favorite cartoon about 'circles' or something like that.. Bring it Bob! Thanx
 

Attachments

  • 0d885e61ae0326f39b4ff9865501f7fb_cliparti1-congratulations-congratulations-smiley-clip-art_590-.jpeg
    0d885e61ae0326f39b4ff9865501f7fb_cliparti1-congratulations-congratulations-smiley-clip-art_590-.jpeg
    16.5 KB · Views: 1
Status
Not open for further replies.
Top