Lights and other elec. device mounting/wiring?

mckutzy

Well-known member
Messages
8,353
Reaction score
31
Location
bc, canada
Hey guys...
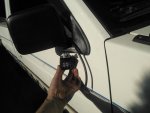
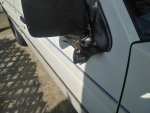
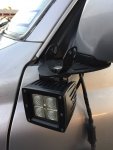
I want to mount some lights to the truck, ditch lights they call them...
A left and right light, mounted at the mirror mount.
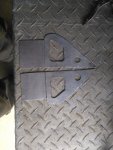
I need to make a custom bracket and theyll mount just under the mirrors.
I can make the routing of the wires into the truck through the mirror base using SS cable glands.
I would like to route the wire inside to keep them tidier than having a flapping wire poking into the hood joint...
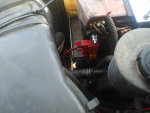
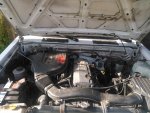
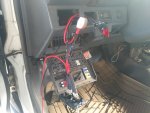
I have a firewall bung hole to use for power in from a fuse block, or maybe the fuse block inside, then power to device inside.....
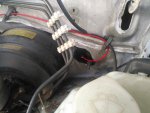
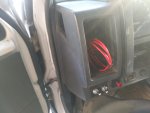
I was thinking a new small fuse block to house the new items, instead of an add-a-circuit power fuse tap, to an existing point on the factory block.

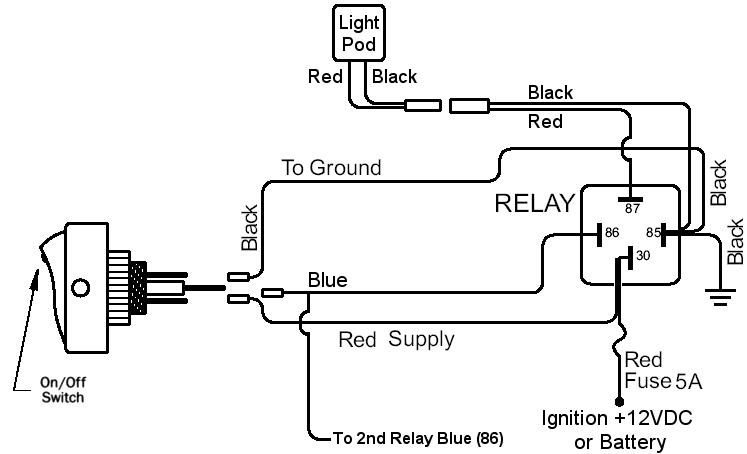
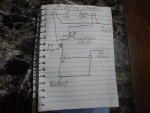
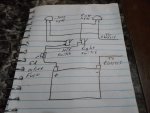
(Hopefully this shows right)

I was thinking either a battery mounted + and - power points,(bolt to the side posts of the battery)
A Blue Sea System 4-Circ Term Mount w/Cover & Neg.....
https://www.amazon.ca/dp/B00SE6Z2WI/ref=emc_b_5_t?th=1


Or
A Blue Sea System 6-Circ w/Cover & Neg fuse block, (all in one +/- fuse block, requiring both leads to mount to it and

https://www.amazon.ca/Systems-Blade...ncoding=UTF8&refRID=2RDHHRWM255DTECTC0B9&th=1

The second keep the +/- all together when routing the Light harness assembly, as its just there, but Im sure a Neg ground buss/any near chassis ground could be also used....

Honestly Im not too sure, but this is why Im asking... been doing a good look around on these topics... and have a few questions to ask....
What do you think???
 

Functional Artist

Well-known member
Messages
4,411
Reaction score
1,694
Location
Toledo, Ohio
Kinda need more info :thumbsup:
...what kinda truck? (old or newer, American or foreign)
...what kinda lights? (incandescent, halogen or LED)

IMO, both of those are "overkill" just to add a few lights :cheers2:
 

itsid

Moderator
Staff member
Messages
11,564
Reaction score
116
Location
Ruhrpott [Germany]
I'd always use a good chassis ground instead of running a ground wire to the battery,
it's usually cleaner and usually you'll end up with less noise
(which frankly is not important for lights of any kind really)

I think I'd wire from a 'switched' powersource,
so the lights won't work unless the key's in the on position.

That wy a creeping current (which is always a possibility I'm afraid)
can't suck your battery dry over night

Now adding another fuse is not necessary most of the times..
if you pay close attention to the fuse box, you will certainly find some fuses that are not
"fully loaded" [flood lights, heated seats etc... extras you might not have ordered that draw a severe amount of amps]
those fuses can be tapped into
sometimes by just adding a higher rated fuse [your manual will tell you if and what],
the wires are usually already beefy enough
(I know no exception, but just look what gauge the wire has and what similarly rated fuses wires look like to be sure ;))

And then you should be good already, make sure to use shrinking tube
or self soldering shrink connections, care about proper insulation on all connectors
(electrical as well as water just to be safe)

Can't open the links atm...
but you know what a fuseholder should look like ;)

OH: some cars have spare fuse slots in the original fusebox [sharing boxes amongst different models] unconnected to any wires usually...
but sometimes they can be activated by just adding wire and maybe the terminals..
that's a cleaner way of adding an additional fuse to an existing car IYAM


So yeah, maybe post a pic of your trucks fuse-box (inside of course) and maybe we can see
some convenient spot :D

'sid
 

mckutzy

Well-known member
Messages
8,353
Reaction score
31
Location
bc, canada
Aight...I knew that statement I say all the time, is going to bite me... Ill have to get some pics soon.... ;)

It an older 92 Nissan D21 pickup, reg cab/box... Called a D21 Navara pickup in UK and AUS/NZ ect.

Lights are a 9 LED, 2"x2"-12Vdc, 15W, 1500lum, .87A@12v. Trux Accessories brand.
I got these cause they were a small spot light, on a good deal at the Princess... I did some checking on the brand and people seamed to have good thoughts....
A switched circuit can be done, I was thinking I could mount a high amp toggle or toggle switch w/relay for power on to the block...

I do have some room, both inside the truck but also in the engine compartment...

This is the first fuse block style...


This is the second one listed above...


Aditionally I had thought about not having to rout a negative through aswell, and using a singe bar like this.....And NEG to chassis ground...
 

itsid

Moderator
Staff member
Messages
11,564
Reaction score
116
Location
Ruhrpott [Germany]
thanks mac..
there wasn't any problem with the links though, just with my computer
Nevermind ;)

Okay 2Amps peak to be assumed for 15W lights..
So I don't think you'll have much issues tapping into an existing fuse.
The KingCab version for example had an optional winch IIRC...
if you do not have the winch installed, the fuse it was powered by certainly carries a line that can handle two additional amps ;)

the 4door had an optional sun roof (electric) if I'm not mistaking..
so that could also be a fuse that should be able to deal with 2 more amps...

RegCabs I mostly came 'nude' around here so the original fuse box (shared amongst all three cab sizes) should have a few empty slots available for you.

But if you want an external box... to me it'd be the first one
small and easy to install and since there's no mounting other than directly to the battery,
it's easiest to be removed again w/o leaving ugly holes :D

'sid
 

mckutzy

Well-known member
Messages
8,353
Reaction score
31
Location
bc, canada
Ok cool.
I wish it was the 4 door one... But thats a JDM/UK/Aus/NZ(Non N-American) variant...Seen one once very cool... not a common sight to say the least..

So with the above nameplate values stated of the lights, Is that a 2amp for the both, or 2amp EACH... IE.. individually protected..
And what wire should I run to the lights...12/14/16ga???

EDIT:
So Ive been looking into the wiring diagram of the typical setups...In my case Id like to have 2 light individually actuated, a left side and a right side.
So with a typically diagram as described and say a chassis ground, the power going to the pod(s) can they be separated with a 3 position switch to activate left/off/right?
 

Functional Artist

Well-known member
Messages
4,411
Reaction score
1,694
Location
Toledo, Ohio
Either way, 2A each (4A total) or 2A together
...a 5A fuse should be fine :thumbsup:

For a 12V ~5A circuit
...16g. wire is fine too
(Second opinion: just match the size of the wire currently attached to the lights)

As for the diagram :huh:
IMO you don't need a relay for a 12V 5A circuit :wai:

When I've added work lights to my trucks
...I would simply wire it as one of the diagrams shown below. :2guns:

The first drawing shows (1) on/off/on switch
…& the second drawing shows individual switches, for each light
(the second option allows both lights to be turned on at the same time)


* I like Sid's suggestion of drawing power from an ignition/switched power source :cool:

So, when the ignition switch is turned off
...EVERYTHING is turned OFF :2guns:

Hope it helps. :cheers2:
 

Attachments

  • SAM_2082.jpg
    SAM_2082.jpg
    256.7 KB · Views: 3
  • SAM_2085.jpg
    SAM_2085.jpg
    249.9 KB · Views: 4

mckutzy

Well-known member
Messages
8,353
Reaction score
31
Location
bc, canada
Hehehe... Awesome...
Thanks FA...

I ended up getting a battery mount fuse block, pictured top, I'll have to get a few switches, but I like the diagram you wrote up.... I might end up doing 2 switches separately so I can have a L/R on at the same time..
 

itsid

Moderator
Staff member
Messages
11,564
Reaction score
116
Location
Ruhrpott [Germany]
14V 5 amp rated wire for assumed length of up to 15 ft : AWG 14
(I think you get waway with 3Amps and 10 ft... that'd be AWG 18... )

So yeah 14 or 16 is what I'd pick
good to have some beefiness left just in case ;)

2Amps is per 15W light..

looking at the nameplate you quoted one is drawing 0.87 Amps;
Assuming a decent LED driver I wouldn't expect much of a spike (switching spike)
of more than 2Amps (for one) really..
and if you exclusively run one OR the other, it'd be for both.
since there's no need to double up the security margin for spikes then,
if you're tinkering with the idea of running both at the same time,
I would double up the spike expectation however.

A slow acting 3Amp fuse would still more than cover the circuit.
since those are rare (around here at least)
I'd go for a 5Amp fuse and a 5Amp wire to match that (AWG 14)
it'd also cover for what little the relay itself draws in case you opt for one.

If you need a relay depends on the type of switch you are running.
2Amp spike 1Amp constant is certainly doable in automotive toggle switches alone.

W/O a relay it's even easier to wire..
lights ground to chassis, +12 to the 3pos switch;
switch just needs one 12V supply from the fuse and done.


'sid

PS I like the king cab myself, emergency seats and still enough bed to be of use ;)
but the coolest I've seen was indeed a reg cab dull white on white stock steel rims [and very coarse tread pattern] , screamed "work horse" but had a surfboard casually tied on the bed ... several hours away from any surfworthy waters..
 

mckutzy

Well-known member
Messages
8,353
Reaction score
31
Location
bc, canada
I got most of the wiring done today.....
I bought the Battery mount Fuse block from the Amazon the other day.
I also got some terminal post for the side of the battery, wire and cable glands...
However the cable glands I bought, I think were really meant for sheet metal enclosures and they have narrow amount of threads for tightening, so Im not too sure if I can use these in the mirror mounts... I think they might be fairly thick.


I did everything up to the mounting of the lights.
I found a port through the firewall, I think it was for the clutch or something(on those equipped models). I removed the panel and made a new solid rubber gasket to fit. Drilled a hole through, then poked a hole through the rubber with a sharp awl. Itll be self sealing around the wire.
Routed the wire from the battery terminal fuse block, to the firewall hole. Will use a 5 amp as suggested. Used 14ga wire throughout.
(Pic shown without cover on, and fuse out of used slot till ready.)

Routed the grounds to a chassis ground. Routed the right side light power up through behind the glove box next to the blower motor, through behind the vent. The same thing on the left, just away from the moving parts and all zip tied and tucked away to the under dash panels...

I used a couple of Wago lever connectors to have an easy solid T junction, for the power and the grounds. These are inside, so Im not so worried about moisture afflicting the connection.

I found a lighted power on switch, and a bunch of other toggle switches..
So now I have independent L and R switches, with a red power on(when lit) switch. I did a bit of a bench test and rigged up a setup for this, worked great...

Im thinking I might just put a hole in the side of the dash (on both sides) for the wire, as there is a space the thickness of my fingers to fit between when door is closed, so a connection could be made to fit with out much binding...
I am worried a bit that it might too easy for it to pinch when the door closes, but Im still thinking on this....I have the vents removed still to work behind, also to vacuum up all the crap built up in there...
Pics of what I did...
 

Attachments

  • IMG_20190724_180328.jpg
    IMG_20190724_180328.jpg
    171.8 KB · Views: 7
  • IMG_20190724_175837.jpg
    IMG_20190724_175837.jpg
    197.4 KB · Views: 6
  • IMG_20190724_180056.jpg
    IMG_20190724_180056.jpg
    283.9 KB · Views: 4
  • IMG_20190724_180048.jpg
    IMG_20190724_180048.jpg
    359 KB · Views: 7
  • IMG_20190724_173224.jpg
    IMG_20190724_173224.jpg
    249.6 KB · Views: 5
  • IMG_20190724_172457.jpg
    IMG_20190724_172457.jpg
    271.8 KB · Views: 7
  • IMG_20190724_173238.jpg
    IMG_20190724_173238.jpg
    166.8 KB · Views: 5

Functional Artist

Well-known member
Messages
4,411
Reaction score
1,694
Location
Toledo, Ohio
Looks great! :cheers2:

That's a really nice-n-clean installation :thumbsup:

Just keep an eye on the wires goin' thru the door jam for a few days
…& if you don't see any pinching evidence on the insulation of the wires, you should be kool :cool:
 

mckutzy

Well-known member
Messages
8,353
Reaction score
31
Location
bc, canada
Thanks man.. For me it's really it's the first time on vehicle 12v.. I've got most experience with 220-600vac pumps and electric motors...

At this point is where I'm at.. I haven't built a mount for the lights yet, but I did make a template for the mount, also scrounged up a piece of SS shelf I think is from a BBQ..

I have to find a good cable gland with decent amount of threads.. I bought a pg7. Theses are too small..
 

mckutzy

Well-known member
Messages
8,353
Reaction score
31
Location
bc, canada
Now after look extensively, I cant seem to find a Cable gland that has a longer base thread for thicker material...there are others, but not for the wire I have....The wire is 5mm or less
Im wanting a clean look, so Not a marine cable clam type or the like( usually has 4 or more screws to bolt through to secure the rubber puck)... way too big and ugly... Or a drilled hole stuffed with sillicone...

The pg7 connector is what I want but the base is so small... not really enough thread to be confident on.
Here is a chart on what I mean...The pg7 has 9mm length


What other options are out there on this?.... for me IM stuck...
 

Functional Artist

Well-known member
Messages
4,411
Reaction score
1,694
Location
Toledo, Ohio
Maybe countersink the area, with like a step drill bit
...so, part of the gland housing sits below the actual surface :thumbsup:

or, maybe a look for a piece of 13mm OD PVC (threaded if possible)
...if your 12.5mm nut doesn't fit, maybe sand ~1/2mm off the top of the threads :cheers2:
 

itsid

Moderator
Staff member
Messages
11,564
Reaction score
116
Location
Ruhrpott [Germany]
never was a fan of screwon glands..
they make sense in industrial applications at times.. but they're always bulky and ugly..

So a rubber cable gland (poke through type) is what I usually prefere when I need to keep water out
or pass a cable through metal boxes (well grommets in this case),
much smaller, cheaper, "less industrial" thus mostly better looking :D

IDK what you want it for tbh so I can't make a sound suggestion really,
but a bend relief can be had in fairly small and fairly long ...
maybe you can repurpose one of those.

'sid
 

mckutzy

Well-known member
Messages
8,353
Reaction score
31
Location
bc, canada
I looked at a bunch of ideas but couldn't really find much as I don't know what they are called...

I'd like to hear what ideas you have...
 

mckutzy

Well-known member
Messages
8,353
Reaction score
31
Location
bc, canada
Well couldnt find another thing like those rubber boot like things as above...Without buying a ton from china...
So I went and had another good look on things with the mirror and thickness of the mount.... I have just enough to make it work.... Not much to make me totally comfortable, but with some locktite itll hold. I can also lightly seal it with the silicone if need be...

I went and got things worked on today...
Went and cut out, bent the light mounts. Got as far as looking on how itll look like on the right side... Not too bad so far....

Once I finalize the exact position ill, trim and transfer the measurment to the opposite side.
The wire will poke through almost center, and feed into the mirror adjuster hole, Mine are manual adjustable so I have a good hole prepared...

The last pic is what look I was kinda trying to achieve...
 

Attachments

  • IMG_20190731_175759.jpg
    IMG_20190731_175759.jpg
    226.8 KB · Views: 3
  • IMG_20190731_162112.jpg
    IMG_20190731_162112.jpg
    200.8 KB · Views: 7
  • IMG_20190731_152744.jpg
    IMG_20190731_152744.jpg
    393.2 KB · Views: 2
  • miror mount.jpeg
    miror mount.jpeg
    152.7 KB · Views: 4

itsid

Moderator
Staff member
Messages
11,564
Reaction score
116
Location
Ruhrpott [Germany]
IIRC the doors open rather wide on a D21..
so check that you cannot accidentally smash your light into the fender ;)

I have some local sources for those bend reliefs and rubber grommets;
a household appliance store (you know the one that also sells spare powercords and such)
as well as a well sorted hardware store
should have some sizes in stock.
my electronics store has them as well... and of course chinese sellers on ebay (cheapest but longest time to actually hold them in your hands)

and apart from the electronics store you won't find any of that listed online (some stores don't even have a website at all ;))

'sid
 

mckutzy

Well-known member
Messages
8,353
Reaction score
31
Location
bc, canada
Thanks 'Sid.... It does open wide...
I did check the opening with the light clamped on above. Its got plenty of room....
Thanks for mentioning the electronic store... I forgot about them. I do know of one that I could ask there to see what they have....
Im just going to wait a bit before I drop the hammer and drill the outside hole....Still thinking I might make it work with the gland I have, but Im going to go check out the elect store first...
 

Attachments

  • IMG_20190801_051912.jpg
    IMG_20190801_051912.jpg
    222.1 KB · Views: 3
Top