Lamborghini Go Kart Project - Electric to Gas

Status
Not open for further replies.

6StringMercenary

New member
Messages
29
Reaction score
0
Location
Dallas
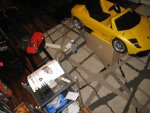
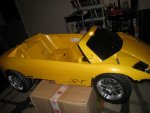
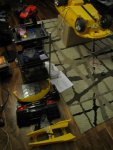
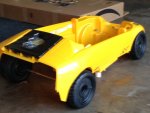
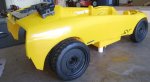
As mentioned in the introduction I'm interested in modifying a kid's ride on car to be capable of holding an adult, running on a gas motor, and have decent street performance and speed. I finally picked up a vehicle, a Lamborghini Murcielago SV ride-on. 6V, pretty great shape overall, and at a really great price. Almost too good, but I was first in line, got it same day, and now can justify having some budget to buy parts.

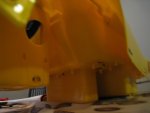
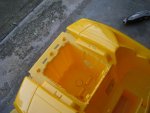
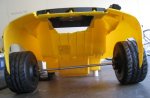
I wanted to get it torn down quickly, and was hoping to get it really stripped by the time for the Swap Meet. Overall it has been a lot of fun to work with. Fortunately for me - and maybe not so fortunate if somebody really wanted to use this as a ride-on car - because this sat in a hot Texas garage for several years, the glue that was applied to the clip areas hardened and can be poked away with a flat head screwdriver or switchblade if it's fussy. There's more for me to clean out on the parts to the side, but the body and frame are nice and clean.

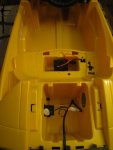
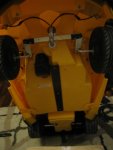
The stupid dash has a really hard to reach pair of small screws, so it's still on, along with the windshield. I left the wheels and tires on too, seems good for reference. On my shopping list is going to be a good quality dremel tool and cutting wheels. In time I'd like to cut away as much plastic as needed to create a subframe in the back to mount the running gear. Not sure of combination of materials (metal, composites, etc) but considering the desire to over-engineer the weight tolerance, it'll probably be a significant amount of design. If possible I'll build the structural support / cage under the car but not mounted to it so I can test outside of the body, then merge into a monocoque using adhesives to accomplish the goal.

For now I'm working indoors. When the real work starts happening I'll hoof it out to the garage. Have to remember proper safety techniques. Thanks for looking!
 

Attachments

  • LGKP - Garage and Lift.JPG
    LGKP - Garage and Lift.JPG
    133.1 KB · Views: 26
  • LGKP - Top Internals.JPG
    LGKP - Top Internals.JPG
    54.3 KB · Views: 25
  • LGKP - Undercarriage.JPG
    LGKP - Undercarriage.JPG
    53.7 KB · Views: 28
  • LGKP - Chop Shop Style.JPG
    LGKP - Chop Shop Style.JPG
    103.1 KB · Views: 30
  • LGKP - Pick and Pull.JPG
    LGKP - Pick and Pull.JPG
    138.3 KB · Views: 30

Half-breeder

"Edit" button removed
Messages
1,686
Reaction score
9
Interresting project...

IMHO... id find an old CL frame that will fill the width... n stretch the frame to fit length wise. Lambo's are a low framed car... so to keep the sports car look ensure the body sets low. If those wheels are plastic...? They won't work for a gas power plant... but... you could cut out the rim pattern. n somehow finaggle it as a hubcap for the metal/rubber wheels.

...just a couple pennies your way.
 

6StringMercenary

New member
Messages
29
Reaction score
0
Location
Dallas
Interresting project...

IMHO... id find an old CL frame that will fill the width... n stretch the frame to fit length wise. Lambo's are a low framed car... so to keep the sports car look ensure the body sets low. If those wheels are plastic...? They won't work for a gas power plant... but... you could cut out the rim pattern. n somehow finaggle it as a hubcap for the metal/rubber wheels.

...just a couple pennies your way.

Yeah I'm thinking a custom made frame, either from metal, carbon fiber, or a combination of things will need to be made to be able to upgrade the overall running gear. I doubt the steering unit will be usable, but at least I've got some of the physics mapped out. Also I'm really planning to re-work the passenger / seating area so it will be a braced / composite / metal type of thing to hold as much as I can do with the space and materials. Initially rated for 66 lbs, I'd like at least 100 lbs more capacity, if not 150 lbs.

Spot on about the wheels too, I'm really desiring enough performance to be able to use - well, need - shifter kart tires. From what I've seen in photos, I might be able to locate some in a really suitable size to fit the scale. Based on the way the hubcaps look attached, I'm pretty sure I can take them off and figure a way to re-mount to a different hub (the kart wheel). If that won't work, I'd probably just take a photo, create a template, and make a knock-off style using sheet metal aluminum or get somebody to CNC machine something, then affix it to the kart wheel.

I'm most worried about airflow to the engine, but that's the fun of cutting holes in stuff, and it looks like I'll probably reuse most of the electrical system for the existing lights, then potentially add in some computer fans or other accessories in pursuit of performance. I have been wanting a wind tunnel lately haha
 

6StringMercenary

New member
Messages
29
Reaction score
0
Location
Dallas
Additional tear down

Time for an update.

Got the Lamborghini completely stripped down. The hardest part for me was prying off the pop washer nut things on the axles. They were on there ridiculously stiff. Prying alone wasn't enough - had to get some WD-40 involved to assist with working them off. Fortunately no damage to the plastic tires or the plastic washers that go with them. Basically they're re-usable.

The photos show general status now. The rear axle came out just fine so I'm thinking about using it as a starting point / test unit for initial gas power. That's kind of getting ahead of myself though, because I'm thinking more about doing some cutting and mock-up work to add strength.

For now my vision is to cut out most of the "box" that was housing the electric motor. This will give me a very large opening. Then I will examine where I can add bracing to develop a rear frame assembly to over-compensate for the loss of structural integrity by cutting out the large section of plastic. I'm going to have to spend a lot of time measuring and figuring out what materials to use.

Making the rear frame under the body is exciting to me, because the design of the car seems to give me some options. That is, there's an actual engine cover that I might be able to customize for air intake (cut plastic out & screen with mesh), other 'fake' vents that might be usable once actually cut out (top of fender, in front of rear wheel), and my favorite part - the back end can be easily removed. I'd like to do a Le Mans style system where I can pull a few pins and have it off in a jiffy. A lot of my options will be dictated by how much space I can create, how strong the upgrades manage to come out, and what kind of motor options I have.

Right now I've only got the Stihl 23cc / 1 hp weed whacker motor. I have no doubt it'll fit in the area just fine...but I'm interested in something quite a bit larger...picking up a working 5 hp motor would be really easy around here. I'd just like to have the car itself closer to the point where designing and mounting the motor / drive train and plumbing the exhaust are the next steps. I do have an idea that if I need to move the gas tank from the engine itself, there is an opening in the front of the Lamborghini (the trunk) where I could theoretically put a large reservoir and then run a line to the back. I like to try and keep these things in mind so I don't eliminate options in the future.

Oh, and I did finally get a strong Dremel tool. I have lots of cutting wheels and shaping things, so I think I'm on track. Stay tuned for more on my winter Lamborghini Murcielago Gas Go Kart project! :wai:
 

Attachments

  • Side Under.JPG
    Side Under.JPG
    56.9 KB · Views: 12
  • Parts Pile.JPG
    Parts Pile.JPG
    54.9 KB · Views: 13
  • Front Under.JPG
    Front Under.JPG
    59.6 KB · Views: 15
  • Front Top.JPG
    Front Top.JPG
    71.2 KB · Views: 14

6StringMercenary

New member
Messages
29
Reaction score
0
Location
Dallas
That looks great, I`ll definitely be following this build. Any more progress?

Thanks! It was sitting for a while and I wanted a reason to move it to the garage. I got my rotary tool kit out yesterday and got to work. I've got photos but they're at home, so will post them later. For the record I probably should have used just a full size drill with a cutting tool, but I used the rotary one because, well, it's new and I needed the practice.

The cutting wheels were of no use - broke two of them really fast. They're wafer thin. After reviewing the kit list I found the "steel cutting" tool and that worked great on the plastic. Occasionally it would get hot plastic wrapped around the shaft and kind of loosen the fit. Overall though the tool did what was needed. The job isn't the cleanest or most even, but I can maybe make it look better during the next phase - adding the structural support and creating a place to mount running gear.

After cutting it I did a mock-up using the plastic wheels/tires, had to put it up on something to get the right effect. I did make sure to measure the height of the axle from the best point to take a reading (about 6", if that's of any use). With the motor compartment removed, there is a LOT of room. There's even more room under where the seat was and the normal 6V battery used to be mounted. I put the "engine cover" piece back on top during the mock up and it looks pretty good. Building the structure underneath totally seems possible to get it to hold my weight and more.

Now I'll need to take some measurements within the space. I want to know how big of an engine I might be able to fit in there, even if more cutting might be needed. I need another bit to be able to get the trimmer torn down - need one larger sized star head style for my ratchet. The plan is to use that as a test fit example.

Materials wise I'm thinking about using heavy epoxy and mounting some thin metal plates along the underside of the top of the car. That plate would serve as the 'frame' mounting point for when I start to build / mount other components. I might extend it further toward the front too. Might as well make the whole structure stiffer, considering the dynamics I'd like!

I've got one pic of the mock up but the bulk of the process are on my camera at home.
 

Attachments

  • Gutted Mock Up (Sized).jpg
    Gutted Mock Up (Sized).jpg
    100.7 KB · Views: 9
Last edited:

6StringMercenary

New member
Messages
29
Reaction score
0
Location
Dallas
So here are the photos from this weekend - it's a little difficult to see the amount of space, but it's pretty significant I think. Well, regarding what I've seen about kart power and drive systems, it seems pretty good. Thanks for looking.
 

Attachments

  • Pre-Cut View.jpg
    Pre-Cut View.jpg
    66.5 KB · Views: 9
  • Cutting the Outline.jpg
    Cutting the Outline.jpg
    92.7 KB · Views: 8
  • Cutting Result.jpg
    Cutting Result.jpg
    95.2 KB · Views: 7
  • Mock Up.jpg
    Mock Up.jpg
    66.4 KB · Views: 9
  • Mock Up 2.jpg
    Mock Up 2.jpg
    63.3 KB · Views: 11

6StringMercenary

New member
Messages
29
Reaction score
0
Location
Dallas
Looking good :thumsup: What engine are you thinking on putting in?

Honestly my dream would be to put in a 125cc shifter kart motor with a sequential gearbox. I don't think I'll be able to get funding to that level though. I would like to make sure the vehicle is structurally sound enough to be able to handle that kind of power. I'd have essentially a shifter kart underneath the body (strong frame, kart powertrain, kart tires), but from everything I saw there's no way to mount a decent PW body - or anything unless custom made / scaled - to an existing shifter kart. So I'm doing it backwards!

Yes, I am aware that going about 50-60 mph on this thing sounds insane, because it is to a certain extent, but I do prefer to aim high and dial things back as needed haha. Guess I saw Kart Vader one too many times? Nah!!!
 
Status
Not open for further replies.
Top