Iron Man off road lawn kart

jamobaum

New member
Messages
5
Reaction score
1
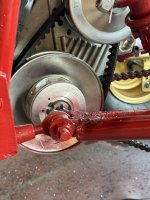
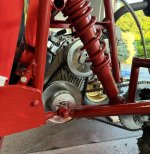
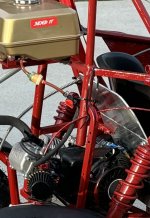
Hello all. Love this forum and have gleaned a lot of great ideas on building a kart. So hear it goes. I just finished yesterday and took it for a spin. I’m 5’10” around 180lbs. It moved out nicely, could get wheel spin in the dirt and gravel taking off. Not sure of top speed yet. It’s pretty smooth on my off-road/in the woods track. I was able to ride about 5 minutes until I lost the nut on the driven pulley and tossed the belt. I shimmed out the driven pulley shaft with 2 extra washers as the chain sprocket on it was very close to the CVT ribbed plate that connects the driver and driven pulley. As a result I was only able to get the nut onto a few threads at the end of said shaft. Needless to say it backed out and off an allowed the driven clutch to slide out and lose the belt. But I’ll call it a win anyway 😎. Pics to come. Feel free to ask Q’s .

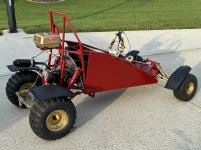
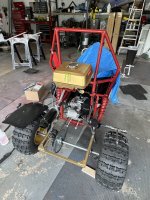
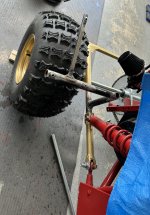
I will say I wish I’d made it bigger. I do have a lot of stuff to store in my shed so I was aiming for small and light. It’s cramped in the cockpit but I didn’t feel like I was ‘hitting’ bars with my feet/legs. However someone taller than I would have their legs bent up more and probably hit the bar for the steering wheel.
 

jamobaum

New member
Messages
5
Reaction score
1
Here’s some photos: More to come. I think I spent 2 months on the build, probably 12 hours a week on average. The part I disliked the most was grinding down the welds. It makes a huge mess, is loud, and takes forever. I liked using a zirconium grit flap disk on an angle grinder but they don’t last long. Grinding wheels are loud and have a lot of vibration but they do last longer.
The lower frame is made from 1” black gas pipe from HomeDepot. It’s just rectangle layout that everything attached too. The upper arch frame is 3/4” gas pipe bent with a Harbor Freight pipe bender. The seat and front suspension attach to this assembly. Then the engine mount(cage) is welded to the back of this frame, maybe 6-8” above the lowest point.
The CVT is rotated to the 8:00 O’clock position so that the driven pulley chain sprocket lines up with the articulation/pivot point of the swing arm. I am trying to avoid using a jack shaft and this appears to work well from the short test drive I took.
 

Attachments

  • IMG_0307.jpeg
    IMG_0307.jpeg
    1.6 MB · Views: 8
  • IMG_0320.jpeg
    5.6 MB · Views: 2
  • IMG_0319.jpeg
    6 MB · Views: 0
  • IMG_0318.jpeg
    5.2 MB · Views: 0
  • IMG_0317.jpeg
    5.6 MB · Views: 0
  • IMG_0316.jpeg
    IMG_0316.jpeg
    3.4 MB · Views: 9

jamobaum

New member
Messages
5
Reaction score
1
The engine is a Predator 212cc. I did a mild cam upgrade, 22# valve springs, thin head gasket, oil sensor/governer delete, some head porting, and a CVL flywheel. I did attach a 3/8” thick 12”x17” aluminum firewall right behind the seat. I don’t trust my backside/mortality to a high revving engine.
 

Attachments

  • IMG_0303.jpeg
    IMG_0303.jpeg
    2.3 MB · Views: 7
  • IMG_0308.jpeg
    IMG_0308.jpeg
    3.7 MB · Views: 7
  • IMG_0306.jpeg
    5.1 MB · Views: 4
  • IMG_0316.jpeg
    IMG_0316.jpeg
    278.3 KB · Views: 7

jamobaum

New member
Messages
5
Reaction score
1
I was most proud of my mud flaps. They were super easy to attach/weld on. The fronts then with the wheels, and the rears have a “nerf/antihooking” tree bar to protect the rear wheel and axle from bending if ya get too close to a tree on a turn.
 

Attachments

  • IMG_0299.jpeg
    IMG_0299.jpeg
    3 MB · Views: 6
  • IMG_0297.jpeg
    IMG_0297.jpeg
    3.6 MB · Views: 6
  • IMG_0306.jpeg
    5.1 MB · Views: 4
  • IMG_0313.jpeg
    4.2 MB · Views: 1
Top