Help with ID and manual

Status
Not open for further replies.

Slimmpd

New member
Messages
82
Reaction score
0
Location
Calera Alabama
Ok
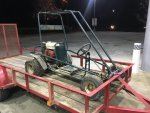
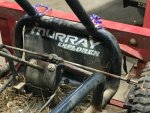
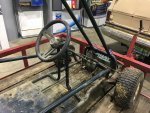
You guys helped me on the Carter Super Wheel, now it looks like I'm getting into the go kart business. Just picked up this Murray Explorer to night. There is no sticker with the model number. I've found some generic info on the explorer model but need the actual model number for parts.
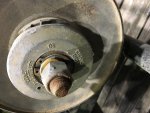
It doesn't have original motor or front wheels, well not original front tires. What it has in the front are lawn mower tires, unsure about the rims.
The old motor is long gone but it was replaced by a pre 2005 GX240. That motor needs a tune and some parts but she turned over and cranked. Drive and driven are Comet series 20 and are in rough shape. Steering is frozen but I can work that out.
The frame is huge and in great shape. What you don't see in the photos, I have in the truck.
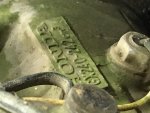
Now just how to figure out the model number.
Any help?
 

Attachments

  • IMG_1689.jpg
    IMG_1689.jpg
    348.9 KB · Views: 5
  • IMG_1690.jpg
    IMG_1690.jpg
    369.4 KB · Views: 10
  • IMG_1691.jpg
    IMG_1691.jpg
    325.7 KB · Views: 7
  • IMG_1692.jpg
    IMG_1692.jpg
    414 KB · Views: 6

Slimmpd

New member
Messages
82
Reaction score
0
Location
Calera Alabama
And more

Only $75
 

Attachments

  • IMG_1688.jpg
    IMG_1688.jpg
    303.5 KB · Views: 3
  • IMG_1697.jpg
    IMG_1697.jpg
    663.1 KB · Views: 3
  • IMG_1694.jpg
    IMG_1694.jpg
    191.3 KB · Views: 4
  • IMG_1693.jpg
    IMG_1693.jpg
    374.6 KB · Views: 6
  • IMG_1683.jpg
    IMG_1683.jpg
    463 KB · Views: 4

Slimmpd

New member
Messages
82
Reaction score
0
Location
Calera Alabama
Steering froze on Murray

Any tricks to unstick or loosen steering on a Murray Explorer or a Gt. Model number is 60501x92, diagram I found looks the same for both. The one I have used to be electric start so that may be the difference. Couldn't turn the wheel only wiggle it a little and could see the steering shaft flex in the middle. Didn't want to bend or break it so stopped there. Hit with everything I have, wd40, PB, Kroil, nothing's helping.
The steering set up on this cart is wielded both top and bottom. I took the stop bolts out of the flange at the bottom of the steering shaft and was finally able to make a complete turn of the wheel but there is no way an 8yo will be able to use it.
Is there a better way to fix this short of cutting and wielding the shaft. I can find no replacement parts on any diagram I can find and the only way to replace, to me, looks like wielding is involved. If I could get it a part, I could make it work but its factory wielded both top and bottom.
Help
 

Attachments

  • IMG_1706.jpg
    IMG_1706.jpg
    437 KB · Views: 3

Hellion

Moderator
Messages
8,417
Reaction score
3,552
Did you hit it with TIME?

Penetrating fluids take time. And copious amounts too. Keep dousing the frozen joint and maybe tap it with a ball peen hammer to induce vibrations.

EDIT: Wait, it turns now?
 

steved

New member
Messages
62
Reaction score
0
Location
Reading, PA
You may need to press the pieces apart, wire brush/sand/file the rust off the parts, relube, and reassemble.

Sent from my SM-T350 using Tapatalk
 

Slimmpd

New member
Messages
82
Reaction score
0
Location
Calera Alabama
Dropped the tie rods,soaking for 2.5 days. Cool at night and direct sun during the day hoping that would do some free work for me. Tapping while grunting with the wheel. Am I missing something, there appears to be no easy way to replace the steering shaft on a / this Murray.

---------- Post added at 09:58 PM ---------- Previous post was at 09:55 PM ----------

The only way that I see to get everything apart is to grind/wash the wields off the bottom of the shaft to clean it up.
 

steved

New member
Messages
62
Reaction score
0
Location
Reading, PA
Dropped the tie rods,soaking for 2.5 days. Cool at night and direct sun during the day hoping that would do some free work for me. Tapping while grunting with the wheel. Am I missing something, there appears to be no easy way to replace the steering shaft on a / this Murray.

---------- Post added at 09:58 PM ---------- Previous post was at 09:55 PM ----------

The only way that I see to get everything apart is to grind/wash the wields off the bottom of the shaft to clean it up.
My Manco is the same way....they slid the steering column in then welded a collar on the shaft. Unless yours is different, the turning issues are probably at the spindles or the tierods.

Take a picture of the area you think it's binding, that might help us throw some suggestions out...

Sent from my SAMSUNG-SM-G900A using Tapatalk
 

Hellion

Moderator
Messages
8,417
Reaction score
3,552
If it's still crusty and rough, it's not inconceivable to pour some diluted grinding compound into the joint and work it right and left to "polish" the rust away.

You'd have to get it out though, by flushing it with a powerwasher or some other method.

All my karts are the same way--the steering shaft is a permanent fixture on the kart.

They should be oiled on a routine basis though to keep the rust monster away.
 

chancer

ɔ ɥ ɐ u ɔ ǝ ɹ
Messages
9,358
Reaction score
83
Location
COMFORT, TEXAS
Mine are that way too. 2 of them I built that way. Beats having a nut fall off and then...
No Steering :surrender:
 

Hellion

Moderator
Messages
8,417
Reaction score
3,552
Mine are that way too. 2 of them I built that way. Beats having a nut fall off and then...
No Steering :surrender:

Yeah. I'm not complaining about it at all. It is the way it is.

I'm gonna blame Slimmpd for buying junk!
 

907debow1234

907 racer
Messages
43
Reaction score
0
Location
Soldotna, Alaska
Maybe just us up here. But hit it with some heat, grab a torch.. I've found that helps to break stuff loose. Let cool. And heat again this can do the trick...
 

Slimmpd

New member
Messages
82
Reaction score
0
Location
Calera Alabama
Tried every trick I know more than once, nothing works except the Hitachi sawsall. Cut that sucker in half. Still couldn't turn it 360' with vice grips attached.it took another 1.5 hours swapping from heat to beat while working the vice grips. Finally got out both pieces. After a good look, there was no way any lube I had was gonna work. The bushing and the rod were pitted and groved, bascilly welded itself together. Found a reamer that was close to the I.D. If the bushing and let it wallow around a little, then a 1/2 inch dowel wrapped in Emory cloth.slicked up pretty good. Went to tractor Supply looking for a coupling that would match the shaft. No luck everything was a little to big. I found the all thread display and the same with their 1/2 thread couplings but their 3/8x2 inch coupling fit real good after another hour on the bench grinder with the shafts. Took my time and kept the shafts Turing so everything turned out smooth with no flat spots. Wound up with a good tight fit to both ends of the new shafts with only a little help from a 3 pound mallet. The all thread coupling has 2 holes drilled about a third of the way from each end. Used those as a guide to drill thru both ends of the shaft. TS had some grade 8 bolts the right diameter and length. It all looks pretty slick, it's tight and I believe it will hold.

---------- Post added at 01:27 AM ---------- Previous post was at 01:08 AM ----------

Another issue:
Good luck finding parts for an older GX240, at least in central Alabama. Honda makes a carb kit at least on paper but none of the parts houses can give you an answer without calling Honda. Two said they could order one but it might take two weeks. Gasket kits are rare also. I found a place in Hueytown, Outdoor Power Supply's, that actually had 3 carb kits in stock. I told him he had the market cornered, he said he already knew it and that Honda was a pain to deal with. That they would rather sell you a new carb at $80 than a kit. He also told me the gasket kits were hard to find and he didn't have a kit but would cross the numbers and put me one together from what he had from other manufacturers, just come get them Monday morning. After 8 other places telling no or good luck,this guys my new best friend. The Murray has a single disk brake. I fooled with the caliper a little tonight. Its tomorrows project. Got the Briggs back together with its gasket and carb kits. Gonna start putting it back together after pressure washing in the morning. Hope to burn some gas and tune it before dark. I would really like to get it sanded and painted this week.
 

Slimmpd

New member
Messages
82
Reaction score
0
Location
Calera Alabama
Jfive, you just went over my head. How would I go about making or finding an adapter? Never heard of this and I've never torn into or built or wrenched on any kind of engine until these two karts. I'm having fun and don't think I'll stop but I'm absolutely learning as I go. Sorry in advance if some of my questions, posts or ideas seem a little off but with the how and why of go karts, I'm a complete newbie. Any ideas you guys kick my way gets a serious look on my end. There is a little kart racing not far from where I live and if the kids bite on what they are fixing to get from Santa, I see us heading that way plus there is an off road park/camping area about 5 miles from me that is pretty nice with some good trails and places that they can wear these karts out (again).
 
Status
Not open for further replies.
Top