OzFab
Well-known member
Don't beat yourself up over your welding; for what it is, it looks ok to me...

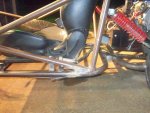
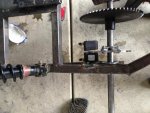
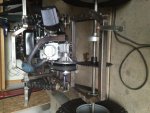
Thanks for the idea for clearancing the torque converter. In the picture I posted I had the motor sitting up on 1 inch square tube. I plan to drill then weld it on. The 1 inch will make for tight tolerances, but I don't want to push it up any higher than necessary so I can keep the center of gravity as low as possible.
Thanks guys!
Matthew
")
Tell me about it - I just completed a complete rebuild of one of my buggies. I would much rather have built from scratch! Lol.
Axle flex is bad for a few reasons. A couple i can think of: constant bending will fatigue the metal, leading to premature failure. Plus your chain will be more likely to slip, causing excessive wear on the sprockets.
****, i wanna live near bmi.
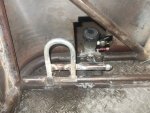
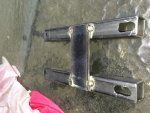
noticed a small problem. your rear bottom shock mount bracket is too wide. with a long skinny bolt like that taking the full weight of the buggy on hard bumps, you will be bending the bolt for sure. if you can make the bracket just narrow enough for the shock, then the inner sleeve of the shock will prevent the bolt from bending. i would cut off the bracket, make it just narrow enough for the shock and a washer (so that you know it will fit just the shock when you're done), then weld it back onto the buggy
Mysteryboy,
As for the rear bottom shock mounts, I have fabricated some spacer to fill in the gaps from a thick piece of steel tube that I had in my scrap bin. If they don't work out I will go with your suggestion and cut them down. Why did I do it this way? Laziness I guess! I had those brackets on my shelf and just grabbed them while mocking things up.
 with Mysteryboy on this one, setting the bracket close to the eye of the shock is the way to go. Even with a spacer between the bracket & the shock, you run the risk of bending/breaking the bolts.