Go Karts... in Sprint Car style!

Status
Not open for further replies.

JMINDY

Member
Messages
254
Reaction score
0
Location
Indianapolis, IN
Hobbies have a way of teaching us valuable skills, growing into a passion that can shape our lives. Mine started at an early age with my father’s hobby of building streetrods, hotrods, muscle cars, vettes and a variety of vehicles in between… infiltrating my life with my first car, a 55 Chevy, at the age of nine and has influenced my life, even my career path ever since. So now as a father, I’m looking for ways to positively influence my sons. Go Karts seem like a great way to teach them a foundation of skill sets, keeping them engage and having fun! Every hobby has a beginning…

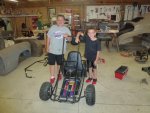
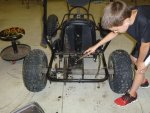
So I recently purchased 2 go karts for my two oldest sons who are 10 & 12 (plus, I have twin baby boys who the karts will some day get passed along to). This past Monday was the 10 year old’s birthday and they got to drive one of the karts for the first time. Eyes bulging out of their heads, with huge grins from ear to ear!!!

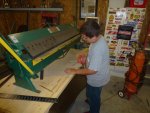
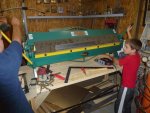
Both boys help me out a lot when working on my cars, but we are going to use the rebuild of these karts to teach them the basics of building a car – maintenance repairs, engine rebuild, metal fabrication & welding, paint and bodywork, and general mechanics, etc.… so for this reason it may slow our progress but hopefully we won’t brag it out too long. The build theme is to create a sprint car feel for each kart much like a quarter midget.

The plan is to keep one running to play with while rebuilding the other kart, then move over to the other kart.

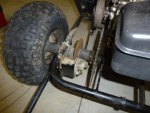
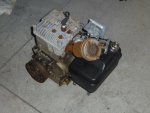
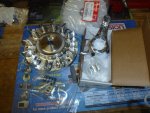
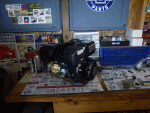
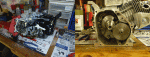
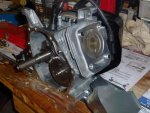
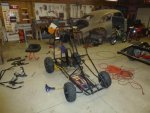
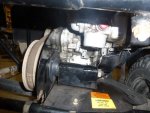
The first kart is (I think?) a Manco Dingo, maybe even a Fox II? It is a 2 seater. The model number sticker is worn off so it is hard to tell. It has a 6hp Tecumah engine. It has a Comet TC. This kart runs and drives ok… but it is in dire need of maintenance repairs. It needs the usual oil, air filter, and spark plug plus a couple of small issues to look at. The eventual plans for this kart is to give it a make over like the 2nd kart, but without all of the mods (internal) to the engine. My thinking is we’ll need a slower kart for the younger boys to learn to drive. Maybe my thinking will change after the first kart is built…:rolleyes:


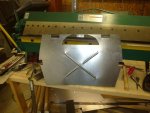
The second kart is a Manco American Express, 1 seater. It too has a 6hp Tecumah engine, but no TC just centrifugal clutch. Although it runs it is in need of a rebuild. Plan is to build a hopped up engine, rebuild the brakes, front suspension, steering and seatbelts, fabricate some body panels, bumpers and nerf bars, sandblast and paint (maybe powder coat).


I have done build threads on the HAMB for my hotrods that I’ve built and have found that it keeps us motivated and focus on the project and is a great source of knowledge from those with experience, which we’ll need as this is our first adventure into karts…

We hope to post some progress every two weeks. Thanks in advance for all of your advise, hope you enjoy following along.
 

JMINDY

Member
Messages
254
Reaction score
0
Location
Indianapolis, IN
As mention, the build theme is to create a sprint car feel for each kart much like a quarter midget. Living in Indianapolis I’m an Indy car fan and really like the 50-60’s Indy roasters and the sprint cars of that era. However the go karts have more a wedge shape of the new sprint cars of today. These go karts are just for our personal enjoyment, we’re not racing them so we are not too concern about era correctness, racing specs, going the fastest possible, areo, lightweight, etc… So we design them with a little of new and old aspects of sprint cars while also keeping them practical and comfortable to use.

Here is a sample of sprint cars we liked as well as a quarter midget.


I think a mock up is best to get some ideas… so I started by making a line drawing of the go kart.


Then mocked up what we have in mind…


Some of the body mods…
• Adding a “firewall” behind the seat. Beyond the fact that is adds a little protection for the driver, it also will give support for the 4 pt. seat belts.
• Adding six panels to form the front enclosure.
• Shortening the rear portion of the roll cage so that it ends closer to the rear of the frame.
• Adding a tail cone and two metal panels that run underneath it.
• Adding louvers in some of the panels around the engine to increase airflow.
• Creating bumpers and some frame supports for them to mount up.

The only part we are not going to make ourselves is the tail cone. I can buy a fiberglass tail cheaper than I could build one on the English wheel, not to mention lighter and probably nicer. My only hold up that I have is figuring out how to mount the tail cone so that I can easily access the engine and pull start it. Hinge? Quick disconnect pins and lift off?

First we need to get the kart mocked up with the new parts in working order, and then we’ll start on these cosmetic designs… but you can see where we want to go!
 

JMINDY

Member
Messages
254
Reaction score
0
Location
Indianapolis, IN
And so it begins…


We started the tare down…
• First removed the plastic splashguard from the bottom of the engine.
• Then removed the rear roll bars. Bagging and labeling bolts and parts.
• Disconnected the throttle linkage.
• Disconnected/removed the chain.
• Unbolted and removed the engine.


Then we scrapped the slug of oil off and then brushed on some degreaser (Super Clean).


When we bought the kart, I was told it just needed a new clutch but I could tell it was going to need much more than that… First, someone welded the clutch to the output shaft. Of course the clutch did not last (I don’t think it was lined up correctly either). So fixing that would be / could be a pain, maybe consisting of a new crankshaft. Plus the carburetor is missing parts and there is no recoil cord on the engine. Lastly, the engine will currently run but it is caked in oil, which usually means more issues to fix… I decided that although I could probably get this engine to work, I might also be always casing problems!


So off we went to Harbor Freight. Came home with a new 212cc Predator Engine.

<


Now the boys need to learn the inside mechanics of an engine!!! So parts were bought….


So that’s it for this week. Lots of explaining of tools, lots of questions, and some greasy fingernails!
 

Attachments

  • Boys-with-Kart.jpg
    Boys-with-Kart.jpg
    58.8 KB · Views: 17
  • Remove-Slash-Guard.jpg
    Remove-Slash-Guard.jpg
    57.5 KB · Views: 16
  • Degreasing.jpg
    Degreasing.jpg
    62 KB · Views: 15
  • Old-Engine-Removed.jpg
    Old-Engine-Removed.jpg
    50.8 KB · Views: 15
  • New-Engine-Parts.jpg
    New-Engine-Parts.jpg
    66.8 KB · Views: 27
  • New-Pedator-Engine.gif
    New-Pedator-Engine.gif
    239.4 KB · Views: 16
Last edited:

OzFab

New member
Messages
15,615
Reaction score
8
Location
Warwick Qld, Australia
Is that a stock plastic fan in the top of the last pic? Can you explain why you need that & a billet flywheel?

Ah, the good ol' AmEx; until now, I'd never seen one with a roll cage...

Can you do me (& everyone else) a small favour & add pics in thumbnail form (upload to the server); we get to see a lot more detail that way...
 

n3480h

New member
Messages
286
Reaction score
1
Location
NW Iowa
I'll second the Fox II, but it appears to have been converted to a live axle (sprocket in center?), and a mud shield added.

Tom
 

JMINDY

Member
Messages
254
Reaction score
0
Location
Indianapolis, IN
Is that a stock plastic fan in the top of the last pic? Can you explain why you need that & a billet flywheel?

Ah, the good ol' AmEx; until now, I'd never seen one with a roll cage...

Can you do me (& everyone else) a small favour & add pics in thumbnail form (upload to the server); we get to see a lot more detail that way...

Yes... pointing out my first mistake! Usually I tare things apart and then see what parts I need/replace. I jumped the gun and ordered parts as soon as I found out which Predator I had. Originally I was just going to remove the governor and try the trick of trimming off every other fan blade. I was going to do that to a new fan blade so that if I don't like how it performed (like overheating) then I would have the original blade to put back on. However, after much reading on this site and the web... I decided to be safer and replace the connecting rod, flywheel, and 22 lb valve springs. When I ordered, I screwed up and left the fan on the list...:oops:

The plan is to build my own intake & air filter setup, build an exhaust header, and re-jet carb if need. I would have love to add a cam but have to draw the line somewhere, plus depending on what cam I chose, that could lead to needing to do more block work and buy additional parts like new carb & fuel pump.

Added the tumbnails...:thumbsup:


I'll second the Fox II, but it appears to have been converted to a live axle (sprocket in center?), and a mud shield added.

Tom

The Fox II (2 seater) has a comet TC / jackshaft. I don't know which series it is (probably 30) as I just took the cover off last night. Looking to see if my employment has a replacement belt that will fit it.

The AmEx (1 seater) just has a live axle with a centrifugal clutch. Mud shield has not been altered. I just assumed that it was the original setup and that kart just did not come with a TC. Engine appears to be original Tecumah and there are no signs of a jackshaft being removed from frame or engine mounts... But I don't know anything about go karts, so you guys tell me?
 

JMINDY

Member
Messages
254
Reaction score
0
Location
Indianapolis, IN
Made a little progress this week, between kids sports and taken care of babies... my garage time is not as much as I would like.

Still waiting on some parts to arrive, so we started on the predator engine. After a quick lessen on "how an engine works", we started disassemble and removed the governor & oil sensor. Still have the two holes in the block to plug or tig weld closed.


Got the head removed and ready to start replacing the connecting rod.


Put the youngest son to work on removing the seat and seat belts. I think he just like using the impact wrench...:thumbsup:


Spent a little time with the Fox 2 Kart. New air filter (don't think it was ever changed), spark plug, disassembled & cleaned out the carb, grease wheels. Whoever designed these karts, did they ever intend to change the oil? Front plug, drains right into the floor pan with the seat cushion. Can barely get a wrench on the rear plug as it is up near the jackshaft, plus there is no hole for it to drain though the engine plate! What a mess...

So then we drive the kart for about 1/2 hour. Pull it in the garage and notice it is leaking oil. Back half of the engine is caked with oil grime from the past, so it was hard to see where. Removed exhaust and breather to get to the valve cover, wasn't it. But remove it and resealed it anyways.

Seems to be leaking around the shaft of the governor. Does not leak while idling, only as the throttle increases and engages the gov. Shaft has a little play in it (I assume it should be solid-tight). Kart runs and sounds fine.

I assume the gov is coming apart inside the engine? I wasn't sure if I was going to replace this engine when it is time to rebuild the kart, but if it is broke or not worth the trouble I will, however I can't afford to rebuild both karts at once!

So guys... what are my options...
A) I have not found anything about installing a new gov. Just removing them. Is this a hard thing to get setup right?
B) Tare it apart and remove the gov. Bypass the linkage. Hope the valve floating (and sensible driving) keeps it from blowing apart. Replace the engine next spring.
C) Move the spring to 1 or 2 setting so the gov is not engaging as much. OP has it at 4. As long as the oil leak stays to small drops... hope it stays together. Replace the engine next spring.
D) Run what you brung! Enjoy it while it last! (Sarcasm)

Here's a pic of it...


Attachments

  • Gov-&-Oil-sensor-removal.gif
    Gov-&-Oil-sensor-removal.gif
    148.8 KB · Views: 10
  • Head-removal.jpg
    Head-removal.jpg
    63.9 KB · Views: 13
  • Seat-removal.jpg
    Seat-removal.jpg
    60.1 KB · Views: 12
  • Fox-2-Governor.jpg
    Fox-2-Governor.jpg
    58.5 KB · Views: 11

Poboy kartman

Senior Moments Member
Messages
12,461
Reaction score
1
Location
White Settlement Texas
Just a little advice.....should you build a sprint car type kart and wreck it......make sure Tony Stewart isn't anywhere around before you get out of it!!!!!
 

JMINDY

Member
Messages
254
Reaction score
0
Location
Indianapolis, IN
Just a little advice.....should you build a sprint car type kart and wreck it......make sure Tony Stewart isn't anywhere around before you get out of it!!!!!

Ya, we'll try not to run back out into traffic...

Funny that the wife is a big fan of his. She has an endearment for a-holes... umm, wait... never mind!!!:lolgoku:

She even email me this just last week, wanting to know if we could paint the kart like it? I said, umm, NO!!!
 

JMINDY

Member
Messages
254
Reaction score
0
Location
Indianapolis, IN
Option B or open it up and maybe replace the seal on the shaft....

I was thinking this too. But it's adding other object to a long list of crap that isn't getting done...:mad: Plus I have a feeling that we'll just brake the engine without it...but on the other hand, if I do nothing it will probably brake too.

Guess I do some more research on how to replace the seal and/or governor...
 

Poboy kartman

Senior Moments Member
Messages
12,461
Reaction score
1
Location
White Settlement Texas
Ya, we'll try not to run back out into traffic...

Funny that the wife is a big fan of his. She has an endearment for a-holes... umm, wait... never mind!!!:lolgoku/QUOTE]

:roflol::roflol::roflol::roflol:

Thanks for that. .....you don't know how bad I needed a good laugh.... .:thumbsup::thumbsup:

That's like a Poboy comment.....apparently. ...your mind has went south as well......
 
Last edited:

JMINDY

Member
Messages
254
Reaction score
0
Location
Indianapolis, IN
Just a quick update on the governor issue on the Fox 2. Found a tech handbook for Tecumeh engines and read some forums on the same problem. It is a common issue with these engines after extended wear...and could be one of two issues. The gov shaft through the engine block has no seal. So the shaft wears out on the block. In most cases I have read online, even when going through the trouble (and it seems like a lot) of replacing the gov shaft, the new shaft will leak also because the block is also worn down. Sometimes the only way to fix it is to re-drill the block and sleeve the new gov shaft.

The other issue (the one I explored last night), is that the crankcase vent gets plugged. Back pressure makes the oil blow out of the gov shaft. My engine has the vent on the valve cover leading to the carb. When I replaced the air filter this weekend, there was a lot of black residue inside the air housing that I cleaned out. Also, the oil was really dirty/sludgy when I change it out. So, last night, I took the valve cover and hose off and cleaned them out. There was some junk in it but it also did not seemed entirely plugged either. So???

Also read to place a felt washer and either some washer/nut to fill space and apply pressure to the felt washer to the block around the gov shaft. It won't stop the leak entirely, but will help slow it down. And it is only a slow drip as it is when the RPMs are up. It does not leak at idle. So I'll try this tonight.

I don't think the gov is coming apart (yet?). As it is still functioning and not making noise. From what I read it will do both as it goes out...
 

JMINDY

Member
Messages
254
Reaction score
0
Location
Indianapolis, IN
It's been one of those days where nothing was going right & projects took twice as long!

Put the new connecting rod in the Predator engine. One of the Bolts on the rod cap snapped off while tightening it, wasn't even at 120lbs torque yet! Instructions said min. Of 150lbs... So bought two new bolts at NAPA, except these were allen-head style. Now the socket with torq wrench is too long to fit inside. Had to trim about an 1/8" off of the front & back of my socket to make it shallow enough. Ruin the socket, but got the job done.

Then when I was changing out the valve springs, the last one slips off while under tension... Shoots the the retaining washer and two little clips across the garage. :censored: 
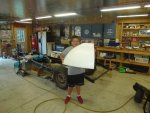
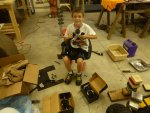
Spent over 1/2 an hour till I found everything!:censored: but everything is back together and sealed now... Just have the flywheel to finish, but it's beer-thirty, so it will have to wait!
 

JMINDY

Member
Messages
254
Reaction score
0
Location
Indianapolis, IN
Not much to report on the karts, started the flywheel swap, new seat belts arrived in the mail, waiting on some other parts. If the weekend does well, we are going to set up my sandblast both outside. Kids are going to bast some kart parts, I have some 47 Caddy parts to do.

Main reason for this reply... thought I'd share a little sneak-peek at my boy's Christmas gift from my brother-in-law, Lance. He's a UPS pilot in California and his hobby is building his own airplanes. As a young kid he was friends with Jimmy Johnson, of NASCAR, and they both raced Motorcross bikes together. For a while now, Lance has been offering to get the boys Motorcross bikes and help get them interested in racing. Wife & I didn't really want to get the boys involved in that... which is why I started looking at go-karts. Finally, he offered to build them a mini-bike, which we agreed to... at least it is not racing. So he has been building a mini-bike for the last month, is a 1969 Honda Z50A.

Yesterday, a mini-bike is delivered to my father's house. Apparently Lance figured I have two older sons, we need two mini-bikes! :huh: 
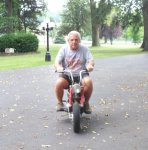
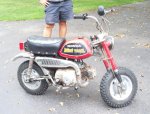
Said this one is like the one he is refurbishing now, but in better starting condition. Plans to rebuild this one too after he finishes the first one... that is if we can get grandpa off of it first!:lolgoku:

This bike is a 1972 Honda Z50AK3


Enjoy the pics, if you know about these kind of bikes by all means please share... I'll post some up dates as I get them.
 

Attachments

  • Mini-Bike-2.jpg
    Mini-Bike-2.jpg
    79.3 KB · Views: 8
  • Mini-Bike-1.jpg
    Mini-Bike-1.jpg
    77.3 KB · Views: 8

JMINDY

Member
Messages
254
Reaction score
0
Location
Indianapolis, IN
Go karts was the main attraction this Labor Day weekend. Not only did we build a track beside our house (and put in some laps,:wai:), we also manage to get some work in on the AmEx kart.

We have been ordering and collecting parts. Small sample...


I finished most of the motor. Installed the billet flywheel. Set timing. Setup the throttle linkage. Setup the crankcase filter. Reinstalled gas tank and remaining parts of the engine. Started building an air intake/filter for carb (will show more of that later).


Bolted the engine to the kart to take measurements and get a plan for how things will fit. I don't have the clutch yet, it's next item to order, but I have some room to adjust the engine. Even if I have to make a new eng. mount to get things to line up it shouldn't interfere with the work we are doing now.

So the boys started learning some metal fabrication by creating a firewall behind the seat. This will help hide the engine from the driver's cockpit, add a protective barrier form any engine/chain malfunction, and primary function of providing position support for the upper sections of our new 4pt. seatbelt straps.

So I started out by teaching them the importance of creating a template. Measure, draw, and cut out from tag board. Folded it, test fit, make alterations...


Then they transferred it to a sheet of 22ga. steel.


Then did the main cuts with the shear.


Then the oldest used a jig saw to finish out the shape.


Then they cut out the two holes for the upper seat belts. Had them use a hammer & dolly to fold the edges over. This will give a smoother edge and not cut into the seat belts.


Finished trimming...


Then they folded it up....


And rolled in some beads to stiffen it up some.


Next we are going to add some louvers to the sides to help maintain some air circulation to the engine. However, I broke the die the week prior while making a part for my old cadillac. After a phone call and email to WoodWard Inc. they are sending me a new die FREE...nice to see a company still stand behind their products! So that part will have to wait...

This week we are going to make tabs to mount the seat belts to the frame and you'll see how the above panel gets mounted to the frame. Then we'll start on the air filter design.
 

Attachments

  • Fiberglass-Tail-Cone.jpg
    Fiberglass-Tail-Cone.jpg
    125.7 KB · Views: 2
  • Shear-Cutter.jpg
    Shear-Cutter.jpg
    112.8 KB · Views: 1
  • Cutting-Template.jpg
    Cutting-Template.jpg
    127.7 KB · Views: 2
  • Flywheel-Install.jpg
    Flywheel-Install.jpg
    152.1 KB · Views: 2
  • 4-Pt-seatbelts.jpg
    4-Pt-seatbelts.jpg
    131.9 KB · Views: 2
  • Trimmed.jpg
    Trimmed.jpg
    107.8 KB · Views: 1
  • Seatbelt-Holes.jpg
    Seatbelt-Holes.jpg
    84.8 KB · Views: 1
  • Finished-Trim.jpg
    Finished-Trim.jpg
    94.9 KB · Views: 2
  • Folding.jpg
    Folding.jpg
    137 KB · Views: 2
  • Finished-Beadroll.jpg
    Finished-Beadroll.jpg
    109.8 KB · Views: 2
Status
Not open for further replies.
Top