We started off with an old blue damsel in distress.. She had been rode HARD and put away soaking WET! She needed more TLC than we realized.
If anyone recognizes this kart, please post the manufacture and model if it has one? I've looked around and can only find where someone references it as a manco? Can't remember the model. It was here in this forum some years back where I found the reference. Please if you know the make and model post in the thread. Thanks
We've learned a ton so far and have more to learn. I would like to personally thank chancer and Jim for answering several of my "NooB" questions.
The wheels you linked me to chancer are working out perfectly. They go with our build well. We ended up putting 145/70/6 tires on it.
Jim, we went with your suggestion to gear it with a 10t clutch and 54t sprocket. I'm still waiting for the sprocket to ship so well see how the gearing works out for us. I'll keep everyone posted on changes.
To date I've had to purchase the following:
Kart
Tires 145/70/6
Wheels 6"
Clutch 10t
Chain #41
Motor 212
Throttle Cable
Steering Wheel
Steering Shaft
Steering Accessory Kit
Spindle kit With Bracket
Vinyl
Foam
Tie Rod Ends
Tie Rods
Metal 20ft Square tube
Miscellaneous nuts, bolts, sanding wheels, cut off wheels, ect........
We pretty much started with nothing. Looking at the first pictures you wouldn't think so but take a closer look.
Day 1:

Another from Day 1:

The steering wheel was an old tractor wheel and they welded it to the shaft. The seat situation was in desperate need of attention. The HF wheels obviously had to go.
You could tell the weak part of the kart was in the seat area. It had been broken and patched many times over. The guys trying to fix it before were absolutely clueless. None of the welds penetrated the steel. It just built up on itself.. What a PITA to grind off
Here's a look at one of the worst areas:

Obviously the repairs just weren't holding up and compiled on each other. They had take an old metal bed frame and welded it straight down the center of this thing? You can see it in the first two pictures.
We knew right away the seat was going to be completely cut out. So we got started.

The bed frame and seat were the first things to come off. There was lots of other little parts tacked in different places that we cut off as well..
We ended up cutting a few more things off and sanding it down really good.

Now we had the seat area gone and the frame all cleaned up. I did not sand the pan because I figured I'd just replace it. I knew I was going to end up cutting more stuff and basically all the way down to the frame. That's exactly what we ended up doing. Basically gutted this thing down and now were in the process of building her back up.
We put a couple seat frame ideas down on paper and picked one. Cut the metal squared it up and welded it. Turned out pretty decent for our first go kart seat frame. Yes, we learned a lot about the seat design and now that we've built one the next would be slightly different. Oh the little things that you learn as you go..makes it easier for the next build
Here's a picture of the seat frame:

At this point we have our wheels and tires on order and the steering parts on order as well. We decided to work on the actual seats.
We ran down to the local fabric store and picked up some marine grade vinyl. It was on sale for $10 a yard. Killer deal if you know vinyl prices. LOL! Got some high density foam which is super expensive holy beep..
We put 3" foam on the bottom and 2" on the back. Knowing what I know now we would have went with 4-5" on bottom")
We cut some old wood we had laying around and cut the foam. Stretched the vinyl and stapled it. The same day we finished the seats the tires showed up! By this point we were getting pumped!

We looked around for some tires and ended up purchasing some from amazon. I never received a shipping confirmation or a tracking number. Right when I was about to email which was two days later the big brown truck stopped out front with a large box. I thought WTF? No tracking number or email confirmation and bam tires just show up. Whatever mount em..

After a bit more sanding we primed the frame. I plan on sanding it down again and putting one more coat of primer on. The final color is still TBT. Right now my son is thinking blue. He said blue like his power wheels jeep.

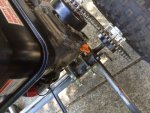
Now that we had the new steering stuff and spindles it was time to cut the old off and weld the new on. The old scrub brakes also had to come off. The new tire/wheel combo would not fit with the scrub brakes in place.

Here's a few pictures of the steering kit we put together and the spindle brackets welded back on...

I've reached the photo limit so I guess I'll stop here for now. I will keep this thread updated as we make more progress with our build. I have a few more pictures I plan on posting in the next few days.
Again thanks to everyone who has helped us out along the way. I'm hoping by this weekend we will be under power with the 212 instead of Dad
Matt
If anyone recognizes this kart, please post the manufacture and model if it has one? I've looked around and can only find where someone references it as a manco? Can't remember the model. It was here in this forum some years back where I found the reference. Please if you know the make and model post in the thread. Thanks
We've learned a ton so far and have more to learn. I would like to personally thank chancer and Jim for answering several of my "NooB" questions.
The wheels you linked me to chancer are working out perfectly. They go with our build well. We ended up putting 145/70/6 tires on it.
Jim, we went with your suggestion to gear it with a 10t clutch and 54t sprocket. I'm still waiting for the sprocket to ship so well see how the gearing works out for us. I'll keep everyone posted on changes.
To date I've had to purchase the following:
Kart
Tires 145/70/6
Wheels 6"
Clutch 10t
Chain #41
Motor 212
Throttle Cable
Steering Wheel
Steering Shaft
Steering Accessory Kit
Spindle kit With Bracket
Vinyl
Foam
Tie Rod Ends
Tie Rods
Metal 20ft Square tube
Miscellaneous nuts, bolts, sanding wheels, cut off wheels, ect........
We pretty much started with nothing. Looking at the first pictures you wouldn't think so but take a closer look.
Day 1:
Another from Day 1:
The steering wheel was an old tractor wheel and they welded it to the shaft. The seat situation was in desperate need of attention. The HF wheels obviously had to go.
You could tell the weak part of the kart was in the seat area. It had been broken and patched many times over. The guys trying to fix it before were absolutely clueless. None of the welds penetrated the steel. It just built up on itself.. What a PITA to grind off
Here's a look at one of the worst areas:
Obviously the repairs just weren't holding up and compiled on each other. They had take an old metal bed frame and welded it straight down the center of this thing? You can see it in the first two pictures.
We knew right away the seat was going to be completely cut out. So we got started.
The bed frame and seat were the first things to come off. There was lots of other little parts tacked in different places that we cut off as well..
We ended up cutting a few more things off and sanding it down really good.
Now we had the seat area gone and the frame all cleaned up. I did not sand the pan because I figured I'd just replace it. I knew I was going to end up cutting more stuff and basically all the way down to the frame. That's exactly what we ended up doing. Basically gutted this thing down and now were in the process of building her back up.
We put a couple seat frame ideas down on paper and picked one. Cut the metal squared it up and welded it. Turned out pretty decent for our first go kart seat frame. Yes, we learned a lot about the seat design and now that we've built one the next would be slightly different. Oh the little things that you learn as you go..makes it easier for the next build
Here's a picture of the seat frame:
At this point we have our wheels and tires on order and the steering parts on order as well. We decided to work on the actual seats.
We ran down to the local fabric store and picked up some marine grade vinyl. It was on sale for $10 a yard. Killer deal if you know vinyl prices. LOL! Got some high density foam which is super expensive holy beep..
We put 3" foam on the bottom and 2" on the back. Knowing what I know now we would have went with 4-5" on bottom
We cut some old wood we had laying around and cut the foam. Stretched the vinyl and stapled it. The same day we finished the seats the tires showed up! By this point we were getting pumped!
We looked around for some tires and ended up purchasing some from amazon. I never received a shipping confirmation or a tracking number. Right when I was about to email which was two days later the big brown truck stopped out front with a large box. I thought WTF? No tracking number or email confirmation and bam tires just show up. Whatever mount em..
After a bit more sanding we primed the frame. I plan on sanding it down again and putting one more coat of primer on. The final color is still TBT. Right now my son is thinking blue. He said blue like his power wheels jeep.
Now that we had the new steering stuff and spindles it was time to cut the old off and weld the new on. The old scrub brakes also had to come off. The new tire/wheel combo would not fit with the scrub brakes in place.
Here's a few pictures of the steering kit we put together and the spindle brackets welded back on...
I've reached the photo limit so I guess I'll stop here for now. I will keep this thread updated as we make more progress with our build. I have a few more pictures I plan on posting in the next few days.
Again thanks to everyone who has helped us out along the way. I'm hoping by this weekend we will be under power with the 212 instead of Dad
Matt