if this makes any since. from the product booklet "quote" assembLY instructions
read the entire important
saFetY inFormation
section at the beginning of
this document including all
text under subheadings
therein before set up or use of
this product.
installation
1. The planned mounting area must
provide a flush fit to the bottom of the
Lights (1).
2. Remove the lens from each Light and
use the base of the Light as a template
to mark mounting holes.
3. Ensure that the installation area has no
hidden electrical or stereo lines before
drilling.
4. Drill the holes, then secure each of
the Lights with two Long Screws (2).
Replace the lens.
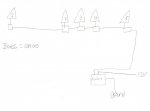
5. See Wiring Diagram, page 4.
6. Connect the wire of each of the Lights
to the Lead Wire (8) using a Wire
Splice (4). Insert the two wires into the
holes of the Splice and use pliers (not
included) to push down the metal tab.
Close the cap to secure.
holes for
wires
metal tab
cap
Wire splice (4)
7. If the Lights are intended to be used
along with the vehicle’s main lights,
connect the lead wire to the headlight
switch positive terminal.
8. If the Lights are to work independently
of the vehicle’s lights, mount the Switch
at a convenient location with the two
Short Screws (3).
9. Connect the Lead Wire to the middle
terminal of the Switch (7).
10. Connect the Fuse Holder (5) to the top
terminal and connect to a 12V power
supply.
11. Connect the Ground Wire (6) to the
bottom terminal of the Switch and the
other end to ground.
12. This product is intended only to be
mounted on the top of a vehicle’s cab.
13. Installation of these products must
comply with DOT regulations and all
applicable State and local laws.