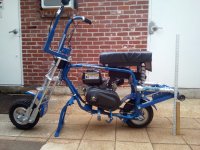
Built it all myself. Handlebars are 1" square tube steel with 3/4" EMT conduit stabbed all the way to the bottom in the square stuff. Hand bent the EMT with a common manual electrician's conduit bender, but stuffed it with 1/2" EMT before I made the bends. Wish there was a video of my lightweight behind jumping up and down on that bender to form those 90's with all that EMT being forced to bend to my will.
Being double-walled like that made them bulletproof stiff, and the square/round transitions were literally filled up with scrap pieces of steel trimmings, and many many welding rods being melted into it all until pretty.
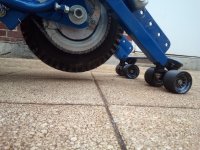
You might notice that there's also square steel forming the back end of the frame to expand the tubing to fit the 212 and the CVT, with no room left over. Same time-consuming transitions for the square/rounds. Took custom motor mounting to get it level for the oil. Wheelie bars have roller skates' trucks and wheels, can actually steer it because of the trucks when just comfortably laying back and cruising around with the sky in my eye and everybody applauding.
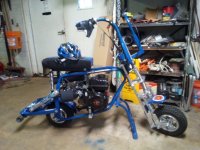
Ridiculous toy, 12+ hp., thought my homemade seat would be okay ay 17" long, scoot forward to hold the front end down on takeoff. Stupid. Thing would raise me up in the air like a floor jack in an auto shop. Never even got a proper test run from it, because it would go from putt-putt to Jesus Save Me! in 3 seconds flat. Sent a helmet, and knee and elbow pads along with it to the guy in Ohio that bought it, and my strong prayers for him to be okay and not die. He's probably still in the hospital.
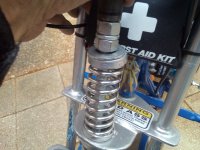
EDIT: Did you notice my one-of-a-kind creation real functioning MONOshock springer front end? And the first-aid kit?
EDIT: Forgot to mention that I also sent the buyer a pair cutoff diving gloves to save his knuckles from road rash (in case he lived through the big dump).
EDIT: Anybody notice the custom shock absorbers I made for the wheelie bars? Whip it back, it doesn't bounce, just settles in smooth. Can ride around all day just leaning back on the rear wheel/wheelie bars, steering around cars, stopping without having to put it down, etc.