DIY offroad gokart in buggy style [two seater, gx200 clone]

wooden

New member
Messages
17
Reaction score
1
Location
Europe
Hi!

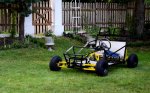
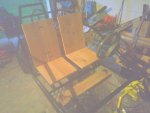
I would like to create the log about my current project. Some time ago I've made wooden electric car for my kids (it's even on this forum:) ), My kids however are older and those wooden car is not enough for them. Moreover, it was one seater but now I have two kids, so I'm making two seater.

Why I want to log my progress ? Two reasons:
- to show You, like You do, my project, becouse it is fun to make, so I'm proud
- to show You how I manage to solve some problems which I came during my work for the others to give some sollutions (e.g. my crankshaft was to short for torque converter)
- to show You my mistakes to avoid them.

OK then, so let's start :)
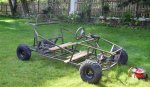

1. Parts & project
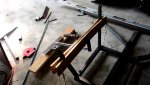
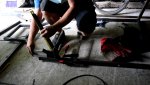
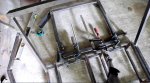
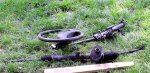
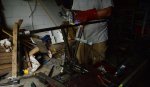
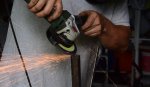
I Started project not from projecting the car, but from buying some cheap stuff. I've searched forums, portals, auctions and tried to buy the cheapest parts as I could. This was the main goal, to build the car with not very much money, so I ended with:
- the real axle from tao tao like offroad small buggy
- the front spindles from quad - i decided to buy spindles because I don't want to make them by own.
- the big disc brake from cross motorcycle
- the engine from current generator (gx212 honda clone)
- wheels from other quad
- maglow from hundai i10 from junkjard
- cardan shaft from fiat tico from junkjard
and many more things..

So as You can see I've bought some parts from different vehicles from quads through gokarts up to real cars.
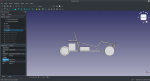
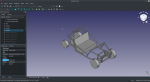
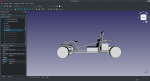
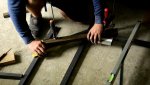
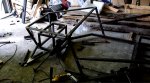
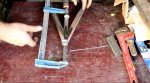
Then, when I knew what I have I've made a project... or maybe not project, but sketch in some free cad program to see how much steel I need and how the car will look in the future.

Here You have my plans-sketch. I'm adding them as Open Source, maybe someone will reuse them :) Take in mind however that plans are just to see the scale and final shape, they are not very detailed.
 

Attachments

  • 2.png
    2.png
    119.5 KB · Views: 18
  • 1.png
    1.png
    153.8 KB · Views: 23
  • 4.png
    4.png
    116.9 KB · Views: 18
  • GokartPlans for free.zip
    71.9 KB · Views: 7

wooden

New member
Messages
17
Reaction score
1
Location
Europe
Part 2

OK I've managed to weld almost whole frame. It was very hard, because I have only one 90 degrees magnet to hold the metal profiles during welding. I don't have professional table even, so I needed to level everything perfectly and measure a lot to not ruin the angles, dimensions etc.

In my project there are many angles different than 90 degrees and with two axis at the same time. They are not so easy to achieve with almost no tools, but I was using wood clamps a lot (as a support/holders during welding) and with them I've manage to construct something which even is symmetrical, leveled and has 'almost' same angles like in the project. Almost, because I do some corrections during welding.

The second thing with making the frame from own project is that You have to rethink angles well e.g. connecting something with angle 145 degree means that You have to cut two pieces with angles 145/2=72,5. But I have the cutter operating only in area 0-45 degrees, so no 72,5 but 90-72,5=12,5 degree. lot of thinking like that.

You can avoid such mathematics thoughts if You don't mind that the inside/hole in profile will be visible, but such projects are (in my opinion) ugly and don't have so strong connections like pieces cutted perfectly (no inside visible).

It took me few evenings to weld what You see on the pics. It's not so fast project If You want good welds and symetrical construction (to have good driving and future geometry).

Some pics from work.
 

Attachments

  • Screenshot_20200708_184330.jpeg
    Screenshot_20200708_184330.jpeg
    332.6 KB · Views: 13
  • Screenshot_20200708_184656.jpg
    Screenshot_20200708_184656.jpg
    475.1 KB · Views: 16
  • Screenshot_20200708_185308.jpg
    Screenshot_20200708_185308.jpg
    405 KB · Views: 14
  • Screenshot_20200708_184617.jpg
    Screenshot_20200708_184617.jpg
    401.3 KB · Views: 15
  • Screenshot_20200708_184505.jpg
    Screenshot_20200708_184505.jpg
    408.8 KB · Views: 12

wooden

New member
Messages
17
Reaction score
1
Location
Europe

I've watched Your log and see that You've some rubber or plastic washers between frame and chair and I started to think if I don't need such washers between engine and the frame. They could work like engine cushion mounts. You know, those rubber things in a real cars which are isolating the frame from engine shakes, Did You mount such things in Your gokart ?
 

landuse

Moderator
Staff member
Messages
18,626
Reaction score
220
Location
Pietermaritzburg, South Africa
I've watched Your log and see that You've some rubber or plastic washers between frame and chair and I started to think if I don't need such washers between engine and the frame. They could work like engine cushion mounts. You know, those rubber things in a real cars which are isolating the frame from engine shakes, Did You mount such things in Your gokart ?

Many people have tried this, and generally it is a fail. The engine either moves because the washers eventually compress, or there is so much flex that the chain keeps on popping off.
 

wooden

New member
Messages
17
Reaction score
1
Location
Europe
Many people have tried this, and generally it is a fail. The engine either moves because the washers eventually compress, or there is so much flex that the chain keeps on popping off.

Hm.. I didn't thought about the chain lenght. This really could be problem. Thanks, because I've already started to search for suitable material for washers ;-)
But hm.. maybe small, not very flex/wobble material hm.. something like thick skin (e.g. from welder gloves) ? Maybe it will take a little of vibrations but won't pop the chain. I'll try.
 

wooden

New member
Messages
17
Reaction score
1
Location
Europe
OK, I'm still working. Today I learned that my breaks are pretty ******.
I have something like this (this is foot break from cross, so it should work):


This breakes have to short hydraulic hose, so I tried to make the interface using metal string (like in bikes). So When You put the break pedal down, You pull the metal string and it push the hydraulic pump and it push the break. Long way. Not very good idea at all. It works, but has small breaking force.

Since that I wonder If I could replace the hydraulic hose to longer one. Can You give me a tip is it possible to do that ? Can I just buy longer hose and replace it ?

OK, I read in internet, that it's no problem to buy longer hydraulic hose. So today I'm gonna buy it:)
 
Last edited:

gegcorp2012

Active member
Messages
491
Reaction score
62
Location
Alabama
Adding a longer hose is OK.

Just add more fluid and bleed the brakes as usual.

Sent from my SM-J700T using Tapatalk
 

wooden

New member
Messages
17
Reaction score
1
Location
Europe
Thanks for advices.
it turns that it's not an easy task in my country to get a longer hose :|

Listen, in 2019 and before it would be no problem, but currently from 01.2020 there are new rules in my country (due to EU directive) that no workshop without special atests can make the hydraulic elastic hose. I've tried to make it 'unofficially' in 3 of them, but:
- in first their said: no it's illegal
- in second: no it's illegal
- in third: ok, but when I get ther it turns, that they don't have the correct endings ech.

So at the end I order a very long hose from some workshop with atests in internet (price is doubled from normal price from 2019 :| )

I think it will work better, if no, I would replace the cross hydraulic pump to some from 'real' motorbike. But let wait and we will see.

Progress update.

I've managed to fit the:
- maglow from hundai i10 from junkjard
- cardan shaft from fiat tico from junkjard
Into my chasis.
I've also made the rear frame for the engine and axle and attached it to the rest of the body.
Oh, and front suspension. I made it too.


I needed to cut the cardan and weld it (it was the thick piece of metal, so it needed pretty much ampers in welder).
Cardan was connected with steering rod, so I didn't disassemble it but instead I've cut everything what was not needed:)

Maglow - it was miracle, fit's almost perfectly. Almost because I needed to make a little bit longer drive shafts.

Some pics of front suspension.It's typical construction in letter A shape. I used the pipe filled with bushing from shock absorber from some ATV/QUAD. It was cheap and fits perfectly into the pipe.

I have a problem now, becouse inside diameter of bushing is 9mm - non standard. I have screws only 10mm or 8mm. 10mm are to wide-no fit and 8mm fits but generates looseness. Hm, for now I'm living the 8mm screws. I hope looseness wan't have big impact in handling - it's only gokart. Maybe in the future I will search and buy 9mm screws.
 

Attachments

  • Screenshot_20200717_133604.jpeg
    Screenshot_20200717_133604.jpeg
    332.5 KB · Views: 12
  • Screenshot_20200717_133540.jpeg
    Screenshot_20200717_133540.jpeg
    266.1 KB · Views: 13
  • Screenshot_20200717_133443.jpeg
    Screenshot_20200717_133443.jpeg
    299.8 KB · Views: 12
  • Screenshot_20200717_132853.jpeg
    Screenshot_20200717_132853.jpeg
    415.2 KB · Views: 13
  • Screenshot_20200717_133344.jpeg
    Screenshot_20200717_133344.jpeg
    369.2 KB · Views: 12
  • Screenshot_20200718_104032.jpeg
    Screenshot_20200718_104032.jpeg
    265 KB · Views: 11
  • Screenshot_20200718_104017.jpeg
    Screenshot_20200718_104017.jpeg
    294.1 KB · Views: 11
  • Screenshot_20200718_103955.jpeg
    Screenshot_20200718_103955.jpeg
    209.8 KB · Views: 12
  • Screenshot_20200718_103941.jpeg
    Screenshot_20200718_103941.jpeg
    184.1 KB · Views: 12
  • Screenshot_20200717_133344.jpeg
    Screenshot_20200717_133344.jpeg
    369.2 KB · Views: 10
Last edited:

wooden

New member
Messages
17
Reaction score
1
Location
Europe
OK, I;ve managed to make longer hose working with my pump and brake. It turns that filling the hose, pump and break with fluid (without air bubbles) wasn't so easy as I expected. I took me more than an hour!

But now it's working I mount everything and play with paint so now the gokart-buggy looks like this:
https://mega.nz/file/6tFljKpS#fk88o4-wQZ8zGUrIanuaWc4acnnMLMOFLvrahOC_i-o

so what do You think ?

some additional pics
 

Attachments

  • Screenshot_20200722_104016.jpeg
    Screenshot_20200722_104016.jpeg
    197.6 KB · Views: 31
  • Screenshot_20200722_104256.jpeg
    Screenshot_20200722_104256.jpeg
    427 KB · Views: 26
Last edited:

wooden

New member
Messages
17
Reaction score
1
Location
Europe
Thanks.

Now I'm building the seats and correcting 'bugs', e.g. I've notcied heavy vibrations from engine which unscrews some screws, or the noise from the metal plate-floor is very loud.
I had to add some additional screws to the floor.

I will definitely try to add some rubber-things between engine and the frame to reduce the shakes.

Yesterday I've made a seats. From wood and some metal to hold them in right position. Nothing complicated. Just sharing the pics with progress.

Today my wife will cover them with fabric.
 

Attachments

  • IMG_20200803_200146_4.jpg
    IMG_20200803_200146_4.jpg
    2 MB · Views: 7
Last edited:

landuse

Moderator
Staff member
Messages
18,626
Reaction score
220
Location
Pietermaritzburg, South Africa
FINALLY ! I've ended my go kart. Sons are really happy with it, and so do I. I have still some work to do, but hey! It works and rides!

Here You have a video how it looks and drives
https://www.youtube.com/watch?v=RhH1Pu1q1E8

You did an excellent job!!! :wai: :D

I really likes the clever idea of being able to move the pedals to the other side to allow you to do the controlling and your kid to do the steering.

The only point that bothered me slightly was the seat belts. I know you are probably wondering why i am worried about them, as they are for safety.

With gokarts and safety, it is normally advised that if you do not have a rollcage, then you also do not have seatbelts. This is so that if the kart does flip, you are thrown clear and not pinned underneath.

If you have a rollcage, then you would want seat belts. This is so that if you flip, you are kept inside the cage and it stops you falling out and being pinned by the cage landing on you.

It is just something to think about. Maybe others can give you their opinions as well.

Otherwise.....EXCELLENT job!!! :D :D :cheers2:
 

wooden

New member
Messages
17
Reaction score
1
Location
Europe
Hm... You have some right about the rollcage and safety belts, but I didn't want to mount heavy cage, so I just put this thing over the seats. I thought that it will be enough. When the gokart will roll it will stop on this elements. Now I think that this is practically not probable to roll this car. It's to wide and in my neighbourhood there is no hills where You can roll it over ;-)

Safety belts are needed. The smaller son is to young to seat without them.

Thanks for good words!
 
Top