Dirtbox Venom mini-buggy upgrade/rebuild!

Status
Not open for further replies.

mysteryboy28

New member
Messages
1,582
Reaction score
10
Location
Lansing, MI
Hoping to have it done by the weekend. But you know how it goes. Out in the garage now hooking up wires and hoses, and adding fluids. Still gotta whip up a chain tensioner, and possibly a skid plate for the sprockets and rotor. Still need some knurled grub/set screws for the bearings. The seller of the bearings hasn't been much help (don't stock the screws, and don't know what size they are), so I will get the screws measured again on Monday (to make 100% sure I have the right size) and just order up a bazillion.

just added mirrors! the passenger mirror needs to come up an inch, but otherwise i think they turned out pretty cool! :)
 

Attachments

  • IMG_20130518_033904.jpg
    IMG_20130518_033904.jpg
    101.5 KB · Views: 16
  • IMG_20130518_034010.jpg
    IMG_20130518_034010.jpg
    103.1 KB · Views: 20

mysteryboy28

New member
Messages
1,582
Reaction score
10
Location
Lansing, MI
spent the night wiring up the headlights, and trying to figure out the source of a short that kept blowing fuses. i traced back all of the wires i had spliced, and none of them were touching anything or grounding out. really the only thing that had changed since i tore the buggy apart for "beautifying" was adding the new starter.

the new starter had a flimsy wire post on it, so i swapped out the old power terminal with the new one, which had better posts for connecting the wires. i'm kind of wondering if the new starter might be what's blowing fuses. i will continue to search for the short, and may try swapping the old starter back into the mix (which works if you beat it with a hammer. lol).

it was such a nice day out i decided to do a little photo shoot of the buggy. :)
 

Attachments

  • IMG_20130519_185622.jpg
    IMG_20130519_185622.jpg
    146.6 KB · Views: 29
  • IMG_20130519_185824.jpg
    IMG_20130519_185824.jpg
    164.9 KB · Views: 32
  • IMG_20130519_190006.jpg
    IMG_20130519_190006.jpg
    169.3 KB · Views: 27
  • IMG_20130519_190027.jpg
    IMG_20130519_190027.jpg
    152.8 KB · Views: 32
  • IMG_20130519_190112.jpg
    IMG_20130519_190112.jpg
    129.5 KB · Views: 31

fowler

New member
Messages
5,463
Reaction score
16
Location
Bullsbrook West Aus
like i said
the brushes are just sticking

rather than trying each possible combination of components why not start by testing
doing volt drops and continuity tests on suspenct components

did u wire a relay in the headlight circuit?
which circuit is the fuse connected in?


a mean looking machine otherwise
have u any concerns that the mud guard may not do as it says
 

B man

Tecumseh FTW!
Messages
2,490
Reaction score
2
Location
Oliver springs,Tn
like i said
the brushes are just sticking

rather than trying each possible combination of components why not start by testing
doing volt drops and continuity tests on suspenct components

did u wire a relay in the headlight circuit?
which circuit is the fuse connected in?


a mean looking machine otherwise
have u any concerns that the mud guard may not do as it says

I was wondering the same. when you turn those tires are gonna throw all sorts of stuff into the buggy. especially mud. need to have something covering that area under the fenders infront of the drivers.
 

mysteryboy28

New member
Messages
1,582
Reaction score
10
Location
Lansing, MI
like i said
the brushes are just sticking

rather than trying each possible combination of components why not start by testing
doing volt drops and continuity tests on suspenct components

did u wire a relay in the headlight circuit?
which circuit is the fuse connected in?


a mean looking machine otherwise
have u any concerns that the mud guard may not do as it says

headlights aren't tapped into the power yet.

blowing fuses with the brand new starter.

how do i test for volt drops and continuity? dammit jim, i'm a fabricator, not an electrician or mechanic! (star trek semi-quote. lol). the fuse is the main (and only) fuse. it's a 30 amp blade fuse.

mud comes with the territory. lol. however future buggies may get a cockpit splash guard, or at the very least a nice rain poncho.
 

fowler

New member
Messages
5,463
Reaction score
16
Location
Bullsbrook West Aus
to test continuity u must first fond the correct setting on your multi meter

it is sometimes an ohms symbol or maybe a speaker or on mine its a diode symbol

with it on the right setting the multi meter will beep when u touch the needles together
it is to confirm electicity can flow from + to -
so if u wanted to test a broken wire u would put one needle at each end and if it beeped then the wire is all good

or in your case if u disconnect the battery and test the soliniod u would first put one needle on the + lead coming in and one goes to earth
if it beeps then u have a dead short

to test the starter put one needle on the + post and the other to ground again
u should get no beep

basically go round and test components from one side of them to the other

if u want even put a needle on each sside of the starter button
if u dont press it then no beep
if u press it then it beeps

to test volt drop u need a working starter circuit

do u blow the fuse as soon as u connect the battery or just as u press the starter button?

also check for rubbed though wires and shorts inside plugs

what sort of plugs and or joiners are u using

maybe a welding spark burned though a wire and is now earthed out
then is allot of possibilities
i hate electrickery its so temperamental
a $0.50 component get shut down a multi million dollar machine for hours while loads of people run round scratching there heads
 

mysteryboy28

New member
Messages
1,582
Reaction score
10
Location
Lansing, MI
Short found! I had actually plugged in a wire harness upside down back by the engine. Lol.

Found my power wire for the headlights, got those hooked up. Determined which wire on the tail light was for stop and running lights, getting that hooked up. Then to hook up the brake pressure sensor wire to the battery (with a fuse) and run that back to the tail light.
 

mysteryboy28

New member
Messages
1,582
Reaction score
10
Location
Lansing, MI
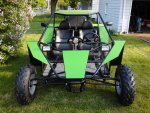
Spent last night working on the brakes. Had a buddy over to help me bleed the front brakes. We fought with them for over an hour and just couldn't get enough pressure to make to calipers grab the rotors. WTF? Lol. So he took off (it was like 1am). I finished hooking up the pressure sensor to the tail light and battery. There wasn't enough pressure in the line to activate the brake light. WTF? Lol. Soooo... I decided to give bleeding the brakes another shot. This time I just balanced the calipers on the front wheels with the bleeder screws wide open (one at a time), with a hose running from them to a coke bottle, then proceeded to pump a good 12 oz of brake fluid though them at a fast rate. Sure enough there was still quite a bit of air in the lines!

Put the calipers back on the wheels - and bam! We have front brakes and a working tail light! Whew! Adjusted the adjustment nut on the front master cylinder to closely match the rear master cyclinder. I think they're pretty even now. I also bled the heck out of the rear brakes till the fluid ran clear.

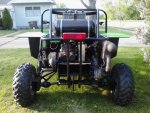
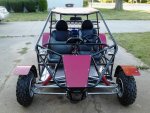
Just waiting for the 100 pack of grub screws to arrive in the mail so I can securely clamp down the bearings on the rear axle stubs and spindle axle, and then it'll be ready for a real final test drive! :)

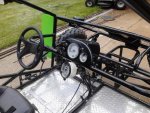
Picking up a 30 amp fuse holder for the lighter socket today. The 15 amp fuse for the tail light just didn't seem like it would be sufficient enough to share.

Trying to think of some good roller material to make my chain slack remover - not really a tensioner, just a heavy duty roller to stick over the 2 chains to take up the slack. a buddy suggested that some ATVs use rubber rollers for chain tensioners. think hard rubber would hold up ok? it wouldn't have much pressure put on it (except when going in reverse). where would i find some super thick and hard rubber roller tubing stuff? i've got a pair of 3/4" pillow bolock bearings - throw a 3/4" steel shaft through that with a thick rubber tube sleeve on it... hmmm...
 

mysteryboy28

New member
Messages
1,582
Reaction score
10
Location
Lansing, MI
second 10 tooth sprocket welded to the jackshaft, edges ground down so chain only rides on the sprockets, not the welds. new chain measured and cut. both chains mounted, half and full links connected.

wired up the lighter socket to the new fuse holder. ended up getting a 20 amp glass fuse cuz it came with the holder, which was only like $2.20. tried my van's cigarette lighter - worked like a charm, aside from having to hold the lighter in place while it heated up. i don't think those lighter sockets are designed specifically to work with the pop-out cigarette lighters...

taped up some more wires, touched up a little paint, replaced a non-locking nut on the front brake master cylinder lever with a locking nut, oh and yesterday i had mounted the 4-point harnesses to the seats. :)
 

mysteryboy28

New member
Messages
1,582
Reaction score
10
Location
Lansing, MI
made a neat little cover for the wires in the "dash" panel.

wired up the light toggle switch to the battery, as well as the motor, so that you can flip the lights on when the buggy is off, or flip it the other way when the buggy is running to save battery power.
 

Attachments

  • IMG_20130527_135622.jpg
    IMG_20130527_135622.jpg
    124.7 KB · Views: 23
  • IMG_20130527_135609.jpg
    IMG_20130527_135609.jpg
    110.4 KB · Views: 21
  • IMG_20130527_135555.jpg
    IMG_20130527_135555.jpg
    102.2 KB · Views: 25
  • IMG_20130527_135542.jpg
    IMG_20130527_135542.jpg
    139.2 KB · Views: 26
  • IMG_20130527_135507.jpg
    IMG_20130527_135507.jpg
    106.6 KB · Views: 34

mysteryboy28

New member
Messages
1,582
Reaction score
10
Location
Lansing, MI
before and after pictures!!!
 

Attachments

  • IMG_20120625_204134.jpg
    IMG_20120625_204134.jpg
    128.9 KB · Views: 30
  • IMG_20130527_135507.jpg
    IMG_20130527_135507.jpg
    106.6 KB · Views: 31
  • IMG_20120627_124543.jpg
    IMG_20120627_124543.jpg
    175.8 KB · Views: 28
  • IMG_20130519_190006.jpg
    IMG_20130519_190006.jpg
    169.3 KB · Views: 32
  • IMG_20120625_204043.jpg
    IMG_20120625_204043.jpg
    123.1 KB · Views: 26
  • IMG_20130519_185622.jpg
    IMG_20130519_185622.jpg
    146.6 KB · Views: 30
  • IMG_20130527_135555.jpg
    IMG_20130527_135555.jpg
    102.2 KB · Views: 27

mysteryboy28

New member
Messages
1,582
Reaction score
10
Location
Lansing, MI
i thought for sure it would go so much faster, because the buggy was basically already built. lol. so much had to be cut and reshaped, and ground down, and stuff. so yeah, no more "rebuilds". lol.
 
Status
Not open for further replies.
Top