Dirtbox Venom mini-buggy upgrade/rebuild!

Status
Not open for further replies.

greaser

new here
Messages
126
Reaction score
0
Location
moose lake mn
You should get another one so you can alternate lol run one till she blows then use the other while getting a new one rinse and repeat. Lol

Sweet yep I have heard good things about those 500s and I think 82 horse should be enough. For now ;)

Oh and please get a bill of sale on the motor it will make life easier for me when I go to license it.
 

mysteryboy28

New member
Messages
1,582
Reaction score
10
Location
Lansing, MI
finished grinding all the unwanted stuff off. now we're ready for new parts!

square pillow block bearings arrived (6 of them), so trailing arms are next! 2 bearings per trailing arm (to prevent shifting of the axles, because the bearings pivot), and the last 2 are for the sprocket/rotor spindle.

will hit the car salvage yard this week and pick up some CV axles. was hoping to use the front spindles that were on the buggy already, but the king pin angle is off on them, courtesy of my stupidy and not drilling the bolt holes out to 1/2" in a straight line. i wondered why it was a little hard to steer... doh!
 

mysteryboy28

New member
Messages
1,582
Reaction score
10
Location
Lansing, MI
mechanical for rear, and hydraulic for front? it's doable, and would save me a couple bucks running steel brake line to the rear. :)

since we'll be runnning dual chains there shouldn't ever be a problem of the rear brake failing due to chain breakage. :)
 

mysteryboy28

New member
Messages
1,582
Reaction score
10
Location
Lansing, MI
the ski doo does have a hydraulic brake, correct (had to do my homework, lol).

meanwhile, spent yesterday rounding up some parts, then it was "kid night", so homework, dinner, showers, bedtime, the works. I have my girls every weekend and and every wednesday.

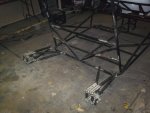
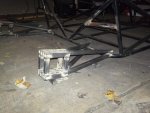
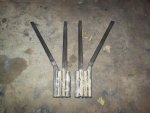
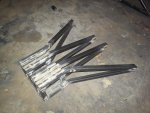
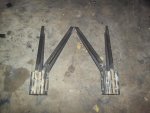
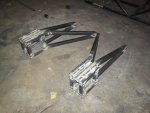
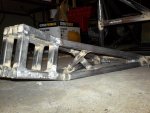
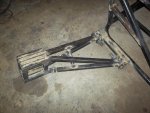
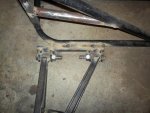
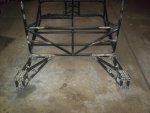
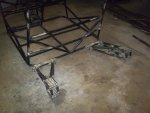
working on fabricating the trailing arms right now. going for a little more streamlined, less bulky design. this buggy will be little lighter overall than the last one. negotiating with a couple of sellers on ebay for front spindles, as the Raptor 660 spindles just ain't cutting it because of odd king pin angles. looked into just replacing the spindles and using the existing hubs and rotors, but after talking to a couple of ATV shops - they didn't think they'd be compatible with Banshee or Warrior spindles - which are the type I want (straight king pin angle, better Ackerman than the Raptor spindles).
 

greaser

new here
Messages
126
Reaction score
0
Location
moose lake mn
I see, I am glad you have that kind of knowledge because this is where I would have issues in doing this myself. Cool I can't wait to see the new redesigned trailing arms. Kid nights are good for the soul man.
 

mysteryboy28

New member
Messages
1,582
Reaction score
10
Location
Lansing, MI
trailing arms almost done. just need to throw some cross braces in them to help prevent flex, weld on the bearing plates, then weld the pivot tubes on after aligning the heck out of them. don't want any crab walkin' going on!
 

Attachments

  • 100_0130.jpg
    100_0130.jpg
    80.6 KB · Views: 59
  • 100_0132.jpg
    100_0132.jpg
    84.5 KB · Views: 49
  • 100_0135.jpg
    100_0135.jpg
    101.4 KB · Views: 51
  • 100_0138.jpg
    100_0138.jpg
    108.6 KB · Views: 59
  • 100_0139.jpg
    100_0139.jpg
    112.9 KB · Views: 57
  • 100_0141.jpg
    100_0141.jpg
    108 KB · Views: 49
  • 100_0142.jpg
    100_0142.jpg
    101.8 KB · Views: 55

mysteryboy28

New member
Messages
1,582
Reaction score
10
Location
Lansing, MI
ordered up a pair of Yamaha Warrior front spindles/hubs/rotors. should be here by around the 25th. gives me a couple days to finish up the trailing arms and get started on the rear end of the buggy. should have some pics tonight. :)
 

mysteryboy28

New member
Messages
1,582
Reaction score
10
Location
Lansing, MI
will have some tonight for sure! kids get picked up around 6pm, and i'll put in a good 6 hours of work. it's awesome outside today!

got the trailing arms aligned last night, more difficult than you'd think. basically run a bar the length of the side of the buggy for the "straight edge", then keep shaving down one connecting end of the trailing arms till the straight bar of the trailing arm lines up perfectly with the "straight edge". then i cut tubing and welded it to the trailing arms for the pivot tube. it's some heavy guage tubing too... 1 1/8" tube with 3/4" inner diameter, so i really had to take my time welding it for maximum penetration (good name for a porno, lol). today will have the cross braces done, and weld the pivot mounts for the trailing arms to the buggy. then i trim out the center of the pivot tube off the trailing arms so that i can quadruple shear them, rather than double shear (2 3/4" bolts per trailing arm, instead of one long 3/4" bolt). then weld a support bar for where the shock mount will be, followed by shock mount tabs. then drill out the holes in the bearing plates and weld them to the trailing arms. then i'm done with them!
 

greaser

new here
Messages
126
Reaction score
0
Location
moose lake mn
Wow that's a lot of little and not so little things to get done. I'll be waiting for pics don't disappoint me lol
 

mysteryboy28

New member
Messages
1,582
Reaction score
10
Location
Lansing, MI
some pics. :)

trailing arms mounted. cross-braces welded into the trailing arms to prevent flexing when the wheels take some heavy bumps.

bored out the big holes on the bearing plates, which takes awhile because you have to go slow. also used quite a bit of oil while drilling to keep things cool and not ruin my bi-metal hole saw (learned that lesson the hard way not too long ago!). also ground smooth the surface on the trailing arms where the bearing plates will be welded.

tomorrow i'll pick up a new 7/16" drill bit and finish up the bearing plates and get the bearings mounted.
 

Attachments

  • 100_0155.jpg
    100_0155.jpg
    117.4 KB · Views: 36
  • 100_0154.jpg
    100_0154.jpg
    129.4 KB · Views: 36
  • 100_0151.jpg
    100_0151.jpg
    118.6 KB · Views: 39
  • 100_0146.jpg
    100_0146.jpg
    107.9 KB · Views: 40
  • 100_0143.jpg
    100_0143.jpg
    127.1 KB · Views: 39
  • 100_0157.jpg
    100_0157.jpg
    126.3 KB · Views: 37
  • 100_0159.jpg
    100_0159.jpg
    89.4 KB · Views: 35
  • 100_0161.jpg
    100_0161.jpg
    88.9 KB · Views: 38
  • 100_0163.jpg
    100_0163.jpg
    115.7 KB · Views: 48

mysteryboy28

New member
Messages
1,582
Reaction score
10
Location
Lansing, MI
no rear tires yet. but i did just spend $20 on 24 1 1/2" 7/16" bolts with nuts and locking washers, and a new 7/16" drill bit! :wai: lol.

i'll throw my 22" tires on the rear for now, just to keep things moving along. :)
 
Status
Not open for further replies.
Top