Coleman CC100X Torque Converter

Pripyat

SCEE
Messages
40
Reaction score
0
Location
SC Pee Dee
It was a headache and required a lot of fabricating but I managed to get an ebay clone of a TAV2 mounted on my sons minibike. He has a hard time riding it because with the centrifugal clutch, it takes off faster than he wants to putt around so he ends up on and off the gas constantly. I was thinking that with the torque converter, it would start off slower at a lower gear ratio and would be easier for him to ride around our bumpy property.

I was wrong. The first test ride, I gave the bike a handful of throttle and the thing flipped backwards, leaving a black mark on the cement where the rear tire sat. It is a blast to ride, I can do wheelies at just the twist of the throttle. But, my son won't touch it now.

How do I fix this? I was thinking of replacing the spring to have it engage earlier? I believe stock is 3100rpm, I'm thinking it needs to kick in at half that. Thoughts?
 

mark20

New member
Messages
22
Reaction score
0
Location
minnesota
there should be a screw that you can turn in that limits the throttle some, so the engine doesn't rev up as much

if not id probably get the lightest spring that you can find to engage the torque converter.
 

Pripyat

SCEE
Messages
40
Reaction score
0
Location
SC Pee Dee
I couldn't find anything about a CC100X Torque Converter so here is some information for anyone who was thinking about adding a TAV2 to a 99cc engine off the CC100X -

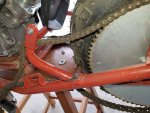
The cross brace has to be removed to allow for the Torque Converter. Also, the tensioner bracket had to go.


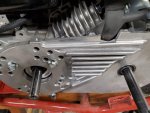
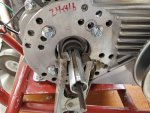
The TAV2 will not bolt up to the engine without modifying the mounting plate. A notch has to be cut out to make room for the exhaust and the mounting holes need to be milled slightly to allow a position between two of the mounting hole sets. The portion of the driven shaft that protrudes out the back of the mounting plate will contact the engine in one set of holes and the entire unit interferes with the engine mounting plate in another. I'm guessing only about 5 degrees of rotation is that I had to add to an existing set of holes.


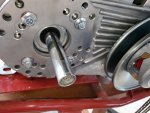
The TAV2 needs 2.25" minimum shaft length from the engine. The 99cc has 2", there is literally no keyway left for the outer pulley. From what I am reading, a 2.5" shaft is ideal, but the 2.25" shaft of a predator engine has enough keyway engagement to work. The sleeve I ordered was 3" long so I figured I could make this work somehow -


I ordered 3/4" TAV2 so it would be compatible with a 212 predator engine. The 99cc engine is 5/8" shaft so I ended up ordering a sleeve adapter to get it up to 3/4". I wish I had some 5/8" keyed shaft and I would have just tack welded it to extend the existing crankshaft. All I had was some 5/8" OD steel tube so I ended up bonding the sleeve to the engine shaft with retaining compound and hammering in the 5/8" tube to fill the void.


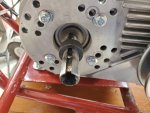
Note there is no keyway on the 5/8 tubing, this had to be filed down to allow the pulleys keys to slide over. I was thinking that this may work as it was but I knew I'd feel better if it were tacked into place.


I believe I could get this back to stock configuration if I needed to although it would be a pain. I tacked the unkeyed tubing to the sleeve in two places at the end of the shaft as well as put a bit of weld at the point where the tubing meets the crankshaft. I also put a small weld closer to the engine, just enough to bind the 3/4" shaft to the adapter sleeve.

It took a while to get the spacers right for the rear sprocket. I would highly recommend buying a kit of spacers/shims for each shaft diameter you are working with when taking on a project like this. I spent a lot of time grinding on washers and actually cut one out of a piece of 5/8" steel plate. It got to the point where I was shopping for lathes on Craigslist. :D

The engine had to slide over so new holes had to be drilled for that and obviously the chain had to be shortened. The TAV2 plastic cover has no provisions for a chain to pass through so that has to be modified as well. I actually don't have any pictures of the complete project, I'll get some and post them soon.

The bike takes off so fast I ended up ordering the different springs, I ordered the three lowest engaging garter springs for the drive shaft (clutch) and a different torsion spring for the driven assembly that delays the higher gearing.
 

Attachments

  • entireplate.jpg
    entireplate.jpg
    364.7 KB · Views: 1
  • shaftbefore.jpg
    shaftbefore.jpg
    330.2 KB · Views: 2
  • weldedshaft.jpg
    weldedshaft.jpg
    326.6 KB · Views: 2
  • crossbrace.jpg
    crossbrace.jpg
    515 KB · Views: 1

mckutzy

Well-known member
Messages
8,353
Reaction score
110
Location
bc, canada
Firstly.... No dont weld on the motor....WHy????

Secondly, a bigger question... ... When setting up for welding... where did you attach the ground????
 

Pripyat

SCEE
Messages
40
Reaction score
0
Location
SC Pee Dee
I typically wouldn't have welded to the crank, it is a terrible idea, but I have a predator 212 engine sitting on the floor in the garage, using the 99cc with the torque converter was meant to be a fun project. I also wouldn't (and didn't) run a bead, they are just tacks, to minimize heat on the crank.

I clamped to the sleeve and started the arc on the sleeve to prevent issues with seizing the bearings. :thumbsup:


I wouldn't have welded the sleeve to the shaft if the key on the TAV2 pulleys weren't fixed. If the TAV2 pulleys had keyway I would have just made a custom key to fill the void of the engine shaft, sleeve, and TC pulley keyways. The fixed key on the TAV2 didn't extend far enough down to get adequate contact with both the sleeve and the engine shaft. I had nothing to keep the sleeve from slipping on the engine shaft except for the retaining compound (loctite). I knew worst case scenario I had permanently made the engine 3/4" shaft which isn't a problem since I already have a 3/4" centrifugal clutch if I wanted to go back to stock.

But I agree that welding to the crank is in general a bad idea but I have no regrets on this project specifically. What would have been the better way to step up the 5/8" shaft to 3/4" and use the fixed key on the TAV2?

[edit] I didn't intend for this thread to be a how-to, had I intended that I would have made a new thread. I got to thinking and figured people would find this thread in the future when searching "CC100X TAV2" and may think, "Oh, this other guy did it, this should be simple." I wanted to make sure anyone that read through this thread realized that putting this TC on this engine on this minibike is a pretty big deal and requires a lot of fabricating.
 

Attachments

  • 20200419_171430.jpg
    20200419_171430.jpg
    463.3 KB · Views: 1

mckutzy

Well-known member
Messages
8,353
Reaction score
110
Location
bc, canada
OK... fare enough..pardon me...
Had me going for a minute.. about to say "well thats cool, nice paperweight"...

Good to see some thinking...


Covid blues in all...
Its early and I think I need more or better coffee...
 

Pripyat

SCEE
Messages
40
Reaction score
0
Location
SC Pee Dee
It's all good, I regularly talk to a buddy of mine about my projects, I referred to this as "the shadiest thing I've ever done" in reference to the crankshaft with a collar and dummy filler metal all tacked together. If anyone has any suggestions on the correct way to have accomplished this, I'm all ears. Only thing I can think of would be a very custom adapter but it would cost as much as a new engine to get a single adapter machined at a shop.

Everything I read online said that to mount a TAV2, it would be much better to scrap the 99cc engine and go directly to a 3/4" predator engine. I weighed the difference between the 99cc (26lb) and the 212cc (40lb) and figured there was value, while my son was young, in trying to utilize the lightweight 99cc until he is comfortable on the minibike. Hopefully the springs slow it down bottom end until he can get comfortable on it.
 

mckutzy

Well-known member
Messages
8,353
Reaction score
110
Location
bc, canada
I hear ya on the makin it work deal.. overall I see what you were doing and I can see it would have been quite the ordeal without machine tools... and or expensive....
 

Pripyat

SCEE
Messages
40
Reaction score
0
Location
SC Pee Dee
I totally hear you, though, seems like to assume someone has common sense is a bad assumption.

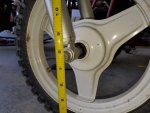
I'm about to try to put some PW50 forks on the minibike. I got to looking at the PW and the way the wheels mount on the forks is going to be a bit weird with the larger wheels. I'm going to have to have a fairly significant spacer on either side of the large wheel so I can clear the fork itself since the inner mounting face on the PW fork for the axle isn't flush with the fork itself. I just wanted to bounce this off someone before I went to ****ering around in the garage.


This isn't a question as much as a statement, I'm open to any comments or suggestions. I already bought the shaft collars for the new fork tube triple in hopes that I can avoid welding the forks to the new triple. :D
 

Attachments

  • PWwheel.jpg
    PWwheel.jpg
    338.6 KB · Views: 0

Pripyat

SCEE
Messages
40
Reaction score
0
Location
SC Pee Dee
:lolgoku:

I'm just an electrical engineer with a welder. When I first started playing around with my first buggy I only made mods that were well documented or that were posted by well respected forum members. Now that I'm a little more comfortable I am having a blast in the garage. I weld things that don't even need welding. Feels good. :thumbsup:
 

Pripyat

SCEE
Messages
40
Reaction score
0
Location
SC Pee Dee
So I got the springs in finally - I paid extra for 2-3 day USPS but there were virus related delays apparently. The engine kicks in really early which is very nice. Interestingly I can still wheelie easily just from the engine power of the 99cc. I dropped it down to a 11 tooth front sprocket, I'm wondering if I need to change the gearing to make it taller so there isn't so much torque down low. I grinded the governor screw on the engine (it is tacked all the way in) and replaced it with a longer one that lets me give the engine maybe 1/8 throttle. That is enough for the bike to go a moderate speed with 150lb me on it. It still jerks when the clutch kicks in but I think my son can handle it.

Currently I have the 99cc engine with a TAV2. 11t front, 75t rear. Any suggestions on gearing to kill the bottom end torque? I'd love to go smaller on the rear to help keep the chain out the sand.
 

brianwbates

Brian B
Messages
2
Reaction score
0
Coleman KT 196-C cannot remove Front Drive Torque Converter

Hi All,

I'm new to the forum and apologies if this is not the right process or place for this question.

I am trying to remove the Front Drive Torque Converter (to clean the converter - its been locking) on my daughters Coleman KT 196-C Gokart and when I got to turn the nut off, it spins the Torque converter and it actually turns the engine (eg - make sounds like its about to start).

Its like a need the converter to stay locked, so I can turn the nut off.

Any thoughts? Thanks in advance everyone!

Brian
 

Karts of Kaos

the many mowers guy
Messages
1,167
Reaction score
197
Location
Wisconsin
get a strap wrench and put it on the flywheel an that can keep the engine from spinning. also pull the spark plug wire while you are working on an engine.
 

landuse

Moderator
Staff member
Messages
18,779
Reaction score
563
Location
Pietermaritzburg, South Africa
Take plug out and feed a bunch of cotton rope down the hole. When you now turn the engine over the piston cannot each the top of its stroke to come down again, effectively locking the engine. You can now remove the nut. Just pull the rope out when done
 

brianwbates

Brian B
Messages
2
Reaction score
0
Thanks, @Karts of Kaos - the wrench did the trick and obviously so did pulling the spark plug wire. I was able to take the torque converter off, take it apart and clean it and so far so good!

And thanks @landuse as well!

Brian
 
Top