Building a Weld Fixture

Status
Not open for further replies.

MatthewBasaraba

Jerry Rigger
Messages
59
Reaction score
0
Location
Alabama
So there is a couple reasons for building a weld fixture to weld your Kart.

1. You want to do it right the first time.

2. You want to do it right EVERY time, IE, make more than one.

Not sure if others have made threads about it but I started a fixture today and will keep an update to building one step by step. I will post an A and B to building a fixture. A being the rich guys way, the B is for the rest of us.

My fixture will be self standing and rotate on bearings to make it easy to reach the whole frame without taking the kart off the fixture till it is finished.

First thing get a list of parts you will need.

1- Surface
2- Side Supports, 2 x 2 1/4 inch Angle Iron. (I used 3/8 and it was over kill)
3 - (10)1 1/2 inch long 1/4 inch bolts with 20 washers and 10 nuts
4 - (4) 2 inch long 1/4 inch bolts, 8 washers, 4 nuts
5 - (#) 1 1/2 inch 1/4 inch bolts with matching washers and nuts. Reason the # is this will be dependent on how many stops you put on your fixture. 2 per hold so figure that out before you buy.
6 - (2) 3/8 plate steel, 6 x 5 inches, and (2) 3 x 5 ((these can be any width but need a minimum of 3 inches wide. Most times you can get drops from the steel yard so they are not that expensive. Plus if you get them this size already, you dont have to try cutting them. You need 2 at least this big and 2 that will can have your bearings to. That will come later.
7 -1 x 1 14 or 11 gauge angle iron. This will be for the stops so buy accordingly. This can also be bought as a drop, just make sure they are at least 4 inches long. Can have different thicknesses, it wont effect the outcome.
8 - 1 inch wide 11 or 14 ga flat stock, again, can use drops.
9 -2 inch wide 11 ga to 1/4 thick flat bar, this needs to be long, it will be the back side of the side supports to match the 2 x 2 angle iron.
10 - 1 inch square tubing, 11 GA is what I will be using. The amount will vary depending on how tall you want your fixture. You need to take the width/2 plus 4 inches. This will make sure the fixture can rotate.
11 - 2 feet of thick ROUND tubing, the same OD as the ID of the bearings you get.
12 - (2) 4 hold pillow block bearings. I got mine off ebay for $6 each, they are 1 3/4 ID.


1. The Main surface.

A. Plate Steel - At least 3/8 thick. Price for a 3 x 7 foot piece is about $400. This is VERY ridged but also VERY heavy. There is a LOT of cutting involved in this one so if you dont have a way to cut steel easily, avoid it. This is the EASIEST route for the last phase of the fixture, the holders and stops for the kart itself, since they can be welded directly to the plate.

B. 3/4 inch sheet of plywood. This is what I use. If you want you can always get a 16 ga sheet to lay over the plywood and attach to the angle iron that will come later on.

So starting with the surface, get a size that will allow room on both sides, at least an inch or so, and at least 6 inches longer on both ends from the length of the kart. My plate is 36 by 70.

I used an old office table to assemble my fixture on since it is narrower than my fixture. Sawhorses will work just was well. After cutting your plate to the size you need first cut the 2 sides supports, with plate steel, only need the angle iron, if using plywood I suggest 2 inch wide flat stock, this will make it rigid and keep its flatness, very important.

**Note** that if you do buy a piece of plate steel, make sure it is a FLAT piece!

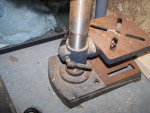
Measure the side lengths first and cut the 2 x 2 angle iron and 2 inch flat stock to the length of your plate. The angle should lay flat on top and hang over the sides. See picture below.


MatthewBasaraba

Jerry Rigger
Messages
59
Reaction score
0
Location
Alabama
Push your plate so the flat stock sits on the surface without you having to hold it. Move the angle iron and flat together on the outside of the plate and secure it with a clamp. The 2 X 2 and the 2 inch flat dont have to be exact, I leave a small gap so that I can make sure some weld gets between the 2. I flush mine to the ends also.

((The masking tape on my clamp is to make sure it doesnt scratch other surfaces on some other projects I use them on. LoL))


Drill a hold about 3 inches from the end, at least 1 inch in from the side and insert a bolt/washer on top and washer/nut on bottom. do the same on the other end and in the very middle. Remove clamps and do the same on the other side.

Here is the side done.


Measure and cut your pieces for the ends and attach them the same way. Make sure they fit between the sides and that they are very close so that they can be welded together.

The plate with its supports is now done. Some would call it picture framed.
 

MatthewBasaraba

Jerry Rigger
Messages
59
Reaction score
0
Location
Alabama
Now to attach the pieces that will secure it to our stand. This is where you use your 3/8 plate pieces. Clamp it to the ends like the picture below. Drill through all materials and bolt it in place.

Make sure the plate is centered.


MatthewBasaraba

Jerry Rigger
Messages
59
Reaction score
0
Location
Alabama
Take your round tubing and cut in in half, 3 inches deep. The cut wide enough to fit over the 3/8 plate.

I used a reciprocating saw with a metal blade and cut a chunk out then used my angle grinder with cutting blade to widen the slot to fit over the 3/8 plate.


Center the tube on the centered holding plate and weld both sides.


The plate is now finished and ready to mount your stops. Even though the mounting plate shows welded in this picture, I have changed that and ONLY bolt it IF you plan on making more than one fixture to mount to the same stand.

I will post that later.
 

KieranM

Doin It!!
Messages
1,409
Reaction score
3
Location
Kilkenny, Ireland
Nice work there man, Im loving the welds you got, ARC? Those angles can be hard to get with a welder, usually when im faced with an angle like that, which is stationary it takes all my experience to lay a nice bead. Its not the easiest thing to do in the world, especially on arc. The only thing getting me is the measurement, we dont use imperial over here, but i get the basic idea of the sizes.

I know you probably know this, but cleaning the steel with one of these on a grinder really helps the flow as the steel is lacking some of the imperfections caused from the rust.

http://www.discount-tools-uk.co.uk/images/products_sorted/normal/1259418530_KDPAB010%204.5%27%27%20FLAP%20DISC%2040G.JPG

Nice work :thumbsup:
 

MatthewBasaraba

Jerry Rigger
Messages
59
Reaction score
0
Location
Alabama
Yeah I bought a 10 pack of sanding paddles like that on ebay for $15. I should have cleaned them better. Can always take my measurements and multiply the by 25.4 to get the mm equivalents.

I use a Lincoln 180 mig welder with 35mm flux core. I want to switch to Argon, I just don't want to spend the $250 for a tank.
 

redsox985

Active member
Messages
4,092
Reaction score
11
Location
PA
You can pick up tanks with regulators on Craigslist. You also want 75% Argon/ 25% CO2 for steel. Then, 100% Argon for aluminum or stainless.
 

MatthewBasaraba

Jerry Rigger
Messages
59
Reaction score
0
Location
Alabama
I will be adding an update to the first section and through out to give the decimal and metric for each item and measurement.
 

MatthewBasaraba

Jerry Rigger
Messages
59
Reaction score
0
Location
Alabama
The Stand...

So I have the 2 pieces of 6 x 5- 3/8 thick flat that I will mount my bearings to. I mark out where the mounting holes will be and also rough in where the pipe will go through the stand.

((((I will be posting a picture of a second stand that can be used also but that will come later today when I can get a CAD model built of it.))))


Drill the holes for the mounting holes.

To cut out the center I drill holes in 3 corners then use a jig saw with fine tooth metal blade to cut out the center. After the holes are drilled and the center cut out, mount the bearing housing to the plate.


Now can slip the bearing and plates over the end of the pipe mount.


MatthewBasaraba

Jerry Rigger
Messages
59
Reaction score
0
Location
Alabama
Cut the leg pieces, I used 1 x 1 11 ga tubing to make my legs. I cut a piece of 1 inch wide flat stock to go across the legs to stabilize it. Can also use another piece of pipe if dont have a piece to strap the 2 legs. Since my stand was much taller than my table I took the bearing plates and welding the legs in place.

Now comes the fun part. 2 options... A lifting device, or 4 strapping lads to lift the plate while you slip the legs in place.

I chose to use my 2 ton cherry picker.


I then welded a piece of 1 x 1 tubing from leg to leg to keep them from moving in and out.

Your fixture is now done and ready for stops and blocks!


Rustydog2010

NZ Nutta :|
Messages
945
Reaction score
2
Location
New Zealand
Looks good mate.

Would have been nice to see the ends of the angle iron cut on a 45 degree angle, would have just finished it off.
 

MatthewBasaraba

Jerry Rigger
Messages
59
Reaction score
0
Location
Alabama
Looks good mate.

Would have been nice to see the ends of the angle iron cut on a 45 degree angle, would have just finished it off.

Yeah I know, It bugs me to no end but I bought 3/8 thick (9.55 mm) and it was brutal cutting it straight let alone at an angle. If I did it over I would get it only 1/4 (6.35mm). Makes a huge difference.

I am used to my BIG chopsaw that was stolen a few years back and this smaller one can take these thick materials that well. I bought a nice band saw but after only 5 cuts I bent the blade and now it sits till I can get back to HF to get a new one. :furious2:
 

Doc Sprocket

*********
Messages
15,677
Reaction score
142
Location
Ontario, Canada
This is neat. You know what I'd like to see here? A drill press column lock- type device. That way you could rotate to any angle and hold it there, instead of pre-determined angles set by pins. If you don't know what I mean, I'll run out to the garage later and snap a pic.
 

Rustydog2010

NZ Nutta :|
Messages
945
Reaction score
2
Location
New Zealand
This is neat. You know what I'd like to see here? A drill press column lock- type device. That way you could rotate to any angle and hold it there, instead of pre-determined angles set by pins. If you don't know what I mean, I'll run out to the garage later and snap a pic.

:confused:
Im in for pictures :roflol:

Wow, I agree 3/8 is overkill, but at least it wont move in a hurry.
 

Doc Sprocket

*********
Messages
15,677
Reaction score
142
Location
Ontario, Canada
Okay, have a look at the pic of the drill press (you may have to enlarge). I have circled the components. Basically a pinch clamp around the column. You would loosen the hand bolt to swivel or raise/lower the table, then tighten the bolt to clamp it in place. I am suggesting a similar method to allow the welding table to lock in infinite positions.
 

Attachments

  • press.JPG
    press.JPG
    151.9 KB · Views: 5

MatthewBasaraba

Jerry Rigger
Messages
59
Reaction score
0
Location
Alabama
Yeah I havent done the collar lock yet. I had to order one for the odd sized shaft. I will get that posted when I get it here and weld the mods on it.
 

MatthewBasaraba

Jerry Rigger
Messages
59
Reaction score
0
Location
Alabama
So we are up to the blocks and stops.

Blocks and stops are the means by which the segments are held in place at the precise angle and location for welding without having to move them after they have been placed.

You will need a starting point, the main parts of the base of the frame are a good place to start. If you know that your kart is 30 (762 mm) inches wide, and your table is 36 (914 mm) inches wide, measure your first line in 3 (76.2) inches from one side, I would use this line and not the opposite side of the table to measure the rest of the kart. Measure the rest of the frame to itself and not to the table.


First is the bottom level of the kart, I have taken 1 x 1 angle iron and cut it into various lengths. I drill 2 holes in each, this is very important, ONE bolt will not hold it in the correct orientation. I put the holes in the angle iron at 1/4 inch, .250 or 6.35mm. Make sure there is room from where you will drill the hole to the 90 degree angle, need to keep the hole near the middle of the flat.


After the holes are drilled in the angle iron, go the table and pilot the holes through the bracket. Make sure to keep the angle iron a distance from where it will connect to the next piece. Need to have room to weld. Since I was using 1/4 inch bolts, (6.35mm) I drilled the holes in the table to 5/16 (7.94 mm) this allows you some movement to position your stop if it isnt perfect. After the holes are drilled, mount the plate so that the angle faces AWAY from where your segment will be located. The pipe will mount directly to the flat of the table.


Using 2 stops on one length makes sure to keep the angle in line and uses less material, versus one long stop. Here you can see I mounted a frame I had welded to the table to show how it would mount. I cut and mount the pieces into the fixture as I add the stops to the fixture, this allows you to double check your angles and measurements.


You continue to measure and place stops and blocks till the bottom level is complete. I will not post my measurements for my build since this is a purchased blueprint and there are copyright issues, but if you have a second level, like a rail or areas that are at a different level, I build the bottom the same way (cut and drill holes), then cut another piece of angle iron and weld it to the inside of the angle on the bottom piece. Make sure to leave it a short distance above the bottom since angle iron is NOT square at the bottom, it has a radius, this will not allow the "Upright" to be at a 90 degree angle if it is all the way to the bottom. I then clamp another short piece to a piece of pipe and square it to pieces of the frame that are mounted in the previous stops.

VERY IMPORTANT! Make sure the TOP piece faces the direction of the segment, the material (pipe) will have to sit on this piece of angle iron.

Here you can see all my stops and blocks and most of the pieces mounted. If you look close and the upright at the bottom of the screen you will notice I welded a piece of metal between the upright and side angle iron. I did this so the ground can be put on one of the legs and once all the pieces are in place it will complete the circuit and not have to move the ground from piece to piece.


My next installment will show the weld access areas..
 

MatthewBasaraba

Jerry Rigger
Messages
59
Reaction score
0
Location
Alabama
I had stated earlier I would post another design for the legs. This is using a 2 bolt pillow block. It was a quick sketch with google sketch. This would be easier and cheaper since the bearing housing mounts to the top of the stand and doesnt have to have plates to hold the bearings.

 
Status
Not open for further replies.
Top