Buggy no.2 for 2013

Status
Not open for further replies.

Jim-L-L

New member
Messages
176
Reaction score
0
Location
South Australia
My second build for the year, and this ones all for me !
I normally get 2 nights a week in the shed so 6 months should be enough and just in time for next summer
 

Attachments

  • DSCF2183.jpg
    DSCF2183.jpg
    95.3 KB · Views: 62

Jim-L-L

New member
Messages
176
Reaction score
0
Location
South Australia
Finally some progress, got the rear axle rigged with the wheels i'm using. Had to make some steel plate adaptors to mount the 110pcd Yamaha rims onto the go kart hubs, bit of a tempory fix as I don't know how well the alloy hubs will last ? hope to get some steel ones turned up eventually (more $$$) Anyway no concerns for the front as I got a local trailer parts manufacter to make a set of bearing hubs with studs for Yamaha instead of the usual 4 on 4" pattern.
Cheers JK
 

Attachments

  • DSCF2198.jpg
    DSCF2198.jpg
    106.6 KB · Views: 48

Jim-L-L

New member
Messages
176
Reaction score
0
Location
South Australia
wow! so are you relying only on thrust or are you transferring the power to your axle somehow?

Unfortuantly the jet go kart is just wishfull thinking.

Those sort of engines are from APU ground power carts and are best suited to provide electrical power from a gen and bleed air from the compressor for aircon and starting systems, not much thrust comes out the exhaust of those.
 

Jim-L-L

New member
Messages
176
Reaction score
0
Location
South Australia
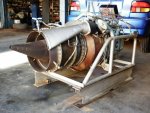
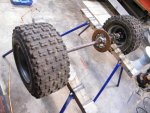
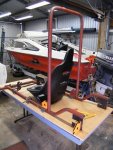
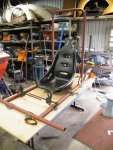
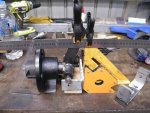
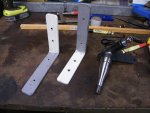
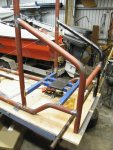
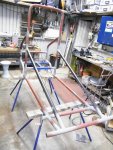
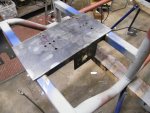
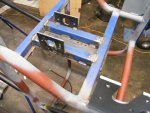
OK Time for an update ! bent up some frame parts with my very ordinary pipe bender, had to fill the pipes with sand to prevent colapse, works pretty well but still got some kinks (like me). Fish mouthed the pipes with that on line tool via metal geek website, worked a treat. Putting some major head scratching into mounting the engine, I have an existing motor to use but intend to make it ready to take a 13hp later, just got to make sure every thing will fit at a later date. I'm hoping to get the same bloke who painted my son's go kart to do mine, so of course I won't want to go cutting, grinding and welding his nice paintwork, thinking of going for a nice retro metallic brown or orange, what do you think ???
Cheers Jim
P.s. Earned a carton of Stella for moving a cupboard today, no more work (shed play) today for me
 

Attachments

  • DSCF2210.jpg
    DSCF2210.jpg
    107.8 KB · Views: 53
  • DSCF2211.jpg
    DSCF2211.jpg
    124.2 KB · Views: 52

Jim-L-L

New member
Messages
176
Reaction score
0
Location
South Australia
Made some small progress, made up some more of the rear of my frame and tacked it together, still got to make the axle bearing flanges and engine plate.

Also made up the C brackets for my spindles from some old heavy duty L brackets I had lying around in the shed, which is good because I can start to make up the front end now that I know what the track will be

Cheers JK
 

Attachments

  • DSCF2259.jpg
    DSCF2259.jpg
    104.4 KB · Views: 50
  • DSCF2258.jpg
    DSCF2258.jpg
    82.4 KB · Views: 32
  • DSCF2257.jpg
    DSCF2257.jpg
    120.1 KB · Views: 28

Jim-L-L

New member
Messages
176
Reaction score
0
Location
South Australia
Made a little more progress after a bit of a break while I saved up to buy a new MIG , bye bye 110A Migmate, Hello 180A Unimig Love it ! Anyway got all the Main space frame made up including front c hub and rear bearing flanges, motor & jack shaft plates next then on to steering and the rest !
 

Attachments

  • DSCF2279.jpg
    DSCF2279.jpg
    98 KB · Views: 22
  • DSCF2280.jpg
    DSCF2280.jpg
    129.2 KB · Views: 21

Jim-L-L

New member
Messages
176
Reaction score
0
Location
South Australia
Well spotted! Yes very much based on Ron Champion buggy, a bit longer, a bit taller, also changed the back end a bit to suit stationary engines rather than motorbike motors. Used the same basic design for my sons go kart
 

Attachments

  • DSCF2191.jpg
    DSCF2191.jpg
    101.9 KB · Views: 43

Jim-L-L

New member
Messages
176
Reaction score
0
Location
South Australia
Engine mounting plate and jack shaft flanges done too ! small balls up with with the holes for the engine bolts :censored: firstly drilled them oversize using a step drill (I thought the 11mm step was 10mm) :censored::censored: Ok not to bad ! BUT then I realised I'd measured the diameter of the hole on the bottom side of the engines foot and not the top side :censored::censored::censored: turns out that the hole is stepped (why???) and that therefore the bolt required to mount the engine should only be 8mm Oh well, I know it's the clamping force and surface area and not shear strength that will hold it all in place, just don't like making the holes bigger than they had to be.
 

Attachments

  • DSCF2283.jpg
    DSCF2283.jpg
    99.4 KB · Views: 17
  • DSCF2282.jpg
    DSCF2282.jpg
    97.2 KB · Views: 21

Doc Sprocket

*********
Messages
15,677
Reaction score
142
Location
Ontario, Canada
Boy, you're not just fooling around with those spindles, are you? I just put trailer spindles on the front of the MULE. Of all the things to possibly fail, I think you're okay there!
 
Status
Not open for further replies.
Top