BMS Wiring for modified Razor Go Kart (pictures included)

Status
Not open for further replies.

garolittle

Member
Messages
96
Reaction score
1
Location
Augusta, GA USA
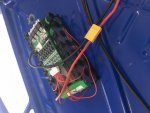
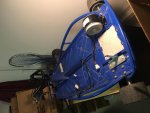
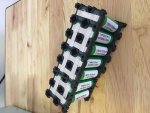
Hello everyone. This is my first post and I really appreciate all the great information from the experts on this forum. I am currently modifying a Drifter go kart (see 1st photo) by replacing the existing 24 V lead acid (14 amp hour) battery with a home made 24 V (7 series 2 parallel) 18650 battery pack (2nd photo). The 18650 Pack is intentionally small so I can learn the basic issues of electric go karts.

The only change I am making is swapping out the battery. All other connections to the original charge controller (30 amp max) remain unchanged (throttle, charger, breaks, etc).

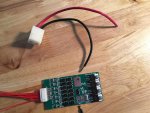
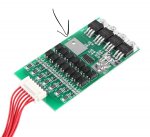
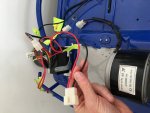
My question is how to add a Battery Management System (BMS) (3rd photo) to my 18650 battery pack before connecting it to the existing charge controller (4th photo). As you can see in the 3rd photo, the BMS has a “P-“ which (according to the the instructions) should be connected to the negative wire of the discharge source. This may be a simple question, but does this mean I would simply connect the negative black wire to be soldered onto the P- of the BMS to the negative black wire shown in the 4th photo? Thanks for any advice you can offer.
 

Attachments

  • 4DC81DA8-C4F1-4696-9790-9CB2B2240E79.jpg
    4DC81DA8-C4F1-4696-9790-9CB2B2240E79.jpg
    242 KB · Views: 4
  • 7907BD0C-0014-4378-8CA1-BA4CF44413A0.jpg
    7907BD0C-0014-4378-8CA1-BA4CF44413A0.jpg
    244.7 KB · Views: 10
  • A896B857-299D-44CD-87CC-CB6AC3FC9B79.jpeg
    A896B857-299D-44CD-87CC-CB6AC3FC9B79.jpeg
    540.6 KB · Views: 6
  • 0C20F464-A873-4428-9C90-7FA563A32833.jpg
    0C20F464-A873-4428-9C90-7FA563A32833.jpg
    213.3 KB · Views: 9

garolittle

Member
Messages
96
Reaction score
1
Location
Augusta, GA USA
Very sorry some of the photos are sideways. I used my iPhone and I guess I’m not very good at modifying the photos before posting them. Thanks again for any advice anyone can offer regarding my BMS question.
 

itsid

Moderator
Staff member
Messages
11,563
Reaction score
239
Location
Ruhrpott [Germany]
uhh paper stickers on LiPo cells...
giving me the shivers.

Anywhoo; yes as basic as that essentially.
BUT since you not only have a motor to power but a controller as well;
you might want to check the manual again i it makes sense to use the B- conenctor of the controller instead.
(essentially that'd short the connection of your batpack - and the P- though.. so check the
BMS manual if that's at all possible without frying the contact)

Two more notes:
1) I hope you have temp fuses wedged in your batpack! (none on that side.. on the underside perhaps?)
2) I hope your BMS has a charger circuit as well, since else the LeadAcid charger is likely going to fry the LiPo cells in very short order.
(seems like from the looks of it tbh.. but without a datasheet.. who knows ;))

Overcurrent/undervoltage checking is nice and good .. a balancer circuit is luxurious really,
but they still do NOT help with temperature too much.. a resetting temp fuse is the quickest easiest and safest way to protect the batpack from overheating.

in fact.. with a 7x2 pack I'd add six of them, every fuse checking four cells, the 10 center cells are checked reduntantly by 2 fuses each.
Yes that sounds overkill...
and with a load balancer it's unlikely to be necessary..
they cost next to nothing and just feeling safer is well worth the money IMHO :D
since they also do a great job when a cell get's pierced by accident.

should buy you the time to get out and away from the batpack.

just saying

'sid
 

garolittle

Member
Messages
96
Reaction score
1
Location
Augusta, GA USA
Sid

Thank you for the reply. You are a wealth of knowledge. I should have mentioned in my previous message that I plan to connect the “B-“ part of the BMS to the negative terminal of my battery pack. The first photo below shows my current wiring plan plan. The negative black wire from the “P-“ of the BMS would be connected to the black wire that leads to the charge controller. The BMS manual states the the “P-“ can be connected to either the charge or discharge connector (which was a surprise). I posted part of the BMS manual for reference. Also thank you for your message regarding the need for re-setting fuses. Currently I do not have any fuses attached to the battery pack. I will certainly add them given the safety issues involved. I checked Amazon.com and they do appear to be fairly inexpensive but the most important thing to me is quality. Do you have any recommended sources? Another option would be for me to simply charge the battery separate from the go cart to avoid any “frying” issues. My goal is to use this project as a learning tool (without electrocuting myself). Thank you again for all the suggestions. I really appreciate it.
 

Attachments

  • 0BA884F3-4729-47F7-B178-7A308868D495.jpg
    0BA884F3-4729-47F7-B178-7A308868D495.jpg
    398.8 KB · Views: 5
  • CB3D2BA6-D9B8-4EB1-8B02-890CDACF20DC.jpeg
    CB3D2BA6-D9B8-4EB1-8B02-890CDACF20DC.jpeg
    480.8 KB · Views: 4

itsid

Moderator
Staff member
Messages
11,563
Reaction score
239
Location
Ruhrpott [Germany]
Cool..

Sources I'm afraid I can't provide you with :(
Main reason I don't know what your BMS is designed for if it has an inbuild circuit
for temp readings
(in which case a thermistor is just reading temperatures and the BMS takes care of disconnecting all loads in case it get's too hot to handle.)
Or you need to handle temperatures on your own (in which case series wired temp fuses are the way to go)

I salvaged a resetting temp fuse from a hair dryer once and used that (since I had it)
and it wasn't even for batteries ;)

other than that I'm a big fan of digikey indeed..
it's a bit messy to use but it provides you with all the small electronic parts you could ever ask for.
farnell would be another great option, RS Components would be the third.

but temp fuses I rarely ever needed (twice in my life I think) since I like to stay away from making LiPo packs,
an old laptop battery once (reused the original internals for that and just added new cells)
is as close as I got to DIY a batpack [not DIY at all.. just welded tabs on cells really] :D

So I'm not exactly the one you should ask in this case.
I know just enough to be scared to have a wish to try on my own.
Luckily I don't have the need for large'ish LiPo batpacks at all.
(So I can learn more... until I know enough to feel confident when I need it ;))

For the charger:
Now that description can mean it takes care of all the charging for your cells,
it could also mean it's limiting the LiPo charger you use from reaching "undesired states"
IDK.
tough call really.
TBH I'd get a LiPo charger
since it's a 24V 7Ah pack (if you're lucky) chances are a laptop charger you have at home will already do the trick :D
And all you'd need is a socket for it to connect to your BatPack ;)

Any chance you got a electronic diagram for the BMS?
I can't find one online searching for the part number on the silkscreen *shrugs*

I can read the Everlight 817 optocouplers and the IRF83607 N-channel Mosfets..
but U22.. I cannot.. a simple voltage comparator? microcontroller? I can't tell :(

'sid
 

garolittle

Member
Messages
96
Reaction score
1
Location
Augusta, GA USA
Cool..

Sources I'm afraid I can't provide you with :(
Main reason I don't know what your BMS is designed for if it has an inbuild circuit
for temp readings
(in which case a thermistor is just reading temperatures and the BMS takes care of disconnecting all loads in case it get's too hot to handle.)
Or you need to handle temperatures on your own (in which case series wired temp fuses are the way to go)

I salvaged a resetting temp fuse from a hair dryer once and used that (since I had it)
and it wasn't even for batteries ;)

other than that I'm a big fan of digikey indeed..
it's a bit messy to use but it provides you with all the small electronic parts you could ever ask for.
farnell would be another great option, RS Components would be the third.

but temp fuses I rarely ever needed (twice in my life I think) since I like to stay away from making LiPo packs,
an old laptop battery once (reused the original internals for that and just added new cells)
is as close as I got to DIY a batpack [not DIY at all.. just welded tabs on cells really] :D

So I'm not exactly the one you should ask in this case.
I know just enough to be scared to have a wish to try on my own.
Luckily I don't have the need for large'ish LiPo batpacks at all.
(So I can learn more... until I know enough to feel confident when I need it ;))

For the charger:
Now that description can mean it takes care of all the charging for your cells,
it could also mean it's limiting the LiPo charger you use from reaching "undesired states"
IDK.
tough call really.
TBH I'd get a LiPo charger
since it's a 24V 7Ah pack (if you're lucky) chances are a laptop charger you have at home will already do the trick :D
And all you'd need is a socket for it to connect to your BatPack ;)

Any chance you got a electronic diagram for the BMS?
I can't find one online searching for the part number on the silkscreen *shrugs*

I can read the Everlight 817 optocouplers and the IRF83607 N-channel Mosfets..
but U22.. I cannot.. a simple voltage comparator? microcontroller? I can't tell :(

'sid


Sir,

Thank you again for the info. I do not have a wiring diagram (sorry) but the attached photo provides a better view of the BMS components. Also, the amazon link to this item is as follows:

https://www.amazon.com/dp/B0751BCSV2/ref=cm_sw_r_cp_api_urJhAbFH2SAT0

I am thinking the idea of charging the 18650 Pack separately using a 24V charger or the laptop charger may be the better option. Either way, you have been a huge help and I will continue to research the issue. IMG_7536.jpg


Sent from my iPhone using Tapatalk
 

garolittle

Member
Messages
96
Reaction score
1
Location
Augusta, GA USA
it worked. It took a while to solder the XT60 connectors (I am new at this) but the motor (original “Razor” 24v 30 Amp) runs well. I conducted several “test runs” with the go kart on the work bench and all worked well. The wires, BMS, and battery all remained cool during several tests. I will conduct a “road test” tommorow by reassembling the rest of the go kart and taking it for a slow and short ride. This is a very small project that I am using to learn the basics. Thanks for all of the advice so far.
 

Attachments

  • D59A1312-2A49-4653-AB91-992ABFA6564A.jpg
    D59A1312-2A49-4653-AB91-992ABFA6564A.jpg
    213.2 KB · Views: 8

Functional Artist

Well-known member
Messages
5,307
Reaction score
2,758
Location
Toledo, Ohio
Nice work on the battery :thumbsup:

I have been doin' a lot of research on these batteries lately

The data says for your 3.7V cells that the max charge per cell is 4.2V

...for your 7S battery pack that's, 4.2V per cell x 7 cells = 29.4V

For that size battery pack, it looks like a 1-2A charger with a preset high voltage cut-off of 29.4V along with your BMS would protect them & keep 'em charged up good
 

garolittle

Member
Messages
96
Reaction score
1
Location
Augusta, GA USA
Thanks for the comments. The batteries are LG MJ1 3500 mAh 18650 cells purchased from VRUZEND.com. I used a spot welder and pure nickel strips for the 7S2P set up. Basically the battery is the only thing that I modified on the go kart. It is a very small battery pack but I have to admit it was exciting to see it work. The existing go kart charger seems to work well but I will research other alternatives based on your response. This electric power stuff is addictive. I just have to find more time and money to keep it going. :cheers2:
 

voided

parking lot pimp
Messages
297
Reaction score
0
Location
CT
When I built my electric kart my bms was the downfall of my battery as for power delivery, but was a safety feature that kept it from burning up using or charging the pack. Keep an eye out for hobby grade lipo packs. You can series parallel them also instead of building your own packs.

Or you can get Nissan Leaf battery packs which are 7v per single pack but 60ah . And Ford C-Max energi models have a 3.7v cell at 20ah .
 

garolittle

Member
Messages
96
Reaction score
1
Location
Augusta, GA USA
When I built my electric kart my bms was the downfall of my battery as for power delivery, but was a safety feature that kept it from burning up using or charging the pack. Keep an eye out for hobby grade lipo packs. You can series parallel them also instead of building your own packs.

Or you can get Nissan Leaf battery packs which are 7v per single pack but 60ah . And Ford C-Max energi models have a 3.7v cell at 20ah .


Thanks. I will do that. I appreciate the feedback. :thumbsup:
 

garolittle

Member
Messages
96
Reaction score
1
Location
Augusta, GA USA
So I just added more capacity to the battery. I now have a 7S4P configuration and the resulting power increase was noticeable. I can easily make it up my driveway and I managed my first official “drift” on a nearby vacant road. The experience has been great and I am enjoying the learning process. I will soon upgrade to a 48v motor/charge controller and a new battery pack (probably 14S/8P) using higher discharge Samsung 18650 cells. I really appreciate everyone’s feedback and I look forward to posting results of the upgrade.
 

garolittle

Member
Messages
96
Reaction score
1
Location
Augusta, GA USA

garolittle

Member
Messages
96
Reaction score
1
Location
Augusta, GA USA
I have been using this spot welder since September. I am new to the practice of spot welding but it seems to work very well.
 

Attachments

  • C755CA2A-3CED-4519-BA98-7A5141CD63BA.jpg
    C755CA2A-3CED-4519-BA98-7A5141CD63BA.jpg
    267.2 KB · Views: 7
Status
Not open for further replies.
Top