Beginner Kart...First Build

Status
Not open for further replies.

SDCoston

New member
Messages
51
Reaction score
0
Location
Albuquerque, NM
Good Job!

I have been lurking on the forum for a bit ... really following your build and one other right now. My experience with the first test ride of our Tarantula variant was not too different from your yours, though some of the stuff I needed to fix was discovered when I just had a rolling chassis -- before my engine was installed.

"1. The throttle return spring I added did not work as I intended..."

That sounds like it was a hassle, sorry about that. I put my throttle spring on the cable between the clamp on the engine that holds the end of the cable and the wire-holder nut attached to the throttle arm. How did you have yours arranged?

"I think it might be too fast at 20mph"

I built mine to have a max speed of 36mph, using this forum's calculator. That was spot-on as we can get the cart up to 38mph going downhill on our road (and I think that it doesn't go faster because the engine actually slows it down). Anyway, after about 10 rides around our neighborhood (on the streets - I know, it's illegal) my boys were asking if it could go any faster. My boys are 11 and 12 though. My recommendation would be to somehow just limit the excursion of the gas pedal until your son's asking for more speed, which won't be long.

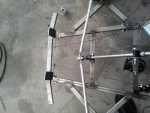
"The steering is not great. It does turn, maybe I expected too much. I noticed some issues with the right front wheel not getting full contact with the pavement when turning left. I might not have bent the spindle back far enough after it got damaged."

I had similar issues with my front-end. (It's good to realize that everyone on the forum has similar issues on their first build) I had to eventually cut off my spindle brackets and use a wooden jig to hold pieces at the exact right height and at the exact right angle to get my caster, camber, king-pin angle, etc. symmetric. And, as FabroMan says, trying to set up proper Ackerman helped me quite a bit. Using the jig was key.

"Very little clearance between the rear sprocket and the ground, not a problem on pavement, but it bottomed out going from grass to the driveway, so just need to avoid doing that." -- is there any way to use a smaller sprocket on your clutch and a smaller one on the axle? You could also try and construct a jackshaft above your live axle, have your engine drive that and then that drive a much smaller chainring on the axle. Probably all too much work though...

"The cable also frayed some and that was causing issues with it sticking in the cable housing, so it needs to be replaced." I've already gone through a cable for similar issues ... got frayed with me adjusting and re-adjusting.

"All the cables, springs and rods for the pedals make for too much going on around your feet. It's not as bad for my son because his feet are small." -- still, it's a huge annoyance! I had the same problem that I fixed (somewhat) by using bolts in my pedals to offset the control rods to the inside of the kart to get them out of the way of the heels of our shoes. I'll take some pictures and post here later so you'll see what I did.

"8. I have a kill switch ..." -- the kill switch is key... I wouldn't let my kids ride on the kart without one (being worried about setting up the throttle wrong or something and having a run-away kart).

"I'm not too upset with the results from the test drive, I knew there would be bugs to work out. I would say it was a success, in that it works - now it just needs some tuning. Then I'll strip it down, repaint and reassemble with the bolts locked down." -- You've got a lot to be proud of. Your kart looks great. Your issues are all fixable. I bet next time you build, you'll wait until the kart's done before you paint...live and learn!

Sean
 

SDCoston

New member
Messages
51
Reaction score
0
Location
Albuquerque, NM
promised pics of pedal control rod modifications

here are the photos of the pedal control rods that I hooked up medially to get them away from the feet
 

Attachments

  • 8023409131_542d63b959_k.jpg
    8023409131_542d63b959_k.jpg
    72 KB · Views: 40
  • 8023405652_86400cce87_k.jpg
    8023405652_86400cce87_k.jpg
    85.1 KB · Views: 37

JCB003

New member
Messages
66
Reaction score
0
I drilled a hole in the throttle lever and attached one end of the spring to that and the other end to an existing hole (see photo) I thought this would be a good method. Why it doesn't work I haven't explored, but it causes the throttle to open. There is a perfectly good youtube video showing how to do it using the stock Predator nut but I tried something else. Next time I'll go with what works. You can see the dent in the gas tank in one of the photos.


close up...


As far as the steering, I admit I overlooked Ackerman, I read the detailed thread on the subject but I rushed through this part hoping everything would work out. If I understand it correctly the king pin needs be be inline with the hole on the rod end diagonally back to the center of the rear axle. I don't see an easy way to achieve this with front facing tie rods without altering the parts I bought, I will probably have to fabricate something to make it work. I cant face the arms rearward and I don't think it would help much either. Here are some shots of the front.


SDCoston, how did you mount your kill switch? I like your pedal setup unfortunately I don't think I have the room to do that. I'll look into it some more.
 

OzFab

Well-known member
Messages
15,615
Reaction score
66
Location
Warwick Qld, Australia
I drilled a hole in the throttle lever and attached one end of the spring to that and the other end to an existing hole (see photo) I thought this would be a good method. Why it doesn't work I haven't explored, but it causes the throttle to open. There is a perfectly good youtube video showing how to do it using the stock Predator nut but I tried something else. Next time I'll go with what works.

I think you may have it backwards. If I understand correctly, by pushing the lever forward, you open the throttle, correct? If so, you want the spring going towards the back, not the front...

You can see the dent in the gas tank in one of the photos.

Ouch! :worried2:

As far as the steering, I admit I overlooked Ackerman, I read the detailed thread on the subject but I rushed through this part hoping everything would work out. If I understand it correctly the king pin needs be be inline with the hole on the rod end diagonally back to the center of the rear axle. I don't see an easy way to achieve this with front facing tie rods without altering the parts I bought, I will probably have to fabricate something to make it work. I cant face the arms rearward and I don't think it would help much either. Here are some shots of the front.

You are correct... with pretty much everything there. You will need to modify parts & get longer tie rods.

Modifying the spindles is a simple exercise, A simple matter of cutting a V in the steering arm, bending it to the desired angle & reweld it. The worst part of doing this with forward facing arms is making sure the arms clear the wheels.

SDCoston, how did you mount your kill switch? I like your pedal setup unfortunately I don't think I have the room to do that. I'll look into it some more.

Have you thought of mounting the pedals on the inside rail & running the control rods parallel to said rails. The brake rod doesn't look too far off it now...
 

JCB003

New member
Messages
66
Reaction score
0
It should work as I have it, the lever pushes to the rear to open the throttle. For some reason when I install the spring it pulls it too far forward causing it to open. Not sure how or why but it does. I'm just going to hook it up to the nut the motor came with.

Tomorrow I'm going to look into making some new spindles. I cut the one I bought down because they were a bit long and I didn't have a deep enough socket anyway. I'm concerned about clearing the wheels.

I had the pedals mounted to the inside rail, I switched them to get more room to get the bolt in. I could look into changing them back. I did weld up the holes already though.

I just saw a Manco American Express on Craigslist, tempted to get that too while I fool around with this.
 

SDCoston

New member
Messages
51
Reaction score
0
Location
Albuquerque, NM
"SDCoston, how did you mount your kill switch?"

I welded a piece of 1-1/4" x 12g steel across between the steering column uprights about 3" below the column. Then drilled a hole in it and just used a simple flip switch from Radio Shack. Wired it in series with the on/off switch on the Honda engine itself.
 

qtband

Well-known member
Messages
1,766
Reaction score
60
Location
St. Louis, MO
Is it me, or is the spring hooked up to the governor arm under the fuel tank? That would pull the throttle wide open without even moving the throttle lever.
 

JCB003

New member
Messages
66
Reaction score
0
What would be a good price for one that looks to be good condition and running, but needs tires? They are asking $350 USD.
 

JCB003

New member
Messages
66
Reaction score
0
I haven't had much time to work on it. It needs to be stripped down for repaint but we've been riding it as is. There are some minor bugs to work out but nothing safety wise, except for I would like to loctite the bolts down instead of having to tighten them down before each ride. I started fabricating some new spindles I'd like to try out and my son wants me to add sides to the seat, so I'm going to bend a pan for support.
 

zip kart

New member
Messages
449
Reaction score
0
Location
ireland
your gearing sounds god ,my kart is geared with 51t on axle sprocket and 11t on clutch with 10in racing slicks ,powered by a genuine Honda gx160 and it has plenty of low end torque
 
Status
Not open for further replies.
Top