Baja Doodlebug mod/rebuild

Status
Not open for further replies.

Oxymoron

Newbesque builder.
Messages
444
Reaction score
1
Location
Maryland
Hello everyone,

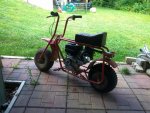
I finally got around to starting a build thread for the Baja Doodlebug I'm fixing up for my stepson and me. It's taking a long time because I don't get much time to work on it, and I don't have a good place to work on it either (so I end up doing some of it while I'm at work). I still have a long way to go, but it's back together enough for me to ride/test.

My background is industrial electrical/automation. I was a slitter mechanic before I became an electrician, so I am fairly mechanical, but always reading, learning, and doing to try and improve. Most of what I know is a result of working closely with my friends in the machine shop for years, and having free reign to run around in there and play with everything and learn. That being said, I just recently started trying to apply some of this outside of work... in the form of hobby building. Although, I already have too many hobbies :surrender:

I used to be heavy into BMX, and built several bikes for myself, and with friends (still have my first one). Also, skated for quite a few years... skimboard, surf, snowboard, kayak, MTB, and tried skydiving (too expensive to keep as another hobby though :( )

This is my first build of anything motorized, and it's really fun and exciting. It's also my first mini bike(share it with my boy). I never had one(or go kart) as a kid. No Dad either, so I guess that's why I get such a kick out of building/riding this stuff with my boys. I live parts of my childhood that never happened, vicariously, through doing things with my boys that I wished my Dad would have done with me. It has, and continues to bring me incredible joy :thumbsup:

Okay, onto the build...

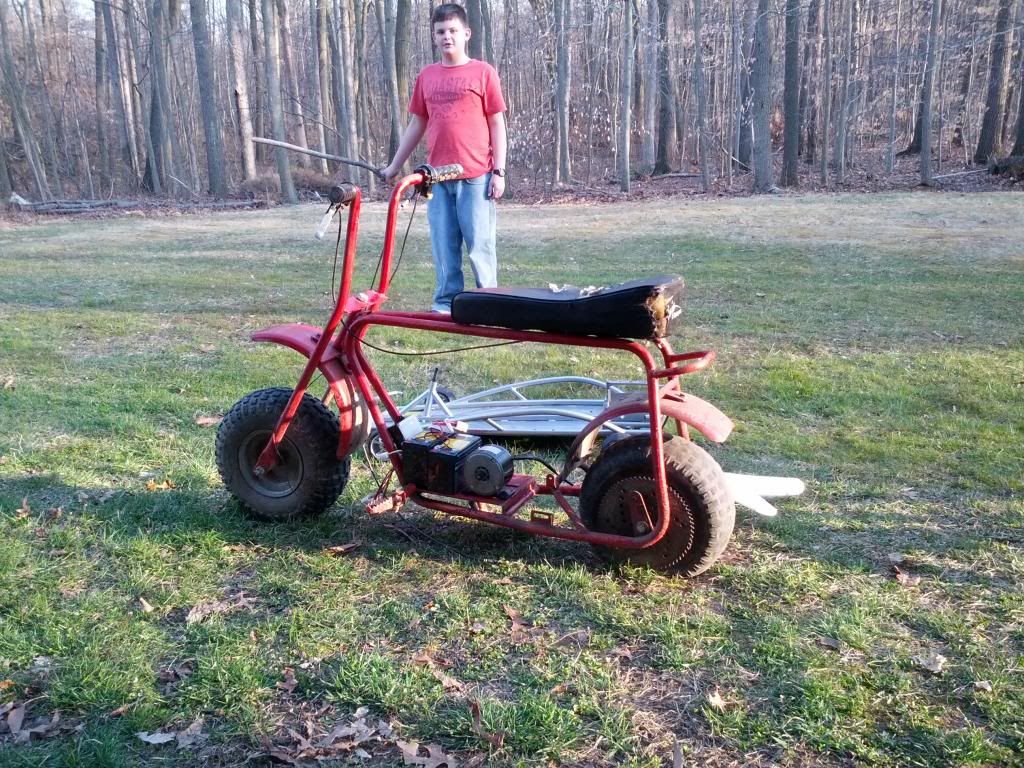
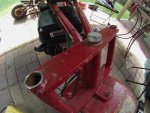
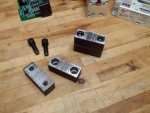
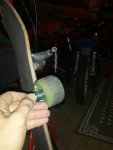
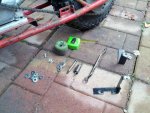
I got it from a 16yr old kid selling it on craigslist to raise money for his first car. Seemed like a good kid, and he asked me to send him a picture of it when it was all done... think I'll send him a link to this thread. Cost $80, and it had a hole in the rear tire, a bad clutch, bad chain, and the engine didn't run(which didn't matter since this was originally going to be an electric conversion). Tried telling my boy his 250W razor kart motor would not work... but let him strip down the kart and mock it up anyway, so he could see what I meant :horse:

Now mods, before I start with the images, what's the best way to put them in order with the post? What I mean is a description above the image posted, not a bunch of descriptions first, with all of the pictures at the bottom of the post listed as attachments... or is that the only way? Or could I just embed them in the post from photobucket, then attach them all as well in the event that my photobucket account disappears?

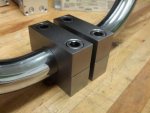
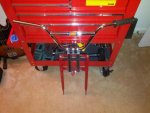
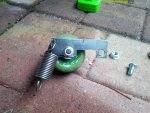
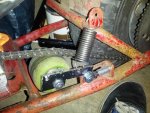
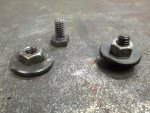
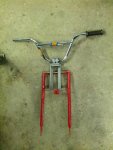
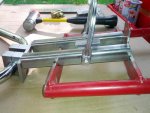
I'm to the point in the build where I just rebuilt the front end to accept any set of BMX/MTB 7/8" bars, so I have a LOT of pics to add. I'll keep it to one for now until I hear back :)

Here's the silly mock up before I convinced him to go gas:
 

Attachments

  • IMG_20130330_182654.jpg
    IMG_20130330_182654.jpg
    187.7 KB · Views: 8

mckutzy

Well-known member
Messages
8,353
Reaction score
31
Location
bc, canada
Id just post and describe, that way no flipping back and forth trying to figure whats happening.
 

Oxymoron

Newbesque builder.
Messages
444
Reaction score
1
Location
Maryland
Alright, I'm on my phone right now, but I'll have a chance either tonight or tomorrow to get the pics here and update this to where it's at now.

Here's a snap of it currently in the meantime... about to change that tire/tyre. You can see the new front end holding my BMX bars leftover from a BMX build 20yrs ago. Pack rat FTW! :D


OzFab

New member
Messages
15,615
Reaction score
8
Location
Warwick Qld, Australia
Tried telling my boy his 250W razor kart motor would not work... but let him strip down the kart and mock it up anyway, so he could see what I meant :horse:

That's how kids learn, you can't simply tell them it won't work, you have to prove it! As long as he did all the work, it's only his time that was wasted so, next time, he may be more inclined to believe/trust you.

I know it can be frustrating, like you're headbutting a brick wall but, if he insists on wasting his time, sit back, relax & let him, then you get to say "I told you so" when it doesn't work... :thumbsup:

before I start with the images, what's the best way to put them in order with the post? What I mean is a description above the image posted, not a bunch of descriptions first, with all of the pictures at the bottom of the post listed as attachments... or is that the only way? Or could I just embed them in the post from photobucket, then attach them all as well in the event that my photobucket account disappears?

The best way is to upload them here directly, that way, it doesn't matter what happens to your photobucket account, the pics will still be here...
 

Oxymoron

Newbesque builder.
Messages
444
Reaction score
1
Location
Maryland
That's how kids learn, you can't simply tell them it won't work, you have to prove it! As long as he did all the work, it's only his time that was wasted so, next time, he may be more inclined to believe/trust you.

I know it can be frustrating, like you're headbutting a brick wall but, if he insists on wasting his time, sit back, relax & let him, then you get to say "I told you so" when it doesn't work... :thumbsup:


The best way is to upload them here directly, that way, it doesn't matter what happens to your photobucket account, the pics will still be here...

Definitely. I totally agree. After I told him we'd have to either upgrade all of the electrical or convert it to gas to have enough mojo to keep him moving, he asked if we could just try. I said "No, but you are absolutely welcome to, and if you get stuck let me know and I'll tell you what to do next." He needed a hand a few times to get the kart disassembled, but he did well. When he saw that little motor sitting on that frame, he decided to go with a gas engine :thumbsup:

Okay, here we go with the images. I'll make a new post for each section of the build I suppose, to keep it organized.


----------------------
Prep for/fit new engine
----------------------

So, the first picture shows the 212cc Predator sitting in there. I wanted to see if I could get away with using the existing mount without slotting entirely new holes. I could not, so I went with an adjustable motor mount from hotrod minibike.
http://i1243.photobucket.com/albums/gg545/quinsdad/Doodlebug/IMG_20130531_194342.jpg

The second picture shows it after we started breaking it down to get it ready for the new engine (still have the original, which will get rebuilt for a different project). I broke three of the bolts off when removing the sprocket from the hub. That was after it soaked all night in PB Blaster. I used a small drill and kept slowly increasing in size until I had a big enough hole to use a punch and hammer to gently back them out. Brain fart on the pics... didn't think to take any while I was getting the broken bolts out. Must have been more concerned with bolts :D

http://i1243.photobucket.com/albums/gg545/quinsdad/Doodlebug/IMG_20130619_181651.jpg

Next is the bike with the engine mounted, new throttle cable and kill switch, and seat. Shortly after I put the old seat back on to keep there until the build is done and gets paint. Also, you'll probably notice that I took off the stock muffler and replaced it with a contoured pipe and resonator. I got it from OMB's eBay store at a discount, but it was this one. Changed the rear tire too.
http://i1243.photobucket.com/albums/gg545/quinsdad/Doodlebug/IMG_0120.jpg

Well... it ran. So well in fact, that I wrecked it twice. One of those times resulted in a broken wrist. I have since chilled out on the frequency that I do wheelies ;) One of those times also bent the handlebars very badly.

The saga continues....
 

Attachments

  • IMG_20130619_181651.jpg
    IMG_20130619_181651.jpg
    113.5 KB · Views: 11
  • IMG_20130531_194342.jpg
    IMG_20130531_194342.jpg
    101.2 KB · Views: 17
  • IMG_0120.jpg
    IMG_0120.jpg
    142.5 KB · Views: 15

Oxymoron

Newbesque builder.
Messages
444
Reaction score
1
Location
Maryland
-----------------------------
Bent handlebars - chop/rebuild
-----------------------------


It didn't occur to me to take many pictures until I actually starting making things. Until this happened, I was really only assembling things. I tried to make a conscious effort to take more, but I still forgot to take pics of certain steps :eek:

Here are the bent handlebars. Yep, that needed some TLC for sure. It's alright baby, come to daddy... I'll fix you up :lolgoku:
http://i1243.photobucket.com/albums/gg545/quinsdad/Doodlebug/GOPR0270.jpg

They had to go. Quick work with the 4-1/2" angle grinder and thin cutoff wheel.
http://i1243.photobucket.com/albums/gg545/quinsdad/Doodlebug/GOPR0273.jpg

Next, I made a new clamp to hold the bars which I mounted to the upper bracket of the triple tree. First, I grabbed some scrap steel 3/4"H x 2"W and cut four 1" pieces.
http://i1243.photobucket.com/albums/gg545/quinsdad/Doodlebug/IMG_0157.jpg
http://i1243.photobucket.com/albums/gg545/quinsdad/Doodlebug/IMG_0158.jpg

Next, I drilled them through with a tap drill for a 5/16-18 bolt, then tapped the bottoms of each clamp (4 holes).
http://i1243.photobucket.com/albums/gg545/quinsdad/Doodlebug/IMG_20130904_143947.jpg

Then I counter-bored the top holes so I could use cap head screws.
http://i1243.photobucket.com/albums/gg545/quinsdad/Doodlebug/IMG_20130904_150435.jpg

Right before I gave them to my buddy Dan in the machine shop to put a 7/8" hole between each segment, and clean up the edges with the mill.
http://i1243.photobucket.com/albums/gg545/quinsdad/Doodlebug/IMG_20130907_143339.jpg

Finished product with handlebars clamped in, after I hit them with scotch-brite.
http://i1243.photobucket.com/albums/gg545/quinsdad/Doodlebug/IMG_20130907_145746.jpg

Next post... attaching that^ to the triple tree.
 

Attachments

  • GOPR0270.jpg
    GOPR0270.jpg
    132.7 KB · Views: 8
  • GOPR0273.jpg
    GOPR0273.jpg
    105.1 KB · Views: 10
  • IMG_0157.jpg
    IMG_0157.jpg
    74.9 KB · Views: 8
  • IMG_0158.jpg
    IMG_0158.jpg
    75.8 KB · Views: 7
  • IMG_20130904_143947.jpg
    IMG_20130904_143947.jpg
    84.5 KB · Views: 6
  • IMG_20130904_150435.jpg
    IMG_20130904_150435.jpg
    89.5 KB · Views: 9
  • IMG_20130907_143339.jpg
    IMG_20130907_143339.jpg
    96.4 KB · Views: 10
  • IMG_20130907_145746.jpg
    IMG_20130907_145746.jpg
    64.4 KB · Views: 10

Oxymoron

Newbesque builder.
Messages
444
Reaction score
1
Location
Maryland
-------------------------------------
Attaching the handlebars to triple tree
-------------------------------------


Now that I had the bracket made, I sat on the bike and held the handlebars to the approximate height of the old bars and figured out how much of a riser I'd need. Then I laid it all on the ground to mock it up.
http://i1243.photobucket.com/albums/gg545/quinsdad/Doodlebug/IMG_20130917_132106.jpg

Next I made a 2" x 4" x 1/4" plate to tie the risers and clamps together, then used a countersink to get my bolts flush (I'd later be welding them in place). These go up through the bottom of the plate, and attach the bottom of the brackets that I tapped out to 5/16-18 earlier.
http://i1243.photobucket.com/albums/gg545/quinsdad/Doodlebug/IMG_20130921_192725.jpg
http://i1243.photobucket.com/albums/gg545/quinsdad/Doodlebug/IMG_20130926_123146.jpg

Then I cut two 8-1/2" lengths of 1" SHS @ 1/8" wall thickness, then notched it 1/2" deep in the channel where it will slip over the triple tree brackets before welding. Here it is all clamped up and ready for tacks.
http://i1243.photobucket.com/albums/gg545/quinsdad/Doodlebug/IMG_0209.jpg

All tacked and ready for final welds.
http://i1243.photobucket.com/albums/gg545/quinsdad/Doodlebug/IMG_0210.jpg

Did I mention that apart from doing some of this at work, I really don't have a place to do this stuff? Yeah... here's my "shop". The patio in my backyard :roflol:
http://i1243.photobucket.com/albums/gg545/quinsdad/Doodlebug/GOPR0327.jpg

All welded up, and ready to go back on the bike...
http://i1243.photobucket.com/albums/gg545/quinsdad/Doodlebug/IMG_0213.jpg

Ready for a test ride... but need to make a temporary chain tensioner before the torque converter gets here first!
 

Attachments

  • IMG_20130917_132106.jpg
    IMG_20130917_132106.jpg
    85.4 KB · Views: 12
  • IMG_20130921_192725.jpg
    IMG_20130921_192725.jpg
    87.6 KB · Views: 6
  • IMG_20130926_123146.jpg
    IMG_20130926_123146.jpg
    77.9 KB · Views: 6
  • IMG_0209.jpg
    IMG_0209.jpg
    92.2 KB · Views: 10
  • IMG_0210.jpg
    IMG_0210.jpg
    102.8 KB · Views: 15
  • GOPR0327.jpg
    GOPR0327.jpg
    117.5 KB · Views: 12
  • IMG_0213.jpg
    IMG_0213.jpg
    81.9 KB · Views: 11

Oxymoron

Newbesque builder.
Messages
444
Reaction score
1
Location
Maryland
-----------------------------------------------
Chain tensioner - The ole skateboard wheel trick
-----------------------------------------------


So, as I mentioned, I ordered a torque converter. It'll be here in a few days... but what if I want to ride it now? Use whatever you have laying around, right?

I didn't give it a proper finish because it's coming right off in a few days, but it works ;)

Took the wheel off of one of my old skateboards and packed out each side with the appropriate number of washers to center the wheel under the chain when mounted.
http://i1243.photobucket.com/albums/gg545/quinsdad/Doodlebug/IMG_0232.jpg

The random bits and bobs I had around to make it.
http://i1243.photobucket.com/albums/gg545/quinsdad/Doodlebug/IMG_0233.jpg

Pre-mounting it to the bike. Realized once it was on that with that stout retention spring on there, there was just too much load on it. I drilled another hole closer to the fulcrum. Much better now. Now I know for when I need to make a nice one for a different project :thumbsup:
http://i1243.photobucket.com/albums/gg545/quinsdad/Doodlebug/IMG_0234.jpg

Mounted. I used two 1/4-20 bolts, and one 1/4-20 coupling for threaded rod. It's all mounted in the original chain tensioner bracket that's welded to the frame. One side is locked up tight, and the other is for fine adjustment of the tension, and rests against the locknut for the carriage bolt that slides in the slot in the bracket. It's really more of a way to let the tensioner "float" freely.
http://i1243.photobucket.com/albums/gg545/quinsdad/Doodlebug/IMG_0238.jpg

The donor and the recipient :D
http://i1243.photobucket.com/albums/gg545/quinsdad/Doodlebug/IMG_2016.jpg

This will be part of a later post... but I made these weldnuts to cap the fork tubes where I cut off the handlebars. I bolted the nut to the hardened washers to get them centered, then welded. I'll put bolts and fiber washers in them once they're welded on, until I have a need later. Headlight maybe... who knows?
http://i1243.photobucket.com/albums/gg545/quinsdad/Doodlebug/IMG_0216.jpg
http://i1243.photobucket.com/albums/gg545/quinsdad/Doodlebug/IMG_0219.jpg
http://i1243.photobucket.com/albums/gg545/quinsdad/Doodlebug/IMG_0218.jpg
 

Attachments

  • IMG_0232.jpg
    IMG_0232.jpg
    57.3 KB · Views: 7
  • IMG_0233.jpg
    IMG_0233.jpg
    132.9 KB · Views: 8
  • IMG_0234.jpg
    IMG_0234.jpg
    138.2 KB · Views: 10
  • IMG_0238.jpg
    IMG_0238.jpg
    122.1 KB · Views: 18
  • IMG_2016.jpg
    IMG_2016.jpg
    117.8 KB · Views: 11
  • IMG_0216.jpg
    IMG_0216.jpg
    109.8 KB · Views: 7
  • IMG_0219.jpg
    IMG_0219.jpg
    99.2 KB · Views: 8
  • IMG_0218.jpg
    IMG_0218.jpg
    67.2 KB · Views: 8

Oxymoron

Newbesque builder.
Messages
444
Reaction score
1
Location
Maryland
Man.....you do some nice work

Thank you so much! That really means a lot since I'm new to this stuff. I highly value the input of you all that have been doing this for awhile.

I've always been a bit of a tinkerer... with just about everything. This stuff is the most fun tinkering I've ever done. I've got a couple other things I'm working on, but I'll wait to make threads for that stuff until this bike is about done.

Thank you again for the compliment, and if any of you see me doing something stupid, let me know. I'm a n00b :D
 

OzFab

New member
Messages
15,615
Reaction score
8
Location
Warwick Qld, Australia
Clever thinking with the washers/nuts; you sure you're a noob? :lolgoku:

One thing I did notice, you moved the spring on the tensioner; it'll have more effect closer to the roller than where it is now...

Also, can I suggest nyloc nuts; you can tighten them to the tension you need & they'll stay there, meaning you'll have more free movement of the roller & the bracket
 

Oxymoron

Newbesque builder.
Messages
444
Reaction score
1
Location
Maryland
Clever thinking with the washers/nuts; you sure you're a noob? :lolgoku:
I would have drilled out some tube I have to make proper spacers, but I couldn't be bothered since I'm putting the torque converter on this weekend... hopefully. Got a new tank as well :wai: Yes, I am a noob to hobby building. I'm fairly decent with tools, but the "how and why" specific to building things powered by a small engine is definitely new to me. Thank you for the encouragement :thumbsup:
One thing I did notice, you moved the spring on the tensioner; it'll have more effect closer to the roller than where it is now...
Yep, indeed. I only moved it back because there was too much load on the clutch at idle. I would have rather used a lighter spring, but I didn't have one, so I improvised :2guns: I definitely agree the first placement was better.
Also, can I suggest nyloc nuts; you can tighten them to the tension you need & they'll stay there, meaning you'll have more free movement of the roller & the bracket
Good tip. I'm using loctite ATM because I know I'll have this thing apart and back together multiple times before it's done, and that tends to where that nylon bushing out. I'll take your advice and use the nylock nuts after it gets paint.

This stuff is FUN! I don't know why I didn't start doing stuff like this when I was younger :lolgoku:
 

OzFab

New member
Messages
15,615
Reaction score
8
Location
Warwick Qld, Australia
I only moved it back because there was too much load on the clutch at idle. I would have rather used a lighter spring, but I didn't have one, so I improvised :2guns: I definitely agree the first placement was better.

There's nothing stoping you from moving it up 1/2" or so, giving you just a bit more tension but, not enough to damage the clutch...

This stuff is FUN! I don't know why I didn't start doing stuff like this when I was younger :lolgoku:

I've been doing stuff like this for years but, when I finished my daughters kart, my other daughter (from a previous relationship, she's now 20 with a kid of her own) asked me why I never did anything like this when her & her brother were little. The only answer I could give her was "because I didn't have the necessary tools or knowledge 20 years ago..."
 

Oxymoron

Newbesque builder.
Messages
444
Reaction score
1
Location
Maryland
There's nothing stoping you from moving it up 1/2" or so, giving you just a bit more tension but, not enough to damage the clutch...
Yes there is. Laziness!! :D Torque converter will be here tomorrow :)

I've been doing stuff like this for years but, when I finished my daughters kart, my other daughter (from a previous relationship, she's now 20 with a kid of her own) asked me why I never did anything like this when her & her brother were little. The only answer I could give her was "because I didn't have the necessary tools or knowledge 20 years ago..."
Well, that's pretty much it. My job is where my skills were formed, over years. I suppose I didn't really have the means to do this stuff until somewhat recently either.
Even though you might be a noob to tinkering, you are getting the idea pretty fast. What welder are you using?
I've always been a tinkerer, just new to tinkering with karts and mini bikes. I used to get in trouble as a kid for taking everything apart :D

The welder is a Hobart 210MVP. It came with flux cored wire, but I bought a little 20 cu ft tank and had it filled with 75/25 argon/co2. I really need to run a 240V circuit out to my patio... it will trip the 20A 120V circuit if I run a long bead with a lot of heat.
 

mckutzy

Well-known member
Messages
8,353
Reaction score
31
Location
bc, canada
That looks cool. nice build up. glad to see some working pics.

I just wanted to give a bit of warning. I see this alot, but just so you know. Your multi- tap cord reel is not a thick gauge of power cord. It appears that the welder is plugged into aswell as all the other tools(Now I understand your not having all tools running at the same time, but I just stating for the highest amp rating of the two I see) I would caution you as not to do this, but run a separate equally thick gauge cord dedicated to the welder instead. I recently saw one of these cord reels torch up as a result of too many things plugged in. Sadly these things are underrated for the draw they can handle safely.
Keep it to the drill and ginders/sanders ect not the comp and welder.

Looking good, I wish I had even a small plot to work in like yours.
 

Oxymoron

Newbesque builder.
Messages
444
Reaction score
1
Location
Maryland
Definitely! I only had it plugged in there for tack welds. I plugged it into an isolated circuit when attempting the first bead, but just can't get the penetration without grinding first and doing multi-pass. I took it to work and used the Millermatic 251 to finish it up.

You're right though... it's probably 16AWG in that reel. They do suck, lol :D I do only use one tool at a time though.

I should be slightly ashamed... I'm an electrician :eek:

You still ride yours? I read your build thread when I first joined, your bike is pretty bad@$$.

----------------

Okay, I'll try to have another update soon... tracking info says torque converter will be delivered today. I'm being asked to work Saturday, but I'm off Monday... so hopefully by then I'll have had a chance to install it and update the thread.

Thanks for the interest guys! I'm getting excited! :thumbup: :beer: :D

Edit: GTC torque converter arrived today. Boo yaa! I only wish I had time to install it and ride today :banghead:

Diggity.
 
Status
Not open for further replies.
Top