You are using an out of date browser. It may not display this or other websites correctly.
You should upgrade or use an alternative browser.
You should upgrade or use an alternative browser.
Arachnid Build
- Thread starter Silvergrizz
- Start date
- Status
- Not open for further replies.
T-man
New member
Silver, the rims that I got were their general steel offset rims, offset is 5 x 3. So far they have held up but I havent used them much. I can tell you that they work good for dirt and gravel and great for street, I haven't used them in snow or ice but I'm sure they wonldn't do very good.
Silvergrizz
New member
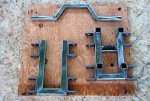
Spent most of today redoing the front suspension. It needed to widened out from 5 to 6 inches and I wasn't happy with the fitment of some of my cuts. I managed to get everything cleaned up and did a mockup to make sure it all fit. Getting dark so will wait till morning to weld things up. Bill mentioned I needed to go real slow on this section to keep it from warping, so slow it is. Here is a snap of the redone parts.
Attachments
-
 IMG_3156R.jpg168.8 KB · Views: 127
Last edited:
The quality of these spindle brackets from BMI are extremely poor. I think the QC guy in the factory, took a week or so off without a replacement.
Actually Grizz, ... I really don't think your going to need any shim stock. The front parts fit well enough. I just laid the A-arms with the brackets bolted "1/4 turn" past seating them by hand, and clamped the arms down. Slide the Suspension Block up to the brackets, and clamp the suspension block down.
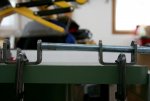
Welding the front is painfully SLOOOOOWWWWWW. Their is a lot of welding in a concentrated area and I could only weld 3/8-1/2" an at a time to prevent the suspension block from warping. I have just finished welding the whole **** thing. It took roughly Nothing like a new front suspension that sounds like a 50 year old rusty gate.
All in all, when I made another order from BMI, I told them about the brackets and they tossed in the two that I had that were completely un-usable. They were very nice about it, ... but it still shouldn't have to happen. They were also duped into the bad brackets. Sad thing is that you need 20 of these brackets to build the Arachnid to the plans, and 20 brackets cost $70.00 + shipping. An awful lot of cash for a huge headache. It appears cheaper to just smack yourself in the head with a ball peen hammer to get the same headache, ... but for free.
One thing I did learn but I was a little to late, ... I could have just went over to Azuza Engineering and had them bring out a box of brackets that I could go through with a pair of calipers and hand picked them. Lesson learned, ... Look for the stuff locally first to avoid shipping charges. So far to date, ... I'm close to $100 in shipping cost alone. I could have saved at least half of that if I would have found all the local shops first. Unfortunately for me, ... the rest of the stuff I need to get needs to be shipped.
She's looking good Grizz.
Regards
Bill
I think that 1/2" rod ends would be easier and cheaper then the brackets for the front and rear suspension.
Silvergrizz
New member
In retrospect, you are probably absolutely correct. However, when I started this project, I knew absolutely nothing about building a Kart, hence the purchase of predesigned plans which I figured would be the easiest way to get a jump start. I'll know better for the next one. Not even finished this one and already dreaming about the next one. I really like the idea of using a motorcycle engine with a 6 speed. 
After you build this buggy, your hole outlook on these will change, what you liked last month will go into the garbage can next month. But at least you bought plans, I say if you are going to build your first buggy, build a simple one and buy plans. This saves a lot of problems and money.
Silvergrizz
New member
The quality of these spindle brackets from BMI are extremely poor. I think the QC guy in the factory, took a week or so off without a replacement.
Actually Grizz, ... I really don't think your going to need any shim stock. The front parts fit well enough. I just laid the A-arms with the brackets bolted "1/4 turn" past seating them by hand, and clamped the arms down. Slide the Suspension Block up to the brackets, and clamp the suspension block down.
Regards
Bill
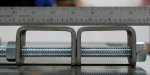
Bill, I'm not sure what your saying will work. I tried that, but as soon as I clamp down the spindle brackets to the suspension frame, everything binds up. I can't move the alignment rod at all. Here are few pictures to illustrate what I mean. I set up two spindle brackets 5" apart (as per the plan) and tried to push a 5/8 rod through the two of them. Note the spindle bracket on the right is one of the worst, I used to illustrate my point. Pictures 1 & 2 show how far off the alignment is over a 5" distance.
Picture 3 shows how a 5/8 bolt will not even go through the spindle bracket on the right. It jams on the solid section of the bolts where the threads stop.

Picture 4 is my idea of a solution. I place two brackets with identical errors onto a 5/8 rod. I keep the higher error to the inside so that the high points on the outside. I jam them with nuts on each side and then, I am going to sand the brackets against a disk sander to get the backsides parallel.

My thinking is that the holes in the 2 brackets need to be in a straight line in order for the A-arms to rotate freely or they will jam, even though they are held by separate bolts, the line needs to be straight. Are you still with me here
 Is this making sense to you. Worst case scenario if I don't get this lined up correctly is I will probably go through A-Arm bushings like crazy.
Thoughts anyone
Attachments
-
 IMG_3160R.jpg50.6 KB · Views: 80
 -
 IMG_3161R.jpg46.1 KB · Views: 73
 -
 IMG_3164R.jpg46.3 KB · Views: 88
 -
 IMG_3167R.jpg60.8 KB · Views: 92
Silvergrizz
New member
Those are spindle brackets drilled for camber (I believe, I don't think it's castor). Either way, they are not drilled for a-arm or swing arm brackets and that is the problem.
I don't know what they are drilled for, but there is absolutely no consistency as to what the error is. I assume they are drilled first, then pressed. If drilling was dome accurately, it should not be an issue. I checked with a local machine shop that specializes with spring repairs on trucks. Unfortunately, they don't have the equipment to make them this small. But he was telling me, they drill the holes first, then the machine automatically self-centers the bracket for pressing and they will come out perfect every time. Most of these of off by varying amounts .046" and better.
Those brackets look terrible! Can you return them and source some better ones? I managed to find some that only have a pilot hole on one side, so I can open them up to the dimension I need using a pillar drill.
As for shipping them back, too heavy and they came out of the US, plus no guarantee what I get in return will be any better. Out of 22 I received, only 1 was perfect at 1" on either side.
Bill CNC
New member
Double Posting
Bill CNC
New member
Bob,
First things first, ... Take that all-thread, ... and throw it as far away from the Kart as possible. It is VERY, very soft steel and will bend lickity split! Get some steel rod , NOT from a hardware store either, ... they are NOT round. Get some steel from a steel distributor.
This is were I get mine from. Obviously you have your own places over their.
Ok,
Welding the brackets on is simple enough even though you have a gap of .050" at one4 end. A good weld will deal with that, ... Yeah I said it!")
1). I took a completed A-arm and bolted the brackets to them, 1/4-1/2 turn past hand tight. This is important. When you weld the brackets the ear (the part with the hole) will want to move if you don't bolt it.
2). Lay the A-arm down with the brackets bolted to it and clamp it. Make sure the brackets are sitting level and flat and any washers you use, .. grind them down if the diameter is larger than the bracket.
3). Place and clamp the suspension block next to the A-arm brackets, touching obviously. Tack weld it in the two top corners and two bottom corners on each of the two A-arm brackets. (I numbered the A-arms to the suspension block, they will only fit in that one location). You are tack welding the A-arm with the bracket to the suspension block.
4). Do the same thing with the opposite A-arm. Grind down the tack welds to get a smooth flat surface.
(Do the bottoms first then the tops.)
5). Flip it over and do the same for the top A-arms.
6). Just keep flipping and tacking until you have it welded enough to stop any movement. (Just make sure you let it cool between tack welds. I would do two tacks on each bracket of the particular a-arm and then I would let that one cool down as I was welding a different A-arm's brackets.
7). Weld between your tack welds until your finished, but remember only weld 3/8 - 1/2" at a time and let it cool.
I'm not the best one to explain things, but I hope I made "MY" process clear enough.
Remember Bob, ... it's a VERY SLOW process.
Regards
Bill
First things first, ... Take that all-thread, ... and throw it as far away from the Kart as possible. It is VERY, very soft steel and will bend lickity split! Get some steel rod , NOT from a hardware store either, ... they are NOT round. Get some steel from a steel distributor.
This is were I get mine from. Obviously you have your own places over their.
Ok,
Welding the brackets on is simple enough even though you have a gap of .050" at one4 end. A good weld will deal with that, ... Yeah I said it!
1). I took a completed A-arm and bolted the brackets to them, 1/4-1/2 turn past hand tight. This is important. When you weld the brackets the ear (the part with the hole) will want to move if you don't bolt it.
2). Lay the A-arm down with the brackets bolted to it and clamp it. Make sure the brackets are sitting level and flat and any washers you use, .. grind them down if the diameter is larger than the bracket.
3). Place and clamp the suspension block next to the A-arm brackets, touching obviously. Tack weld it in the two top corners and two bottom corners on each of the two A-arm brackets. (I numbered the A-arms to the suspension block, they will only fit in that one location). You are tack welding the A-arm with the bracket to the suspension block.
4). Do the same thing with the opposite A-arm. Grind down the tack welds to get a smooth flat surface.
(Do the bottoms first then the tops.)
5). Flip it over and do the same for the top A-arms.
6). Just keep flipping and tacking until you have it welded enough to stop any movement. (Just make sure you let it cool between tack welds. I would do two tacks on each bracket of the particular a-arm and then I would let that one cool down as I was welding a different A-arm's brackets.
7). Weld between your tack welds until your finished, but remember only weld 3/8 - 1/2" at a time and let it cool.
I'm not the best one to explain things, but I hope I made "MY" process clear enough.
Remember Bob, ... it's a VERY SLOW process.
Regards
Bill
Bill CNC
New member
The Steel rods are not used for a pivot rod, ... it to be used as a jig to hold them in line during the welding process.
Silvergrizz
New member
Bill, I see what you mean about the threaded rod. I noticed that with the bolt, it jammed in the bracket as soon as the bolt shank hit the other side of the bracket. I had no trouble sliding the threaded rod through that bracket.
Have you got any pictures of your completed front suspension? I am starting to weld up the front suspension pieces this morning as soon as I finish my coffee. :biggrin5: Can't do a thing before my caffeine jolt.
Thanks
Have you got any pictures of your completed front suspension? I am starting to weld up the front suspension pieces this morning as soon as I finish my coffee. :biggrin5: Can't do a thing before my caffeine jolt.
Thanks
I don't know why I just thought of this but if you could find a set of brackets that have the holes offset the same amounts couldn't you flip one over and weld on so that the kingpin (or whatever it's name is) is on an angle but the hinge works properly because the countering angles offset each other?
r97
Measure twice cut once
redsox i thin your idea would work if you used 2 bolts for eack set of brackets, otherwise it would probably bind, you could get some yerf-dog swing arm mounts from bmi or email bmi and ask whats happening
Silvergrizz
New member
redsox i thin your idea would work if you used 2 bolts for eack set of brackets, otherwise it would probably bind, you could get some yerf-dog swing arm mounts from bmi or email bmi and ask whats happening
I probably should have opted for the yerf-dog swing arm mounts, but as I recall they were $10 apiece as opposed to $3.50 each for the spindle brackets.
 (ya get what ya pay for and I needed 20). I think I have a solution worked out, but won't know till morning till after I try it out on one set. Two bolts won't work BTW, the A-arm connects to these brackets, I am using 5" bolts to hold it all together.
r97
Measure twice cut once
okay, let me know how it comes along! i think when i order spindle brackets for my swing arm i will leeve a note in the box at checout saying im using them for swing arm mounts and dont want the holes off set, also you should email bmi and see if they can help you out
- Status
- Not open for further replies.