Advanced Hemi 212cc Predator Build

Status
Not open for further replies.

bob58o

SuckSqueezeBangBlow
Messages
9,646
Reaction score
1,846
Location
Chicago-town USA
I have been playing around on Engine Analyzer Pro V 3.9 Demo.

I had to choke my initial inputs to get it to stop making power below 7500 RPM (that is where the 26lb springs are supposed to be good to? I think?).

I wonder is a heavier spring would be better. Since some of these tolerances are close, I think floating a valve at 7500 RPM with only 0.070" clearance to begin with may be too close.

Maybe my Predator will quit before I get to 60 mph (7500 / 6.75 OD / 18.5" Tires),
But maybe it won't.

I guess I'll pay attention when first testing and see how high my RPMs will get.

If springs are the only thing holding max speed back at that point, AND may prevent float and help avoid possible engine destruction...... ???? Seems reasonable?????

May not matter if my lil engine don't turn so fast???
 

Attachments

  • Dyno Sim 212cc.jpg
    Dyno Sim 212cc.jpg
    219.1 KB · Views: 12
  • Dyno Sim 212cc 2.jpg
    Dyno Sim 212cc 2.jpg
    428 KB · Views: 4

bob58o

SuckSqueezeBangBlow
Messages
9,646
Reaction score
1,846
Location
Chicago-town USA
Curious to see what happens when you hog out the ports to average 1" Diameter (instead of 0.9" average port diameter) and gasket match???

I was!

About 1 additional HP and it moves Max HP further up the RPM scale.
 

Attachments

  • Dyno Sim 212cc Hogged Out and Gasket Matched.jpg
    Dyno Sim 212cc Hogged Out and Gasket Matched.jpg
    240.8 KB · Views: 6
  • Dyno Sim 212cc Hogged Out and Gasket Matched  2.jpg
    Dyno Sim 212cc Hogged Out and Gasket Matched 2.jpg
    425.2 KB · Views: 1

bob58o

SuckSqueezeBangBlow
Messages
9,646
Reaction score
1,846
Location
Chicago-town USA
My expectations are better defined now, even if by incorrect simulations...

Max Torque... 13.5 - 14.0 Ft Lbs
Max HP......... 16.0 - 17.0 Ft Lbs

This Sim is fun to play around with.

Not really expecting concrete numbers from it, but for comparing purposes it is cool.

Want more lift, more duration, 1.2 ratio rockers, a 28mm intake valve, a bigger bore, NOS, blower,...

I can install it and have dyno'ed in a minute.
lol

Me likey the 28mm Intakey.

---------- Post added at 04:29 PM ---------- Previous post was at 03:44 PM ----------

The ports entries are now 1" from top to bottom and also 1" from side to side. AND 1.125" from corner to opposite side (D -shaped).

My exhaust is EDIT: 0.75" ID and 8" long total with a 90 degree 3" radial bend (6" diameter).

The exhaust flange is 1.00" ID but the tube it is welded to is 0.85" ID.
The Widest opening on the port entry is 1.125".

I am thinking about welding on the inside of the exhaust (it is only welded on the outside) and then opening opening up to 1.125" and tapering (instead of step) to 0.85". Maybe just cutting some humps into the round opening (to accommodate for the corners of the D) instead of making a 1.125" round opening (Mickey Mouse pancakes?).


Please post objections now, or forever hold your peace.
I think I want to do this. And maybe the intake as well after some measurements.


---------- Post added at 04:46 PM ---------- Previous post was at 04:29 PM ----------

The carb opening is 1.125" Round.

The carb adapter is D shaped on one side and round on the other.

The round side is 1".
It is 0.125" smaller than the carb.
The D side is 7/8" from top to bottom and side to side (instead of 1")
The D side is 1" on the diagonals (instead of 1.125")

Would you open up the adapter? Right now, it is another "venturi"???? Cough, Cough, CHOKE,... I mean restriction. (sorry I'm sick!)
 

bob58o

SuckSqueezeBangBlow
Messages
9,646
Reaction score
1,846
Location
Chicago-town USA
http://www.enginelabs.com/engine-tech/tech-feature-custom-racing-intake-manifolds/

Let's say...
The volume of the ports are probably about 30cc (guessing).
The volume of that carb adapter is probably same 30cc (guessing).

What volume is supposed to match displacement?
What is " intake plenum" volume on this type of OHV with bowl, port, carb adapter, carb, air filter?

The volume of exhaust pipe is ~75cm^3.

---------- Post added at 08:26 PM ---------- Previous post was at 07:33 PM ----------

Port c/s Area = height x width

To find the area of the valve throat (venturi) simply measure the diameter of the throat opening above the valve seat and calculate the area as follows:

Throat Area = Pi x radius2 Throat Area = diameter2 x 0.7854

Head porters contend that the upstream cross-sectional area (in the port itself) should be 90 percent of the flow diameter of the intake valve for a race engine and 0.85 percent for a street engine. Some feel that 90 percent is good across the board. This is based on the valve’s flow diameter at the inner edge of the valve seat. It’s a reasonable assumption although the throat diameter directly above the valve seat may be even smaller and that is what the air actually sees. And it doesn’t account for the partial blockage caused by the valve guide and stem. For now however, we are simply relating port cross-sectional area in the port itself to the flow diameter at the valve seat.

For example, a 2.02-inch intake valve has a flow diameter of 1.717 inches if we’re going by the 85-percent rule. To calculate the equivalent port cross-sectional area, use the following formula.

Flow Diameter for Street Engine = valve diameter x 0.85

2.05 x 0.85 = 1.7425 inches

Port Area = (flow diameter2 ÷ 4) x 3.1417

(1.74252 ÷ 4) x 3.1417 = 2.38 square inches

http://www.cartechbooks.com/techtips/cylinder-head-math-for-engine-performance/
 

bob58o

SuckSqueezeBangBlow
Messages
9,646
Reaction score
1,846
Location
Chicago-town USA
WTF are these numbers? LOL
Who did this math?
the last line doesn't even add up?


EDIT: some 2's should be ^2's (squares)
I Think it is telling me the throat in a port for a 1.06" Diameter Valve (using 87.5%) should have a throat of 0.675 sq inches.

0.8125" by 0.8125" square shape or 0.925" Diameter Round throat.

My sickness and lack of business got my double turned into 5 hrs!

I knew these toys would be useful eventually.
 

Attachments

  • Tech Measuring Set.jpg
    Tech Measuring Set.jpg
    155.7 KB · Views: 2

bob58o

SuckSqueezeBangBlow
Messages
9,646
Reaction score
1,846
Location
Chicago-town USA
Some not exact measurements has my intake throat at around 0.50 - 0.55 square inches.

That is significantly smaller than the optimized 0.675 square inches calculated.
 

Attachments

  • Inake Throat.jpg
    Inake Throat.jpg
    141.9 KB · Views: 9

bob58o

SuckSqueezeBangBlow
Messages
9,646
Reaction score
1,846
Location
Chicago-town USA
GAB is becoming redefined as insane, in depth mathematical analysis of an engine that may not ever run.

---------- Post added at 11:54 PM ---------- Previous post was at 11:41 PM ----------

Well for "not exact measurements" That not too far off!

I believe you are correct sir. You have all witnessed how bad my measuring can be, even when trying to be exact.

This is one area where I will probably leave it alone for now.

I think I could really screw stuff up here. I do; however, like every opportunity to use my grinders. So.....?

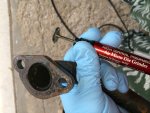
Think I'll just gasket match the exhaust like I mentioned and gasket match both sides of the carb adapter. Leaving the port throats alone.
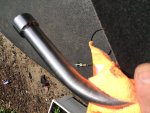
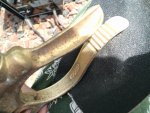
I already polished the exhaust and ran out of 320 grit finishing buffs. The 320 sanding rolls don't leave the same finish as a worn out finishing buff.

So Still Stamped Done!!!!

Tomorrow I get to break out THE WELDING MACHINE!
Excited for a chance at redemption after the pedal stop joke.

---------- Post added at 11:57 PM ---------- Previous post was at 11:54 PM ----------

Let me clear my throat... Nah, maybe next time? This is also how I got sent home from work. Clearing my throat.
https://www.youtube.com/watch?v=qG9ZWUitFik

---------- Post added 06-12-2016 at 12:18 AM ---------- Previous post was 06-11-2016 at 11:57 PM ----------

1. Finish Polishing the exhaust. - Clean Head
2. Check P2V clearance - Clean Head - 0.070" Intake, 0.080" Exhaust
3. Decide on Gasket Thickness 0.027" DECIDED 0.027"
4. Lapp Valves - Clean Head
5. Install 26lb springs
6. Drain Oil
7. Open and Clean Crank Case
8. Inspect, Clean, Lubricate crank, cam, lifters....
9. Replace Side Cover Gasket with new one, Attach Side Cover, Fill with Oil.
10. Remove Flywheel, Check Flywheel key, Re-Attach Flywheel
11. Set Coil Gap to .030"
12. Seal Head with Head Gasket
13. Attach Carb Adapter with Gaskets
14. Attach studs to Carb Adapter
15. Attach Carb to carb adapter with new gasket
16. Attach Air Filter to Carb
17. Fan Shroud/ Recoil Starter
18. Gas tank
19. Exhaust Pipe- new gasket
20. Throttle Plate
21. Throttle Linkage
21. Set Valve Lash
22. Valve Cover - New Gasket
23. Torque Converter
24. Chain
25. Brakes
26. Jet the Carb
27. Do Wheelies
28. Remove Engine
29. Add Two Engines
30. Do Bigger Wheelies!
31. Check for Valve Seal
32. cc combustion chamber - 18cc's
33. Gasket Match Carb Adapter
34. Gasket Match Exhaust Pipe

List is slowly getting smaller!:popcorn::yawn::huh::furious2::surrender::sleeping::auto::drool5::bannana:
 

bob58o

SuckSqueezeBangBlow
Messages
9,646
Reaction score
1,846
Location
Chicago-town USA
Is this going in the minibike

Eventually, Yes. That is the plan. But first it will go on the kart.

---------- Post added at 03:40 AM ---------- Previous post was at 03:30 AM ----------

I was looking into DIY design open header exhaust pipes. Wave tuning, displacement matching, .... lots of calculations have shown me that it probably should be roundish in shape for the most part? LOL

Some of these exhaust calcs are confusing.
 

bob58o

SuckSqueezeBangBlow
Messages
9,646
Reaction score
1,846
Location
Chicago-town USA
Been thinking about opening up the carb adapter... A little worried about reducing velocity and vacuum pressure (plan on running pulse fuel pump from the adapter instead of the valve cover).

Perhaps I can just taper the edge so that the charge coming from the carb doesn't slam into a sharp stepped reduction as it enters the adapter. The adapter will gradually narrow. The incoming mix will increase in velocity. The pressure will drop for the pulse to run the pump. Upon exiting the adapter and entering the port, the charge will experience a sharp stepped increase in cross sectional area. The velocity will slow, the pressure will build up again as the c/s is increased. As the mix moves towards the bowl, the velocity is again increased and pressure reduced as the port narrows at the throat.

I will probably end up gasket matching both sides of the adapter with tapered ends, leaving a narrow section where the pulse fitting goes. That way, there will be no sharp steps, and I will keep the "venturi" for the fuel pump signal.

---------- Post added at 12:28 PM ---------- Previous post was at 12:03 PM ----------

OK the plan is set....

Starting with the exhaust. The D shaped gasket is slightly smaller than the port entry.
Not sure if it came that way, or if my porting opened up the entry.
The gasket looks like layers of a dull grey metal (or coating). Feels slippery like graphite.
Not sure if a razor would be best to cut this gasket to fit. Maybe grinding the gasket would work better?

---------- Post added at 12:54 PM ---------- Previous post was at 12:28 PM ----------

Just to show how opening up a bore can have a big difference on cross sectional area....

A 1.000" Diameter (0.5000" Radius) has a cross sectional area of 0.785 sq inches.
A 1.125" Diameter (0.5625" Radius) has a cross sectional area of 0.994 sq inches.

About 20-25% increase in area for a 10-12.5% increase in radius.

Waiting for phone to charge for some pictures.
 
Status
Not open for further replies.
Top